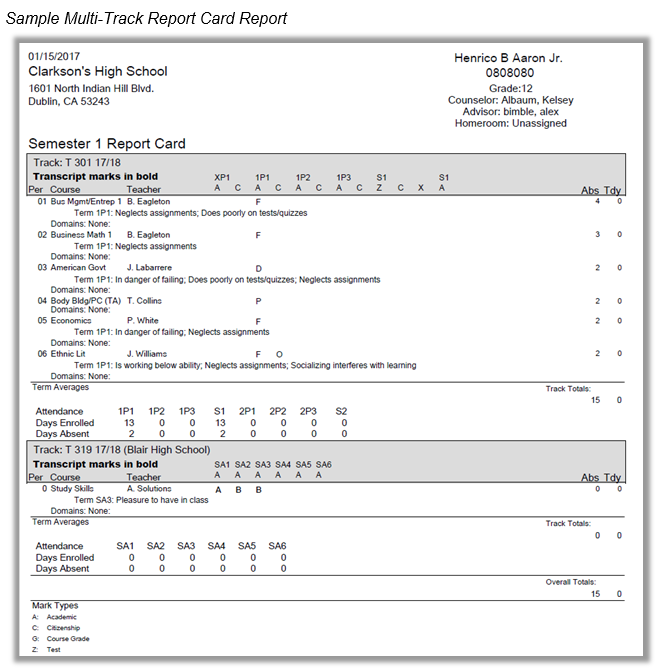
Multi-Track Report Cards
This report card has all the features of the Report Card, plus the ability to report multiple tracks per student and report in languages other than English. Numerous other options and data sets are available to make this report a robust, ‘all-in-one’ customizable report card.
While details specific to this report will follow, users can find general information about reports within the Reports documentation.
Multi-Track Report Cards is located within Reports in the Marks menu in Q.
Report Options can be accessed by clicking the + sign next to Report Options, or by clicking the Options link on the right-hand side of the screen.
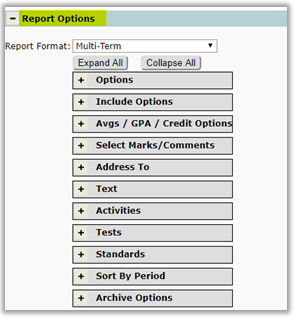
- Expand All/ Collapse All – these items can be selected to open/close all items under Report Options if desired.
Options
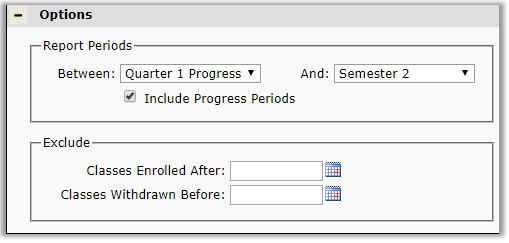
- Report Periods - Define the range of mark reporting periods to report in the Between and And If you choose the same Reporting Period in both dropdowns, only that one Reporting Period will appear on the report card.
- Include Progress Periods – Check to include progress marks that fall within the report period range defined.
- Exclude:
- Classes Enrolled After – Enter a cutoff date to exclude classes that the student enrolled in too late. Classes that were enrolled on or after this date will be excluded from a student’s report card.
- Classes Withdrawn Before – Enter a cutoff date that will exclude classes that the student dropped too early. Classes that were dropped up to and on this date will be excluded from a student’s report card.
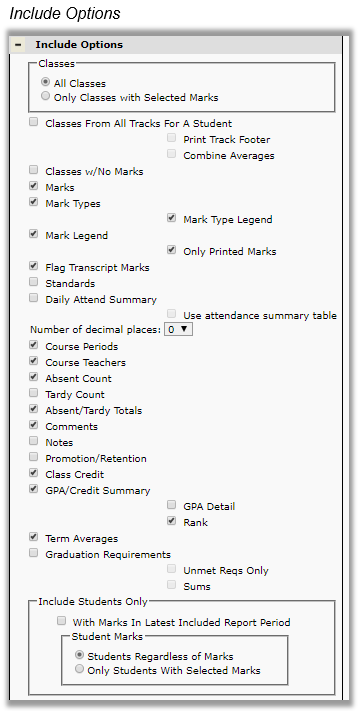
- All Classes/Only Classes with Selected Marks – The default setting is All Classes. Select Classes with Selected Marks to print only those classes that have the marks selected in the Select Marks/Comments area.
- Classes From All Tracks for A Student– check this to print marks from all tracks
- Print Track Footer – when this option is selected, the Daily Attend Summary and Term Averages options becomes available for selection.
- Combine Averages – this option combines term averages if they exist across multiple tracks.
- Classes with no Marks – Check this option to print a line for classes where a student did not receive any Marks.
- Marks – Select this option to print the marks received for each class.
- Mark Types– Select this option to print the mark type codes in the column headers of the marks reported (such as ‘A’ for Academic, ‘C’ for Citizenship, etc.).
- Mark Type Legend – When this option is selected, a legend will print at the bottom of the report for the printed mark types.
- Mark Legend– Select this option to print a legend for marks.
- Only Printed Marks - Select this option to only include marks printed on the report, rather than all marks for the associated mark set.
- Flag Transcript Marks – Check this option to have marks that have been posted to transcript appear in bold on the report.
- Standards– turn this option on to include standard marks on the report card.
- NOTE: when Standards are included, the mark legend option then becomes disabled.
- Daily Attend Summary – this option will report Days Enrolled, Days Absent, and Days Tardy for each reporting period for the associated track. The values are displayed in the footer. NOTE: if Classes for All Tracks option is turned on, the Attendance Summary values will show only when the sub-option Print Track Footeris selected.
- Use Attendance Summary table – when this option is selected, data from the attsum table is used.
- Number of decimal places – users can specify the number of decimal places to be included in the attendance summary data.
- Course Periods – Select this option to print the period that each class is scheduled.
- Course Teachers – Select this option to print the teacher for each class reported.
- Absent Count/Tardy Count– These selections will print the totals calculated from the Calculate Attendance process. Select each option as desired. The totals printed will be tallied of all the Reporting Periods included on the report card that attendance was calculated for. These counts are across all periods for classes reported.
- Absent/Tardy Totals – This sub option will only be enabled when at least one of the previous two options is selected. This will display (at the bottom of the count columns), the total periods absent and/or periods tardy for all classes combined.
- Comments – Select this option to include any comments that have been associated to a marking term.
- Notes – Select this option to include any free-form notes that have been given.
- Promotion/Retention – Turn this on at the end of the school year to print a line at the bottom of the report card that states that the student will be promoted or retained for the next school year. This will reference the ‘Is Retained’ flag in the school information section of the Student Editor.
- Class Credit – This will print the Credits Awarded values that a student may have earned for any Marks included on the Report Card, if any exist. They will generally only exist for Marks that will eventually be posted to Academic History (Semester and Year-Long Terms). Credits Attempted values are not printed on the Report Card. Marks Processing must have been run to populate these values.
- GPA/Credit Summary– Check to include a Historic (Academic History) GPA / Credit Calculation on the Report Cards.
- GPA Detail – Select this option to display details of the GPA calculations.
- Rank – Select this sub option to print the student’s class rank.
- Term Averages – Used to include Current-Term GPA’s on the Report Card. When this is checked selections must be made in the Avgs/GPA/Credit Options area. This is where you select what Honor Roll Calculation result you want to include on the Report Cards. The Calculate Current GPA/Eligibility (within Marks Processing) must have been run (or within Student Academic History > Grad Requirements tab for the selected rule), for Current-Term GPA’s to print on the Report Card.
- Graduation Requirements – Select this option to print the student’s Graduation Requirement information.
- Unmet Reqs Only – Select this to print only those Grad Requirements that are unmet.
- Sums – Select this option to display the sums of all Graduation calculations.
- Include Students Only:
- With Marks in Latest Included Report Period – check this to ensure that report cards are not printed for students who do not have any marks in the latest report period in the defined range.
- Student Marks
- Students Regardless of Marks – Select this to include all students whether or not they have any of the marks selected in the Select Marks/Comments area.
- Only Students with Selected Marks – select this to print report cards only for students who have marks selected in the Select Marks/Comments tab.
Avgs/GPA/Credit Options
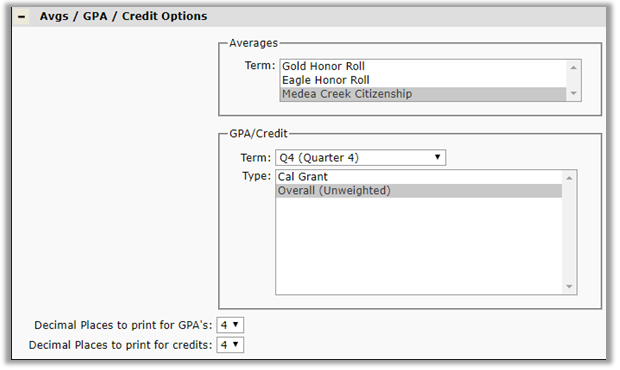
- Averages – select the Term Average type to be included on the report.
- GPA/Credit – select the Term and GPA Type that was calculated that you want to include on the report card. The records found by the system on the GPA History tab of Academic History, FOR THE CURRENT SCHOOL YEAR filter the list of selectable Terms. If the GPA Calculation under the Academic History menu (or the GPA calculation within Marks Processing) has not yet been run for the current school year, this selector will be blank.
Select Marks/Comments
When the options Only classes with Selected Marks and/or Only Students With Selected Marks are checked in the Include Options area, only the marks selected below will be reported.
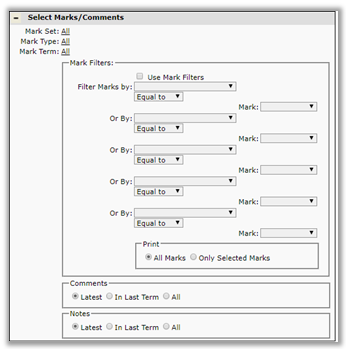
- Filter the report card by making any combination of selections from the following choices by clicking the Alllink to display all available choices. Click on the desired selections using Ctrl/Click if multiple selections are desired. Click Done. :
- Mark Sets
- Mark Type
- Mark Term
- Additional Mark Filters are available to further refine mark selections.
- Comments – Select from Latest, In Last Term or All.
- Notes – Select from Latest, In Last Term or All.
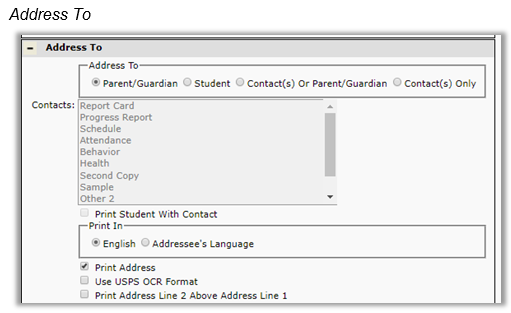
- Address to:
- Parent/Guardian
- Student
- Contact(s) or Parent/Guardian – When this option is selected, choose which contacts will receive a copy of the report card from the list of contact mailing flags below.
- Contact(s) Only – When this option is selected, choose which contacts will receive a copy of the report card from the list of contact mailing flags below.
- Print Student with Contact – Prints Student’s name after the contact name in address.
- Printin
- English – Report card will be English only.
- Addressee’s Language – Report card will be printed in primary language of selected Addressees providing language has been defined for the selected Report Card Set in Report Card Setup.
- Print Address – prints address on bottom of report card
- Use USPS OCR Format
- Print Address Line 2 Above Address Line
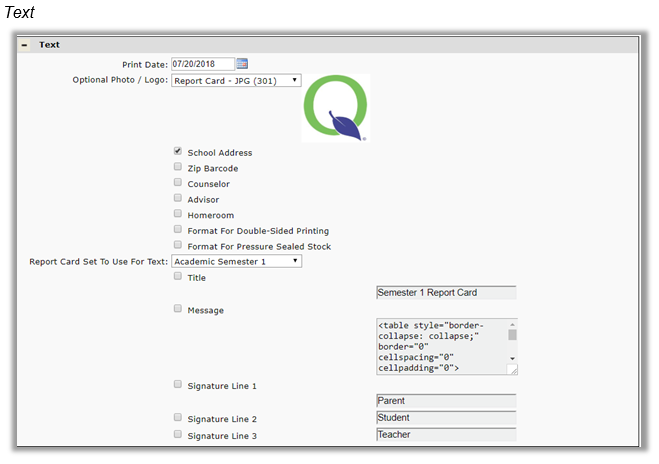
The following selections will determine the look of the report card:
- Print Date – Defaults to system date.
- Optional Photo / Logo – Logos that have been associated to the logged in school or the district will appear as an available logo to be printed on the report.
- School Address – Check to print school address on report card.
- Zip Barcode – Select this option to print the postal bar code above the zip code.
- Counselor – Select this option to print Counselor’s name on report card.
- Advisor – Select this option to print Advisor’s name on report card.
- Homeroom – Select this option to print student’s Homeroom.
- Format for Double-Sided Printing – Select to print double sided.
- Format for Pressure Sealed Stock – Select for Pressure Sealed Stock.
- Report Card Set to Use for Text – (Report card sets are created in the Report Card Setup Application in the Marks Menu). If a Report Card set is selected the text for Title, Message and Signatures can be selected to print as defined in the Report Card set.
- Title – If no Report Card Set has been selected, a Title may be entered in the blank text box.
- Message – If no Report Card Set has been selected, a plain text Message may be entered in the blank text box. Messages created in Report Card Setup may be formatted using the Formatted Message Editor. Report Card Messages may also be defined in the Marks Setup Application/Report Card Message
- Signatures – If no Report Card Set has been selected, signature descriptions may be added in text boxes.
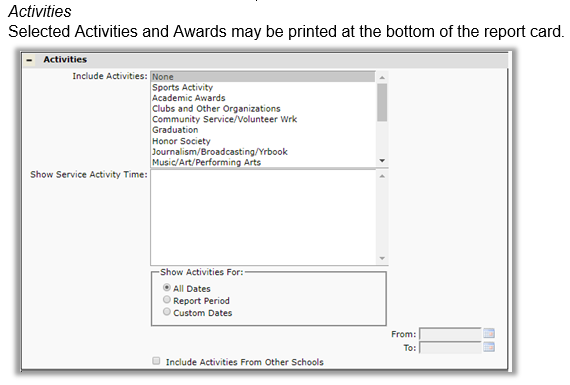
- Include Activities – Select desired Activity Types from list. Multiple activities may be selected using Ctrl/Click while selecting activities.
- Show Service Activity Time – Select Activity Types that you would like to report service time for, if applicable. Service Time could be the time assigned for an Activity or the time completed for an Activity.
- Show Activities For:
- All Dates – Select this option to print all Activities the student has participated in regardless of dates.
- Report Period – Select this option to print only those Activities effective during date range of report card. The dates will auto fill in the date boxes matching the defined dates for the report periods selected in the Options.
- Custom Dates – When this is selected the user may enter the desired dates in date boxes.
- Include Activities from other Schools – If the student is multiply-enrolled, check this box to include activity records from schools other than the logged in school.
Tests
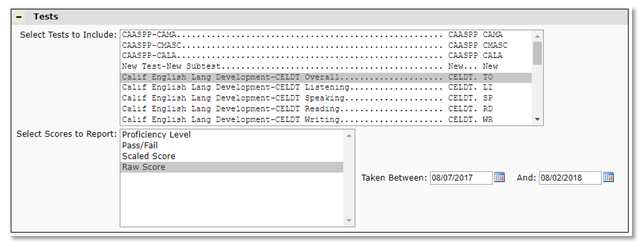
Test scores may be printed on the report card by selecting desired tests and scores to print. A date range may be defined to limit the tests to those taken within the date range.
Standards
This area is enabled when Standards is selected in the Include Options
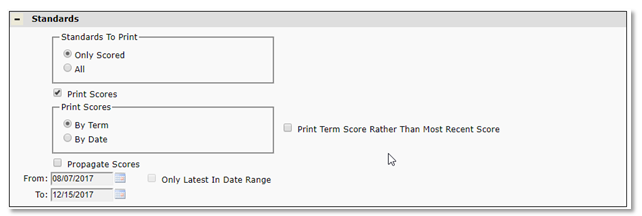
- Standards to Print– Select from the following:
- Only Scored – Print only those standards that have scores.
- All – Print all standards even if there are no scores.
- Print Scores– The default mode is ON, but you can suppress the printing of scores by unchecking. When unchecked only the descriptions for the standards for a class will be printed. When checked ON the following options become available:
- By Term– This selection will print the most recent score of each report term reported.
- Propagate scores – When this is selected a term that does not have a score will inherit the most recent score of the previous term
- By Date– This option will print all scores on record within the defined date range. (warning, this may take up a lot of space)
- Start Date/End Date – Enter desired dates to define date range. Dates default to selected reporting period dates.
- Only Latest in Date Range – Select to print only the most recent score within the defined date range.
- By Term– This selection will print the most recent score of each report term reported.
Sort by Period
The default sort for the Multi Track Report Card is by name and grade as defined in the Sort options. The defaults may be changed by clicking Change Sort Items and selecting from the following additional options: Advisor, counselor, Addressee Zip and Homeroom.
Advanced sorting is also available and allows the report cards to be sorted by a teacher or a classroom that is scheduled for a specific period on a specific date. To activate the additional sort options expand the Sort by Period area.
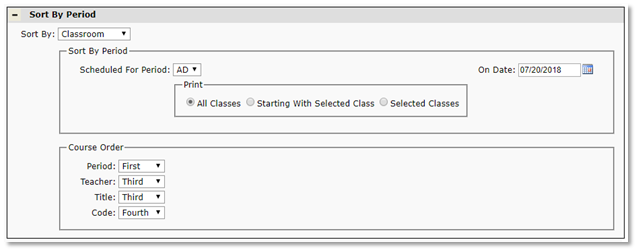
- Select sort by:
- Teacher
- Classroom
- Select Period – from drop down list.
- Select Effective Date – by typing in date or using calendar.
- Once a sort by option, period and date have been selected you may select specific teacher(s) or classroom(s) by clicking the desired option under Print
- Sort by Teacher– selected teachers may be selected from the drop down list:
- Starting with Selected Teacher – if you want to print all report cards from a selected teacher onward (in ascending alpha order). Select one teacher in the list as the starting point.
- Only Selected Teachers – if you want to print only one teacher or a random set of teachers. Multiple teachers may be selected by holding the Ctrl key while clicking teacher names.
- Sort by Classroom– classrooms may be selected from the Select a class drop down list.
- Starting with Selected Class – if you want to print all report cards from a selected classroom onward (in ascending alpha order). Select one room number in the list as the starting point.
- Selected Classes – if you want to print only one classroom or a random set of rooms. Multiple rooms may be selected by holding the Ctrl key while clicking room numbers names.
- Course Order – the default sort order of courses on the report card is:
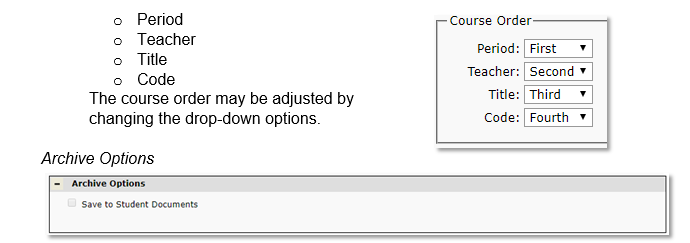
- Check to save a copy of the report card to Student Documents.
- NOTE: This option will only become available when the ‘Print Address’ option under ‘Address To’ band is de-selected.
- *We do not save report cards to Student Documents if addresses are being printed.