The Food Service Setup application can be used to define and configure food service settings for use in the Food Service and Cafeteria applications.
Food Service Setup has 10 tabs and it is recommended that they be set up in order from left to right as they build upon one another. 
Food Service Setup is located under the Food Service PoS menu in Q.
Access to each tab and its contents is managed by Permissions in the Permission Editor and the associated Role Restrictions. 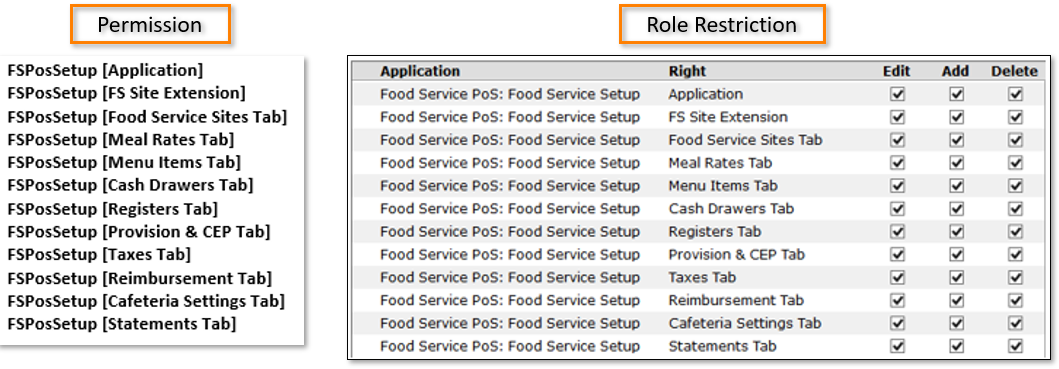
An example of how Permissions and Role Restrictions work together might be a user with access to the Meal Items tab through the FSPoSSetup [Menu Items Tab] permission but cannot delete items because the Delete box is not checked in Role Restrictions.

The Role Restriction removed the Delete button. Many different combinations are possible to provide users with the access that is needed.

The example below shows the permissions to a single tab and no role restrictions.

Note:
The FSPosSetup [Application] by itself grants full permission to all tabs and functions. To restrict access it must combined with individual tab permissions.
Food Service sites should be configured for all District sites that will provide service to, or take payments from students, staff, or food service patrons. Food Service sites can be added, deleted, or edited from the Food Service Setup application. 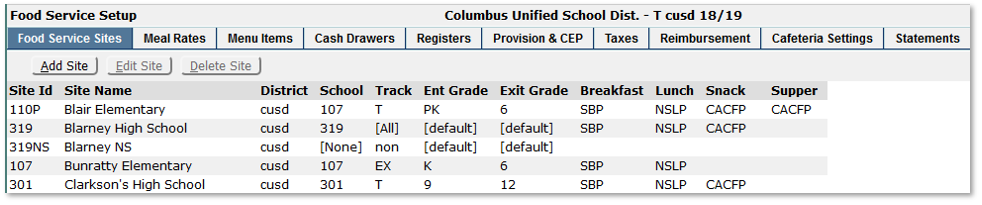
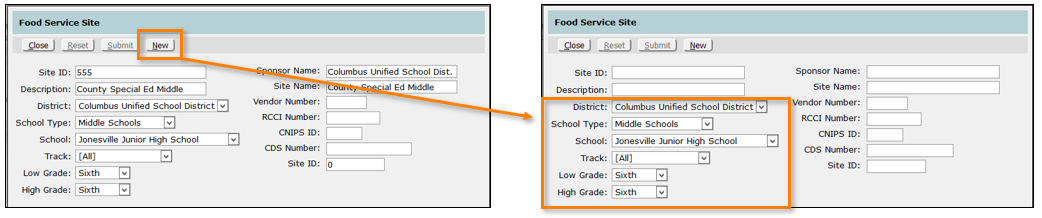
Adding a Food Service Site
To add a Food Service Site:
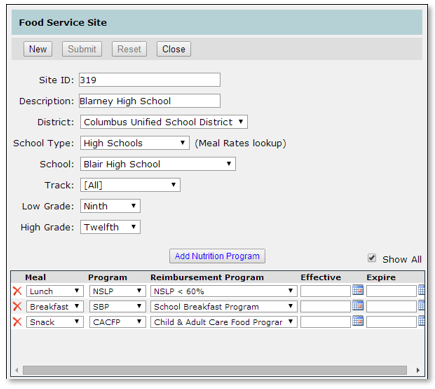
- From the Food Service Sites tab, click Add Site
- Enter Food Service site details. Site ID, Description, District, School Type, School, Track, Low Grade, High Grade, and Nutrition Programs that are offered at the new site should all be entered.
- Site ID: User definable, 10 characters, alpha numeric. Typically, the school code is appended with an ‘E’, an ‘M’ or an ‘H’ to designate an elementary, middle, or high school Site within a multiple rate school. Refer to the “Multiple Sites per School” section of this document for Site Code requirements when a school is split into multiple sites.
- Description: User definable, 32 characters, alpha numeric. Appears throughout Food Service applications. A description that clearly defines the site is recommended (for example, Clarkson High School).
- District: District in which this site resides. Available choices are those districts present in the School District Codes table.
- School Type: Select a school type. The school type selected will be used to filter the meal rates displayed for the school.
- School: The district school in which this site resides. Available choices are derived from data present in the School Editor. Use if the site does not reside in a district school. A contract site would be an example of when should be used in the School field.
- Track: Use [All] if this site pertains to all tracks within the school. Choose a specific track if this site pertains to one track only. For example, a track has been created for a certain group of students within the school, and food service for these students must be reported independently, or different meal rates must be used.
- Low Grade: The low grade in this school that this site will service. Use [Default] to service all grades for this school. Available choices are derived from the data present in the School Editor.
- High Grade: The high grade in this school that this site will service. Use [Default] to service all grades for this school. Available choices are derived from data present in the School Editor.
- Nutrition Program: Nutrition Programs that are offered at the site can be defined by Meal type and can be set to be effective for a specific period of time.
- Once all details for the site have been entered, click Submit to save the entry, Reset to clear any changes made since the previous save, or Close to return to the previous screen.
Multiple Sites per School
School sites may sometimes have schools within schools. In order to accommodate this scenario, multiple sites per school can be created.
- The original or BASE Site ID must remain unchanged for the base site. The site code is the school code, which is assigned to food service sites by setup scripts.
- Change the Description to identify this site. For example, MS can be appended to the description to identify the school as a Middle School.
- Select the Category to identify which rate category is to be used by this site.
- Select the School.
- Select the Low and High grades for this site.
- Complete the remaining parameters and click Save.
In the example below, a site has been added to the primary site of 555. An ‘M’ has been appended to the Site ID to identify the site as a Middle School site.
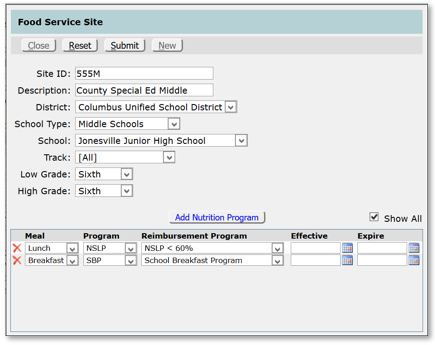
The Base Site for a school is used as the site of service for all transactions for which the grade or track cannot be determined, such as cash, visitor and Staff transactions. The site of service School Type also determines which rates to use for these consumers.
Note:
To speed up data entry, throughout the app(s), adding a new record using the ADD button brings up an edit form with blank or default values. Clicking NEW from within the edit form allows the user to add a new record based on the existing record.
Edit a Food Service Site
Highlight a site and double click or click Edit to open the edit form. Complete the necessary changes and click Save.
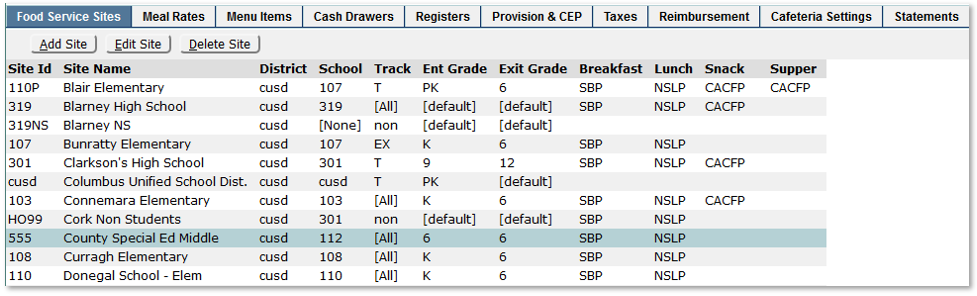
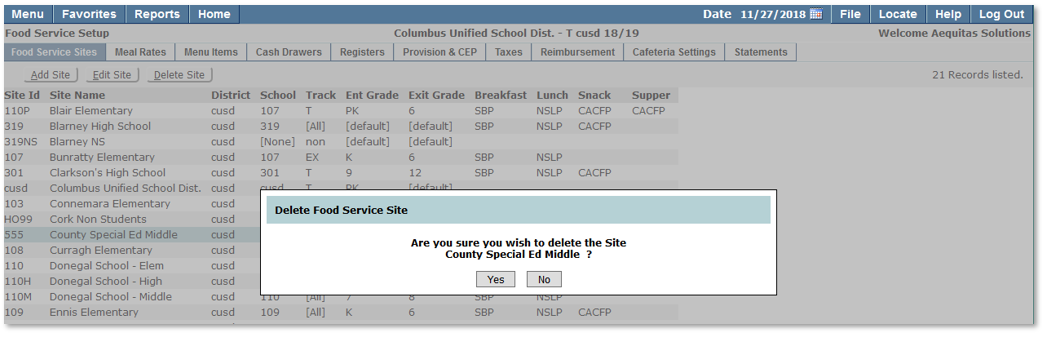
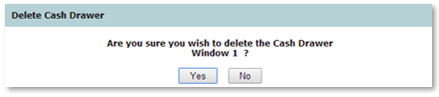
Delete a Food Service Site
A Food Service site may be deleted only from within the site. A site with transactions attached to it may not be deleted.
Highlight a site and double click or click Delete. A confirmation message will be displayed, click Yes to complete your deletion or No to return to the previous screen.
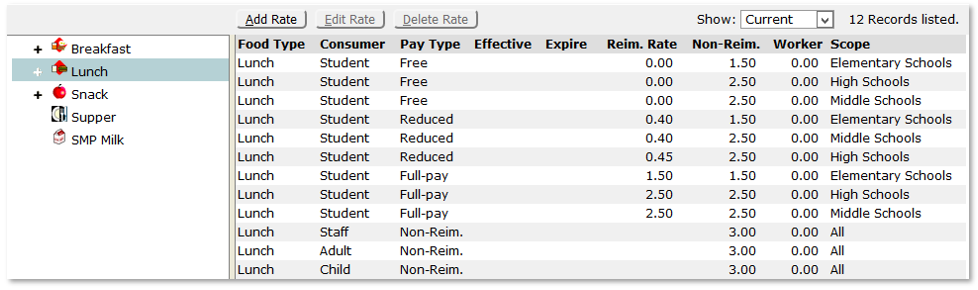
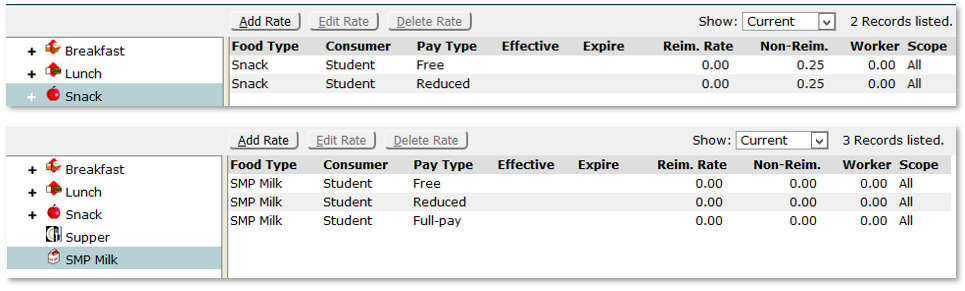
Set rates for reimbursable and non-reimbursable meals, SMP Milk and After School Snacks. Rates may be scoped to district wide, by school type, to a Food Service Site, to a specific district, or to non-district schools.

Add Meal Rates:
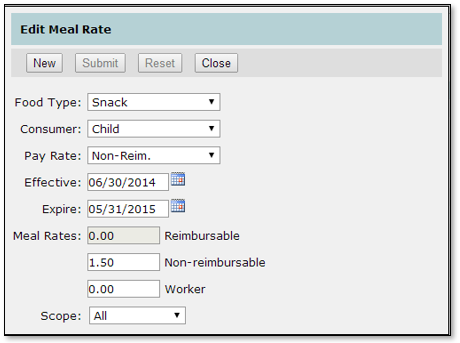
- From the Meal Rates tab, click Add Rate.
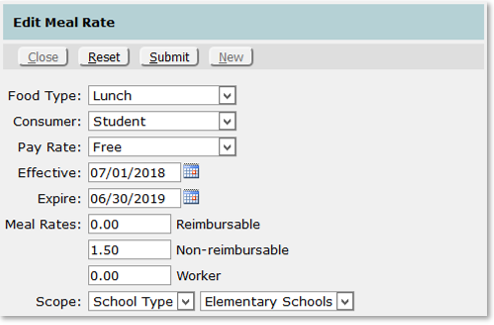
- Enter Meal Rate details.
- Food Type: Breakfast, Lunch, Supper, Snack, SMP Milk
- Consumer: Student, Staff, Adult, Child
- Pay Rate: Free, Reduced, Paid (available choices are driven by the Consumer selection).
- EffectiveOptional: The date this rate goes into effect. Unless the rate being entered is a replacement rate, in which case the Effective Date should be the date that the rate will become active.
- ExpireOptional: The date the rate expires. Unless this rate is being expired and replaced in which case the expiration date should be entered.
- Meal Rates: Rate for a Reimbursable meal, Non-Reimbursable meal, and a Worker meal for this consumer type.
- Scope: Scope refers to the extent of the rate.
- All: This rate is used by all sites. To create a rate that is district wide (not scoped to a site, school type, etc.). For example, After School Snacks are provided at one rate throughout the district (per consumer type).
- Site: Rate applies to a specific food service site. Any site that uses rates that are unique. A school with multiple rates (K-12 for example).
- School Type: Rate applies to specific school type. Available choices are those school types present in the School Type Codes table. Create district-wide rates by school type (Elementary, Middle, High, Etc.). School Exceptions within a Category scope are permitted.
- Click Submit to save changes.
Sites within a Scope that use a different rate
Typically used when Scope = School Type. A site within that type uses a rate that is somehow different than the rest of the sites in that category.
1. From that rate, click New to create another rate. Information from the existing rate is moved to the new record.
2. Set Scope and Site and choose the site that is different.
3. Modify the rates as needed.
4. Click Submit to save changes.
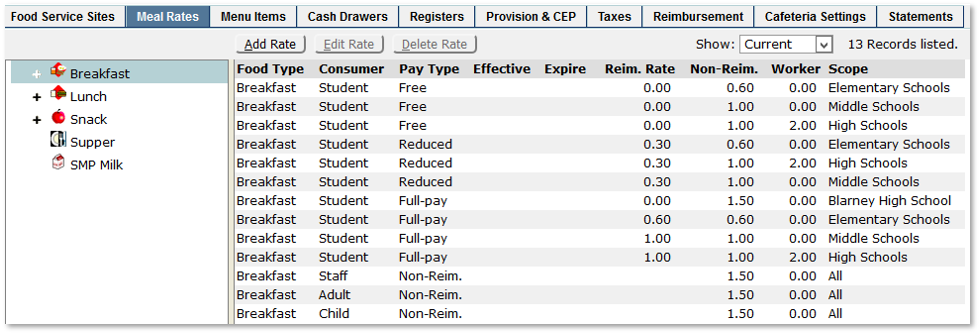
A schoolhouse icon identifies meal rates that are scoped to a site. In this example, the student worker rate for Blarney High School is ‘0.00’, while the student worker rate for all other high schools is ‘2.00’.

Typical Meal Rates
Student Free, Reduced, and Paid are district-wide for elementary, middle and High Schools. Staff Adult, and Child are scoped All, which means they are district wide.
Lunch
Breakfast
Snack and SMP Milk (Not to be confused with ala Carte milk)
When a Meal Rate Changes
This allows rates to change midyear without affecting historical reporting.
- Effective and Expire Dates are NOT required unless a rate changes. If these dates are not present the system will assume the rate is in effect.
- Only the Expire Date is required to close the current rate.
- Only the Effective Date is required for the replacement rate.
- Edit the current rate, add the Expire date (the last date this rate is in effect) and save.
- Click New to add the new rate. Clear the Expire date (the first date the rate is in effect). Edit Meal rates as appropriate and click Submit to save your changes.
- Edit the current rate, add the Expire date (the last date this rate is in effect) and save.
Create the Meal, ala Carte and snack items served by the district. Menu items may be available district-wide, or scoped to a specific district, school or school type.
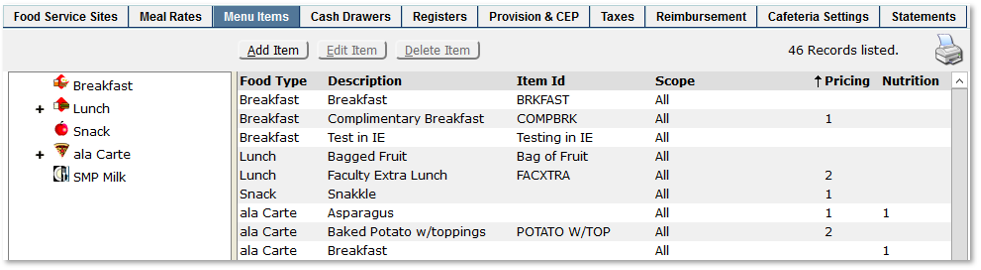
Create a New Menu Item
From the Menu Items tab:
Click Add Item
- Food Type: Breakfast, Lunch, Snack, Supper, ala Carte, SMP Milk,: Prices for Meal items are derived from Meal Rates. The meal rate for a meal item can be overridden (See Pricing below).
- Description: The description is used in various Food Service applications and reports.
- Item ID: Internal ID code. May be up to 16 alphanumeric characters.
- Scope: All, Site, School Type
Pricing for meal items is set by Meal Rates. Exceptions can be added for items that do not conform to the normal Meal Rates, and exceptions affect pricing for the single item only. As shown below, prices can be applied to different consumers or eligibilities (Pay Rate) during different time frames. Only one active price range is allowed per consumer per item. Prices without dates are open records (always active). Ala Carte items must have an active price record for each consumer type served, or a single pricing record for All consumer types.
An ala carte item can have a $0.00 price, allowing for price entry at the point of sale. This feature is turned on by a preference called Allow Ad hoc ala carte pricing as shown below. This allows the item to be created in FS Setup. The same preference in Data Entry and Food Service Accounts allows the feature to be used at those points of sale.
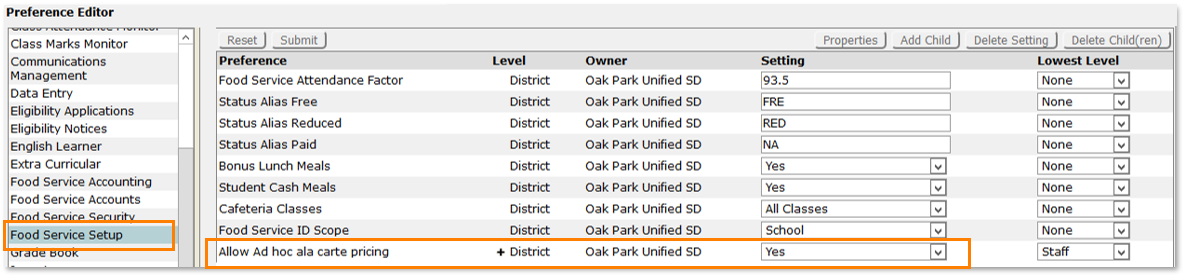
Ad hoc ala carte pricing can be used with the Data Entry app allowing bulk items sold at extra-curricular events (sporting events, bazaars, banquets, etc.) to be logged as total amounts per event or with the Account app to serve items from a regularly changing vendor’s cart.
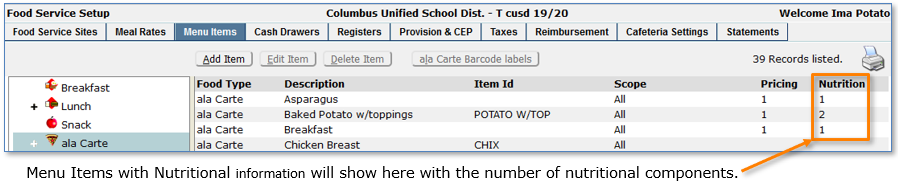
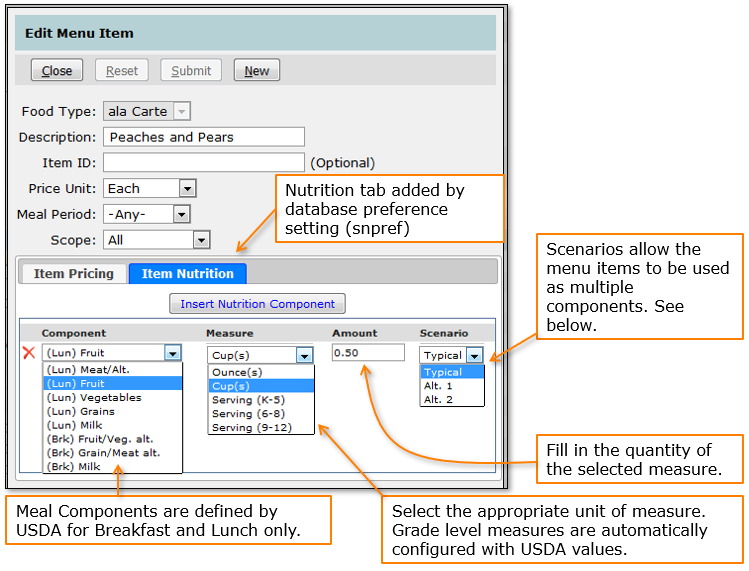
Item Nutrition: This feature is used as part of the Offer vs Served feature. Please see the corresponding section within this documentation.
Ala Carte Barcode Labels
Ala carte items can be configured to be scanned into the Cafeteria PoS when serving customers.

For items to be recognized as scannable at checkout, they must be formatted using one of two formats:
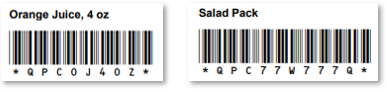
- All pre-packaged foods have a 12-digit UPC (Universal Product Code) number that is present on the item or packaging. The Item ID can be entered as read off the item or scanned directly into the field.
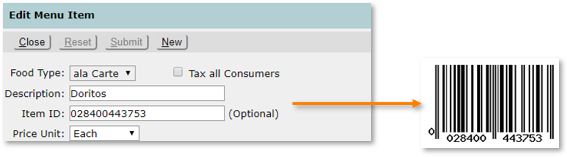
- For items packaged on-site or otherwise without a 12-digit UPC, an Item ID beginning with “QPC” can be assigned as shown below. These IDs can have numbers and/or letters but no spaces or special characters, limited in length to 10 characters after the QPC designator.

- To print or display QPC labels click the ala Carte Barcode labels button. This button will be activated only when one or more QPC items are present.

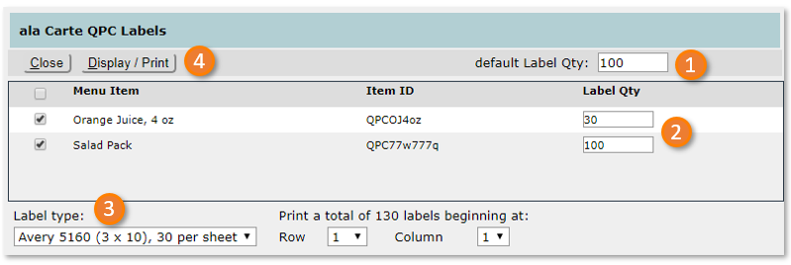
- Default Label Qty: The value set here will be applied as the number of labels to be displayed or printed for each of the items selected. The value is filled in when the item is checked and can be overwritten if needed for any item.
- Label Qty: Each item can also be set independently from the default.
- Label Type: Select the label sheet, either Avery 5160 (3 x 10) 30 per sheet or 5161 (2 x 10) 20 per sheet, and choose the starting position on the sheet. Note that the total number of labels to be printed is displayed.
- Display/Print: Click this button to view the sheet prior to printing.
Cash Drawers are used to identify where payments and services were recorded for reporting and reconciliation purposes. Payments, Cafeteria, Data Entry, Class Entry and Accounts applications use cash drawers. Each school needs the following cash drawers:
- A cash drawer for each food line (for reporting and reconciliation purposes). The Drawer type is Cafeteria. Reconcile value can be Daily or Each Meal.
- An Office cash drawer for use with the Payments applications, to process transactions such as prepayments, write-offs, refunds, etc. The Drawer Type is Office Only. Reconcile value is Daily.
- Data Entry cash drawer is suggested if you would like to print reports by cash drawer for Data Entry transactions. If not, the Office cash drawer can be used. The Drawer Type is Office Only. Reconcile value can be Daily or Each Meal.

Create a New Cash Drawer
From the Cash Drawers tab, click Add Drawer.
- School: The school that will be using the cash drawer.
- Description: Can be 32 characters in length. The description is used during login for the Cafeteria, Class Entry, Data Entry and Payments applications. The description will also appear in various reports. The value entered should clearly define the cash drawer in order to assist the cashier in making the correct choice when logging in.
- Drawer Type:
- Cafeteria: The drawer can be used by Cafeteria, Class Entry and Data Entry applications.
- Office Only: The drawer can be used by the Payments and Data Entry applications only. This will prevent accidental mingling of office transactions and food service transactions.
- Reconcile:
- Each Meal: Cash drawer reconciliation is performed for each meal. Beginning and ending balances are recorded for each meal.
- Daily: Cash drawer reconciliation is performed once a day. Beginning and ending balances are recorded for the day.
- Drawer Status:
- Active: Drawer is in use and available during logon.
- Archived: Drawer is no longer in use and is not available during login. Does not affect historical reporting.
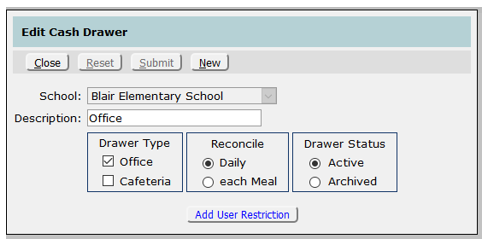
- UserLimit
- Click Add User Restriction to restrict the use of the drawer to designated users.
- Select the desired user(s) and fill in the date range and whether a password is required.
- * indicates a district user. The available user list is made up of staff with FS Setup or FS Cafeteria permissions either at the site or the district office.
- Check Show All to show previous users with expired restrictions.
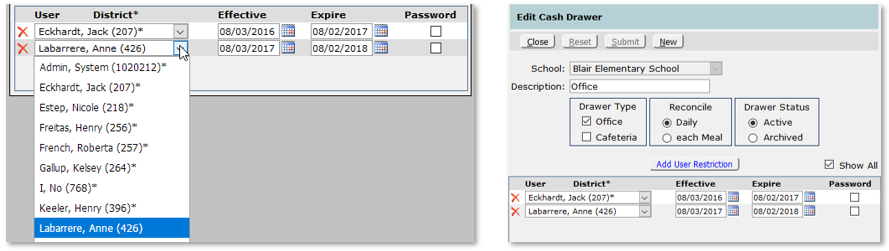
Note:
Once users are added to the restricted list, only those users will be able to use the drawer during the dates shown. Dates are not required so if a drawer needs to always be restricted to only a few users, just add them to the list without dates. System Administrators and users with the Application Administrator Permissions, such as Cafeteria [Administrator] are not subject to User Restrictions.
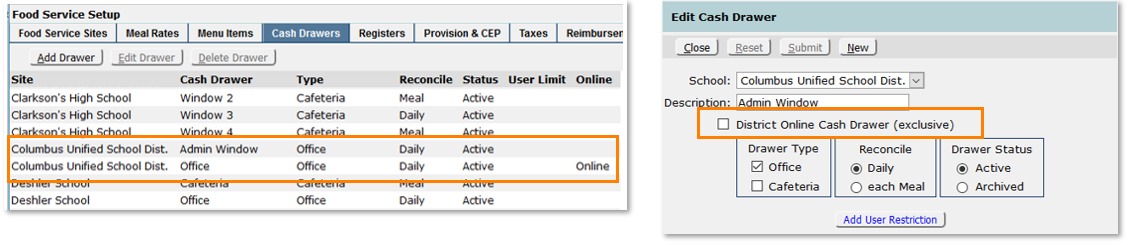
- Online
- In order to make online payments a district office drawer must be designated as Online. Check the District Online Cash Drawer (exclusive)
Once all fields have been defined, click Submit to save changes and create the new cash drawer.
Edit a Cash Drawer
Click to highlight the desired cash drawer and click Edit Drawer, or double click to open edit mode.
- Cash drawer reconciliation records can be edited retroactively, regardless of the current Reconcile value present for the drawer.
- Daily / per meal limitations do not apply when editing historical records. A check is made for existing records; if found, the form allows retroactive editing. Business rules for entry of new data are enforced.
This situation occurs when cash drawer reconciliation has been re-configured to daily from per meal (or vice-versa), then attempts are made to edit data retroactively.
Delete a Cash Drawer
- Click to highlight the desired cash drawer and click Delete Drawer. A confirmation message will be displayed.
- Click Yes to delete the cash drawer, or No to be returned to the previous screen.
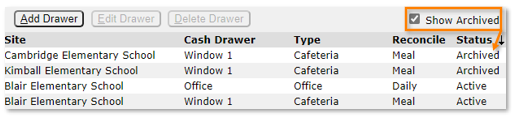
Archived Cash Drawers
- Cash drawers that have been flagged as Archived will not be displayed unless the Show Archived button is checked.
- Archived cash drawers will then be displayed in the list of cash drawers with a Status of Archived.
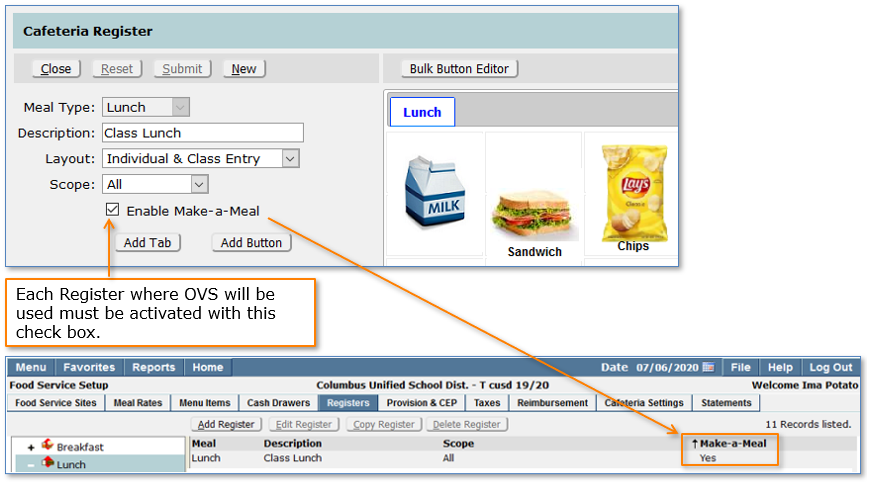
Registers
Create Point of Sale (PoS) Registers for use by cashiers in the Cafeteria line. A register contains buttons that represent the Menu items sold in the line, displays consumer information and processes transactions. More than one food line may use a register.
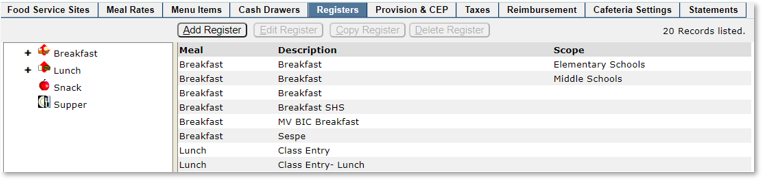
From the Registers tab, click Add Register.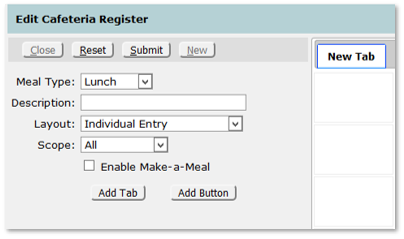
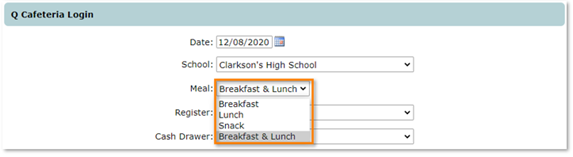
- Meal Type: Breakfast, Lunch, Snack, Supper (as defined in the Site setup)
- Description: User definable, 32 characters, alpha numeric. Appears in the Cafeteria login screen. A description that clearly defines the register is recommended (to assist the cashier in making the correct choice when logging in).
- Layout:
- Individual: The Register will only support food service entries for individual patrons.
- Individual and Class Entry: The Register will support both Individual and Class Entry food service entries. Selecting this option will allow cashiers to display classes by Teacher, Period, or Class.
- Daily Distribution: The Register can serve breakfast and/or lunch.
- Weekly Distribution: The Register can serve breakfast and/or lunch on multiple days.
NOTE: When Daily or Weekly Distribution is selected, the Meal Type will automatically display “Breakfast & Lunch”
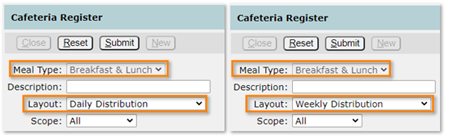
and that Meal option is added to the Cafeteria login.
- Scope:
- All: Available for use by all schools
- Site: Available for an individual school site only
- School Type: Available for use by a specific type of school only, i.e. Pre-School, Elementary, Middle or High School.
- Enable Make-a-Meal: This feature, along with Menu Items noted above, is also used as part of the Offer vs Served feature. Please see the special setup instructions within this documentation.
Add Buttons
Add a food item to the Cafeteria Register:
- Click Add button
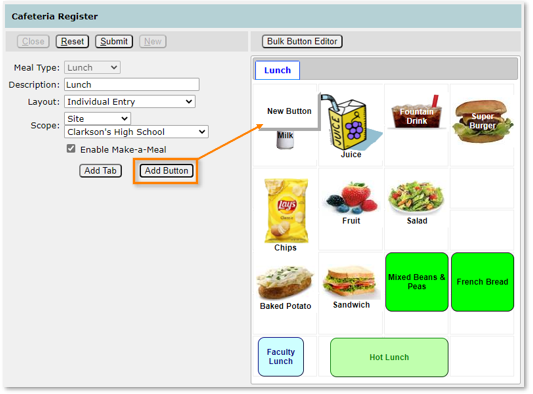
- A New Button will be created on the Register layout. Click the button to display the button properties.

- Lunch, ala Carte: Defines if this button will reference a Meal item or an ala Carte item.
- Menu Item: Lists menu items available to this school, per the Meal setting for this register.
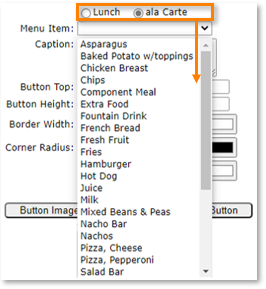
- Caption: The button text. Text will default to centered, experiment with carriage returns before, after and between lines. To adjust a button with one line of text, add a carriage return and insert a ‘.’ (period) in the new line. The insert carriage returns between the line of text and the ‘.’ To move the text up. Add spaces before and / or after a line of text to move right / left.
- Button Top: The position of the button from the top of the register.
- Button Left: The position of the button from the left side of the register.
- Button Height: The height of the button.
- Button Width: The width of the button.
- Button Color: The color used for the button.
- Caption Color: The color used for the button caption.
- Border Width: Enter the desired width of the button. For touch screen workstations, an increased border width will give a more three-dimensional appearance.
- Only Item: Check to designate this button as an ONLY button. The menu item referenced by the ONLY button will replace all items in a transaction. For example, Only Item can be used to denote a food service item that can be served to students who have forgotten their lunch money. When it is clicked, all other items in the Register will be removed.
In the example below, an ala Carte item has been chosen which automatically creates the item caption. Use the mouse to drag items to the desired menu location.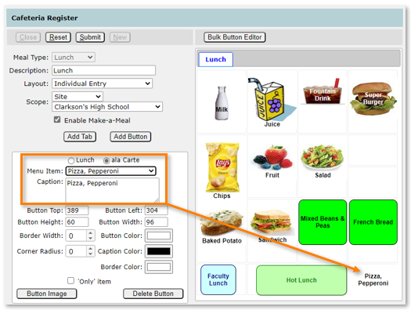
Button Image: Click the button to navigate to and select an image for the button. .jpeg, .gif and .png images are supported. Button default size is 60 high by 96 wide (pixels) and images will need to be resized to fit that or any other size created. Once the image is added, caption color and location can be adjusted for best viewing and if the image is self-describing, the caption can be removed.
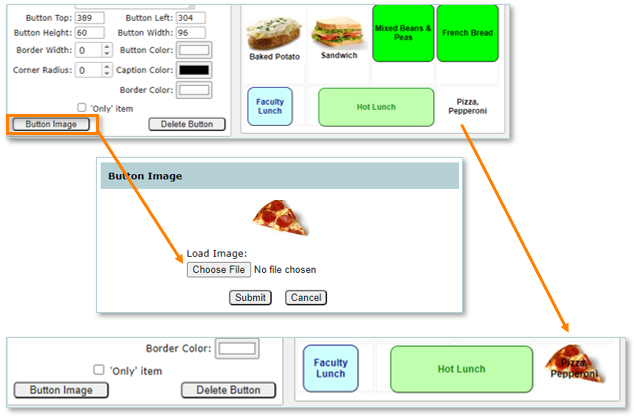
- Click Submit to save the changes.
Add Tabs
A PoS register may have an unlimited number of tabs and consequently, an unlimited number of buttons. Tab width decreases as the number of pages increase.
- Click Add Tab
- A New Tab will be created on the Register layout. Click the tab to display its properties.

- Caption: The caption that will be used to identify the new tab.
- Tab Color: The color used for the tab.
- Caption Color: The color used for the tab caption.
- Page Color: The color that will be used for the background of the new tab.
- Buttons can be moved to other tabs by dragging and dropping the button over the desired tab.
- Bulk Button Editor: Opens a separate Button editor window for easier editing of multiple buttons. Hold the CTRL key to select multiple buttons. Those selected will have red border. In the example below two buttons have been selected and the height and border width increasedproperties have been defined, click Submit to save your changes.
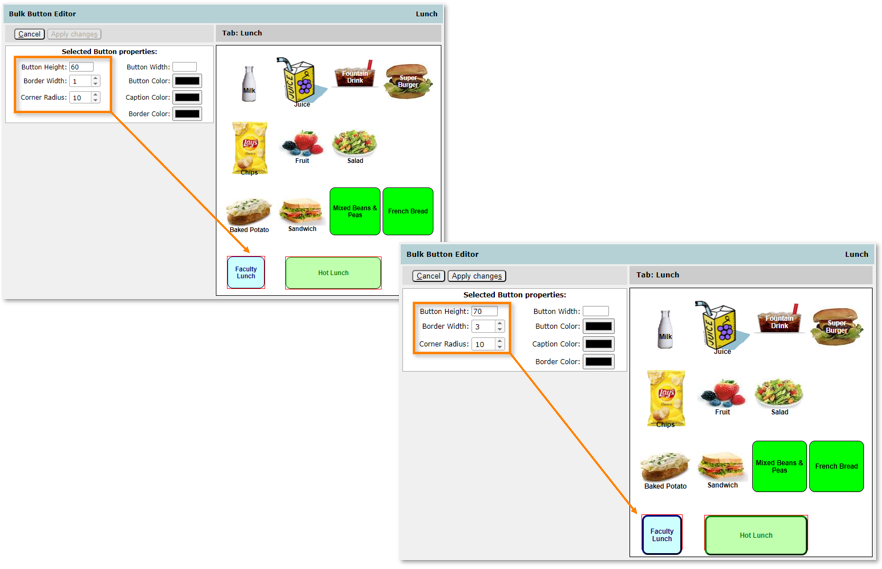
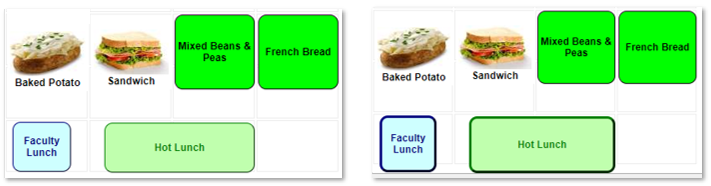
Click Apply Changes when done. The results are shown below in the menu.
The Bulk Button Editor can also be used to create and configure multiple buttons quickly.
Once all the buttons and tabs are defined, click Submit to save the changes.
Require Buttons
Auto Serve: If a default meal is set for the line (Cafeteria preference Auto Serve is ON) a button representing that meal must be present in the register.
- Lunch registers: A button that references that default lunch item.
- Breakfast registers: A button that references that default breakfast item.
Copy a Register
Select the register to copy from the list of source registers, click Copy Register. Register, page and button properties are copied to the register with the exception of button images. Any button images present in the source register must be reloaded into the destination register.

Confirm the selection and click Yes to continue, No to cancel.

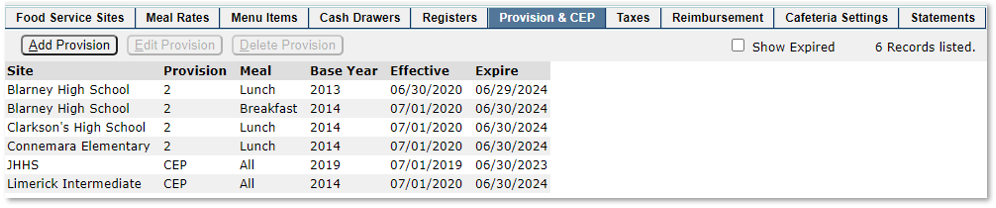
Create Provision 2 & 3 sites. These include:
- Creating the claiming Base Year
- Identifying Claim start and end dates
- Calculating Base Year monthly eligibility and meal counts (optional).
- Recording Provision 3 annual percent enrollment changes.
The information defined is used by the Data Entry, Cafeteria, Accounting, Reimbursement and various reporting applications.
Overview
To define the site as a Provision site:
- The school is present as a Food Service site.
- Set the Free and Reduced reimbursable meal rates for Provision 2, 3, and CEP to 0.00 for the 4 year period the program is to be in effect. Students are charged the normal rates during the base year.
- Configure the Provision 2 or 3 Base Year, or the Community Eligibility Free.
Configuring Provision 2 or 3
From the Provision & CEP tab:
Click Add Provision.
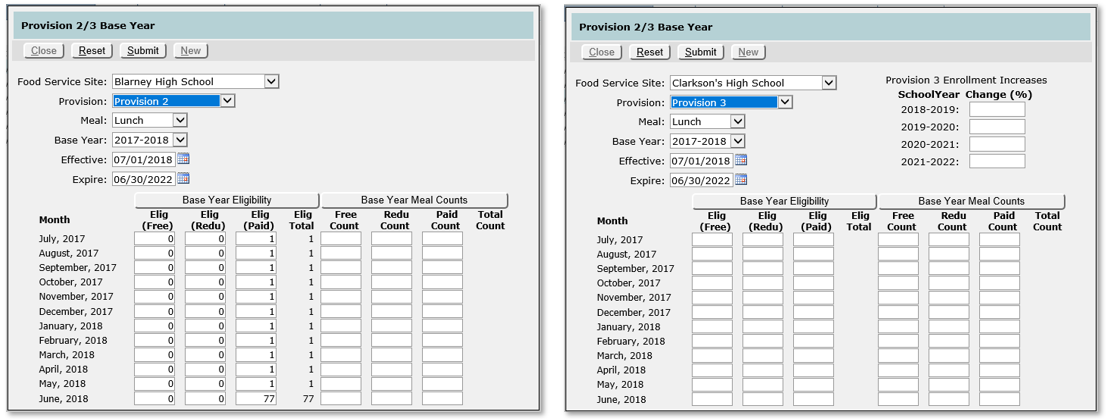
- Food Service Site: Select the site from those present.
Note:
When multiple food service sites are present for a Provision school, a Base Year is created for the Base Site only, i.e., the site that uses the unaltered, original site code. Sub-sites for Provision schools use the base year data present for the base site./p>
- Meal: Choose lunch or breakfast.
- Provision: Choose Provision 2 or Provision 3. The Provision 3 value includes the ability to record annual enrollment changes.
- Base Year: Identify the Food Service year used as the Base Year (ends 06/30).
- Effective: This date defaults to 07/01 of the School Year following the Base Year. This date can be changed.
- Expire: This date defaults to 06/30, four years following the Base Year, which is the last day of the fourth Food Service Year following the Base Year. This date can be changed.
- The procedure for configuring Provision 3 is identical to Provision 2. The percentage of enrollment increase can be entered for the period the program is in effect. These values can be entered each year as enrollment numbers are known.
Click Submit to save your changes.
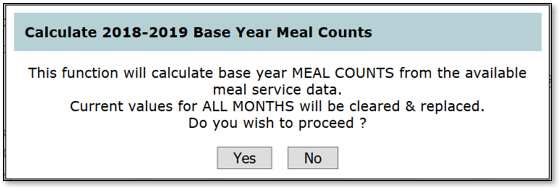
Base Year Meal Counts button (Optional): This function calculates and inserts the monthly values free, reduced and paid meal records for the Base Year. Perform this procedure after the last school day of the base year to capture all data.
- Monthly values can be entered manually. Values should be present for each month of the Base Year.
- Annual percentages will be used when data is not present for any given month (perhaps school starts in August this year, but started in September in the base year). The term Annualindicates when an annual percentage has been applied to a month (reports).
- *Provision 3 designation does not utilize Annual figures. Therefore, Base Year Meal data must be present for each month.
Note:
The POS New Year procedure clears food service transactions which includes meal records. To use the Calculate Base Year utility, do so before the Food Service POS New Year procedure is performed.
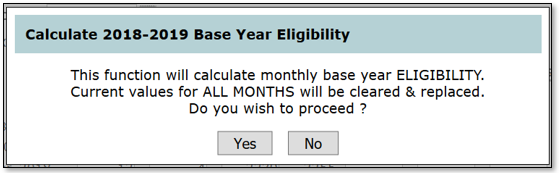
Base Year Eligibility button (Optional): This function calculates and inserts the monthly values for free, reduced and paid eligibility for the base year. Perform this procedure after the last school day of the base year. Perform this procedure after the last school day of the base year to capture all data.
- Monthly values can be entered manually. Values should be present for each month of the Base Year.
- Annual percentages will be used when data is not present for any given month.
Note:
Provision 3 designation does not utilize Annual figures. Therefore, Base Year Eligibility data must be present for each month.
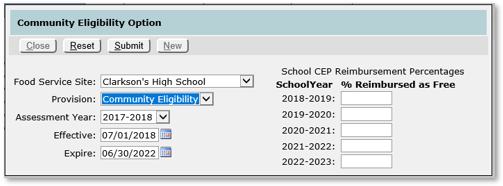
Configuring Community Eligibility Provision
Configure the dates for the Assessment Year, Effective and Expire dates for the site and fill in the percentages of students reimbursed as free for each year.z
Create Taxes and rates to identify taxable items and consumers for districts that are required to collect and report tax on the sale of food items. This information is used by the Food Service Accounting application and also to produce Sales Tax reports.
Sales Tax Liability
Sales tax is included in the price of menu items. Sales tax liability is calculated as follows:
Tax = rate x (amount / (1+rate))
If rate = .08175
And amount = 5.00
.08175 x (5.00 / (1+0.8175)) = .37786
Tax
From the Taxes tab in the Food Service setup application:
Click Add Tax
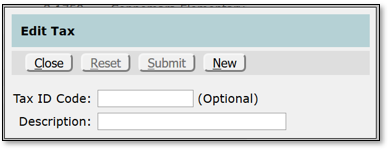
- Tax ID Code: Alpha numeric up to 8 character code.
- Description: The description entered will be used in the Setup applications and reports.
Click Submit to save your changes.
Tax Rate
Click Add Tax Rate
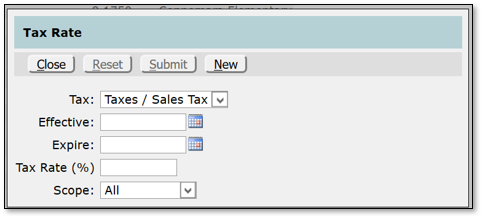
- Tax: The tax rate that will be used for the menu items.
- Effective (Optional): The date the tax rate will be put into effect. Dates are not necessary unless this rate is replacing an expired rate.
- Expire (Optional): Date the tax rate is set to expire. Dates are not necessary unless this rate is replacing an expired rate.
- Tax Rate (%):
- Scope: A tax rate may or may not be global. Sometimes different tax rates are applied to specific areas within a district, or a different rate may apply to an outside district. If this is the case scope the rate as appropriate.
Click Submit to save your changes.
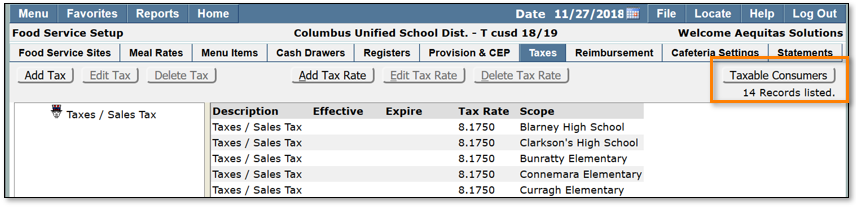
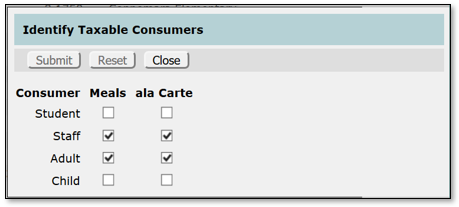
Taxable Consumers
Identify taxable consumers:
- Click the Taxable Consumers button located in the upper right-hand corner of the screen.
- Insert a checkmark by each taxable consumer and click Submit.
Set rates for federal, state and other reimbursement programs. A basic set of federal programs and reimbursements is provided each year which should be reviewed as part of the setup.
- Federal Lunch
- School Lunch Program
- Severe Need Lunch
- Snack
- SMP Milk
- Federal Breakfast
- Basic Breakfast
- Severe Need Breakfast
- State
- Commodities
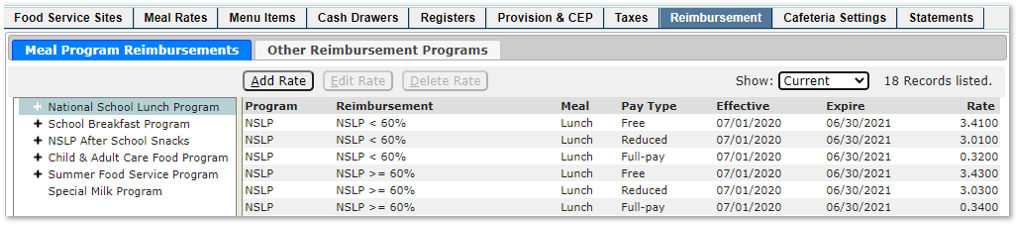
Meal Program Reimbursements
Add a new Reimbursement Rate:
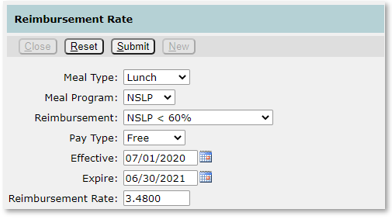
- From the Reimbursements tab, click Add Rate.
- Meal Type: The Meal to which the rate applies (Breakfast, Lunch, SMP Milk, Snack).
- Meal Program: The Program to receive this rate.
- Reimbursement: Selections are those programs associated with the selected meal and program for this reimbursement.
- Pay Type: Free, Reduced, Full-Pay
- Effective (Optional): The date this rate goes into effect. Optional unless this is a replacement rate.
- Expire (Optional): The date this rate expires (inclusive). Optional unless this rate is being expired and replaced by another rate.
- Reimbursement Rate: Rate per meal for this meal and pay type (include decimal).
- Click Submitto save the new rate.
- Click New and repeat to create reimbursement rates for the remaining student pay types. The New button simplifies creating a new rate by moving information from the existing rate to the new record where it can be modified to reflect the new reimbursement.
Other Reimbursement Programs
Any Food Service reimbursements other than the Federal Meal Program reimbursements (state, local, etc.) can be added in the Other Reimbursement Programs tab.

For more information on Reimbursement types, or to add Other Reimbursement Program types, please refer to the instructions outlined in Add a New Reimbursement Rate section of this document.
These settings manage Preference and Policy choices as well as access for the Cafeteria Application. Food Service Policies (Alerts and Restrictions) are defined here and may be applied at district or school levels, or assigned to Students, Staff, and Patrons using the Accounts app. Cafeteria Preferences can be managed here at any level (per district, school type, school, meal, or cash drawer). Preferences can also be accessed by each cashier in the Cafeteria app.
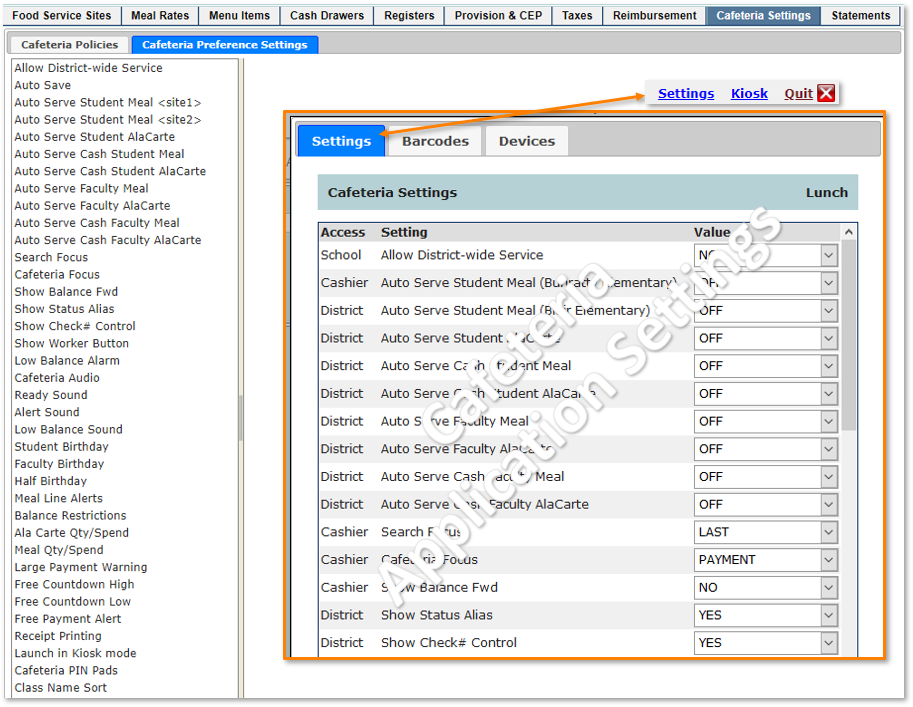
Cafeteria Preference Settings
Selected Preference settings will be highlighted and show in the Title.
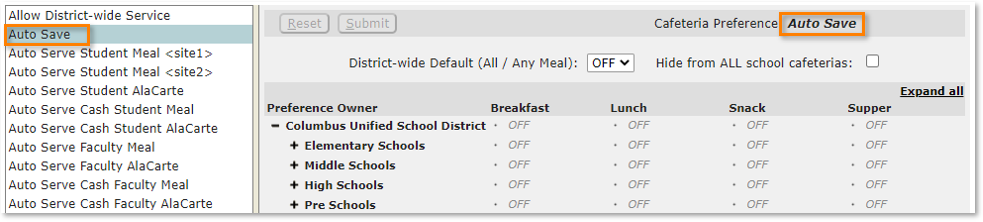
Preference Settings for each item follow a hierarchy from the district level down to the Individual Cafeteria PoS stations.
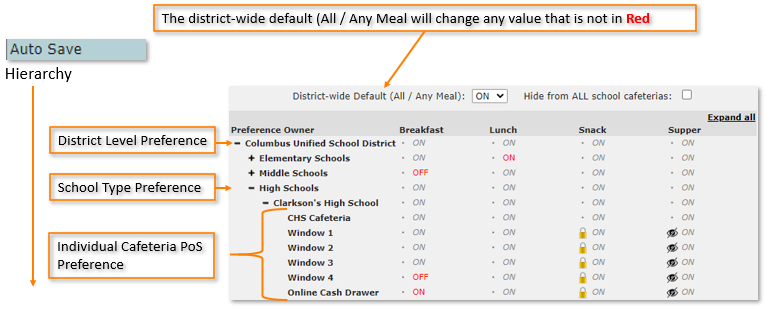
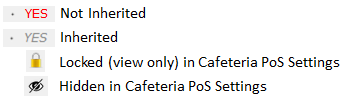
Preference Settings can be propagated by meal type from the District or School or can be set at the individual Cafeteria PoS stations. Here is a key to the options.
Click “Hide from ALL school cafeterias” to quickly remove an individual Preference setting from showing on all Cafeteria Settings menus.

Explaining the Hierarchy
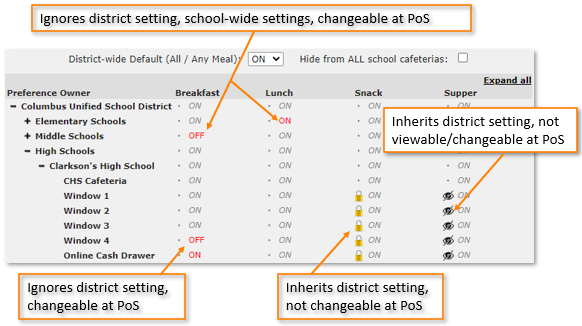
Settings changed at the PoS station are reflected in the Food Service Setup | Cafeteria Settings.
How to change settings:
For a complete listing of the Policy and Preference settings with descriptions and options, click here.
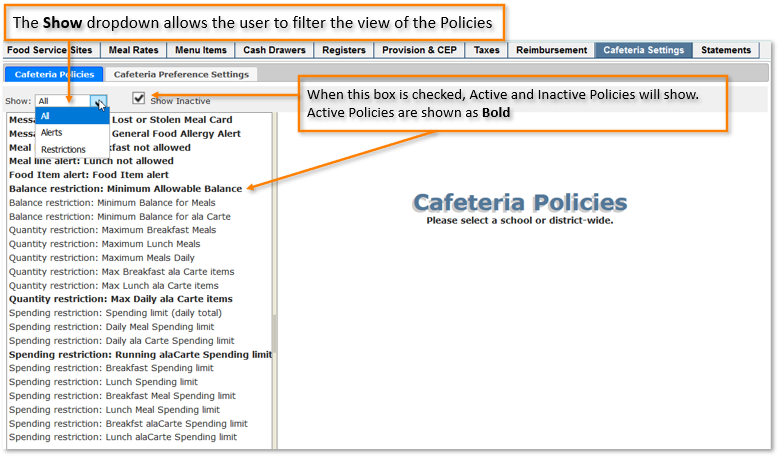
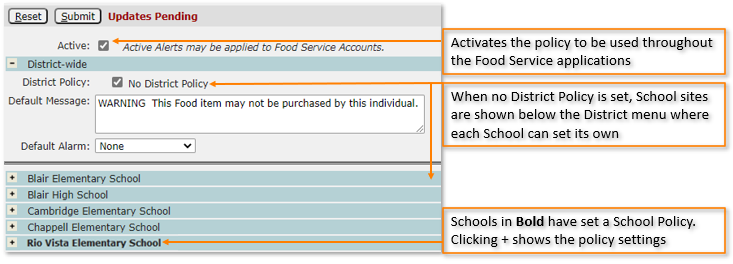
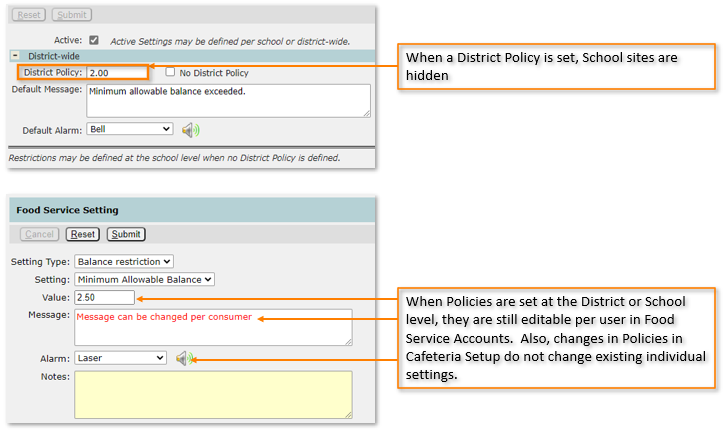
Cafeteria Policies
Q Cafeteria Policies are used to enable alerts, balance, quantity and spending restrictions.
Key Points to Understanding Cafeteria Policies:
- An alert or restriction must first be enabled by the district before it is available for use by schools.
- Alerts and restrictions may be enabled with or without district or school values.
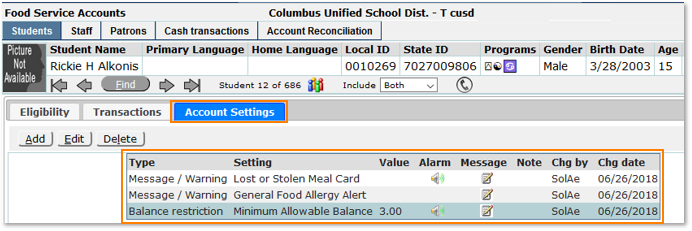
- All alerts and restrictions may be customized for individual consumers in Food Service PoS | Food Service Accounts.
Example from Food Service Accounts
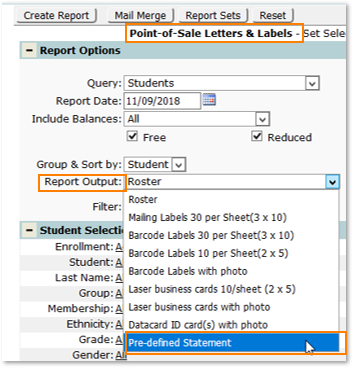
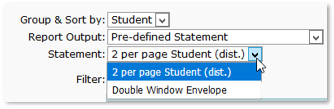
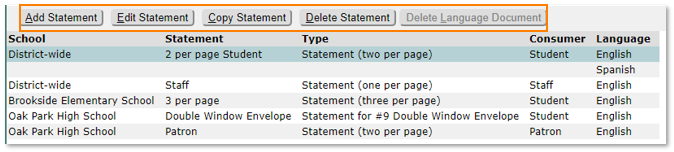
The Statements tab allows users to create and manage statement merge documents for Statement Reports in Food Service POS Letters and Labels. These are identified as Pre-defined Statements in the Report Output shown below.

Each Statement contains 5 elements.
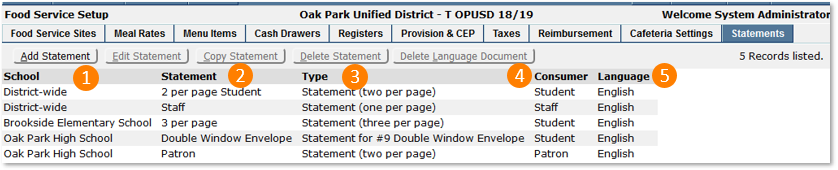
- School – controls the scope of the statement. If a statement is district-wide, it will be seen at every site in the POS Letter and Label report menu and is designated by (dist). If a statement is assigned to a site, it will only be seen in the menu at that site.
- Statement – this is the name of the Statement.
- Type – there are 5 preset types of Statement formats:
- Statement (one per page)
- Statement (two per page)
- Statement (three per page)
- Statement for #9 Single Window Envelope
- Statement for #9 Double Window Envelope
- Consumer- Statements can be designed for the 3 types of consumers:
- Student
- Staff
- Patron
- Language – each Statement can be translated and assigned a language code that will produce the reports according to the household’s language preferences.
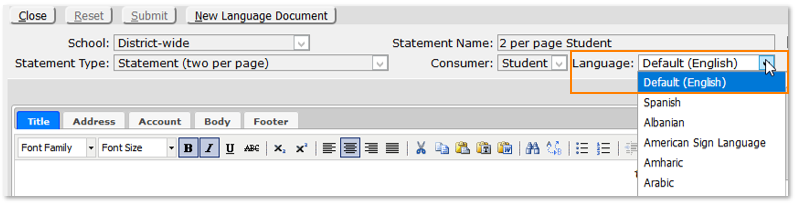
Create a Statement
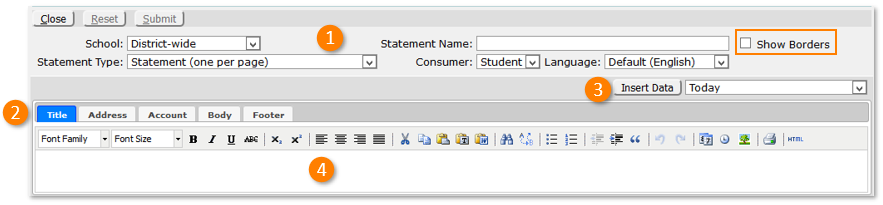
Click Add Statement

- Select the 5 options, School, Statement Name, Statement Type, Consumer, and Language described above including whether to Show Borders.
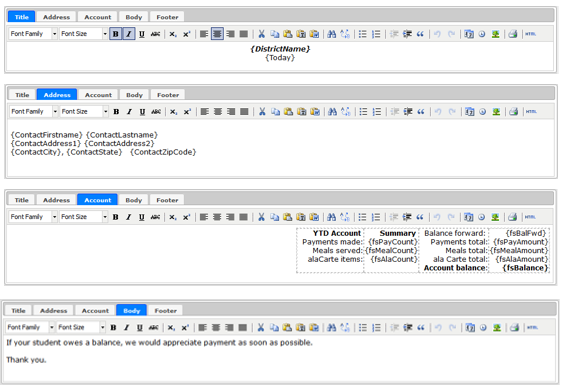
- Choose the part of the statement to be designed, Title, Address, Account, Body, and Footer.
- Choose the data fields to be inserted. The data available is unique to each kind of customer. Select the data field and click Insert Data.
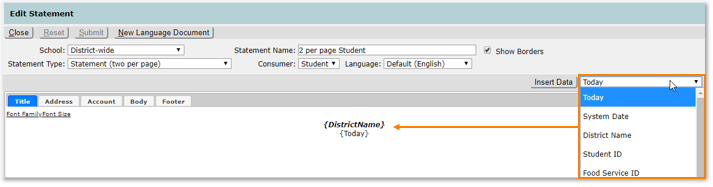
- Type the desired text using the formatting options of the advanced text editor.
Shown below the tabs and text editor is a sample report showing the regions of the reports represented by the tabs. The Show Borders check box turns the border lines on/off on the Statement report. Select a tab and use the text editor with the inserted data elements to create the content.
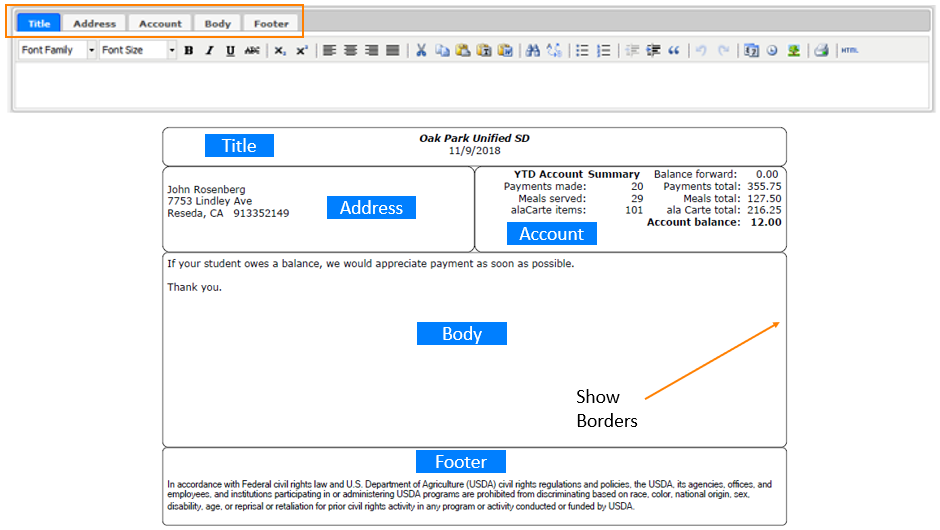
Select a tab and design each section. Sections are limited in size depending on the type selected so the amount of text may have to be adjusted accordingly.
New Language Document
Select the desired Statement and click New Language Document.
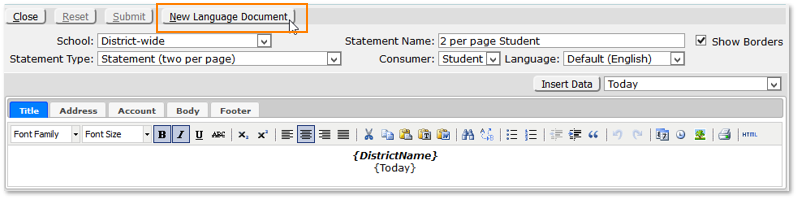
All the fields will then lock except for Language. Select a language. The text and data fields will be populated from the original letter. Translate the regions and click Submit.
The New Language Document for that Statement will show below the original.

Managing Statements
Use the tool bar buttons to Add, Edit, Copy and Delete Statements. The Delete Language Document button is only available when a Language Document is available and selected.
Offer versus Serve (OVS) is a provision in the National School Lunch Program (NSLP) and School Breakfast Program (SBP) that allows students to decline some of the food offered. The goals of OVS are to reduce food waste in the school meals programs while permitting students to decline foods they do not intend to eat.
Q Food Service now provides districts with tools to assign meal component values to ala Carte items served in the cafeteria, and automatically build reimbursable meals using ala Carte items served.
Setting up for OVS
Menu Items and Registers must be set up first to use Offer vs Served (OVS)

Before getting started, there is an important OVS Preference in the snpref table. Contact the database administrator for this setting.
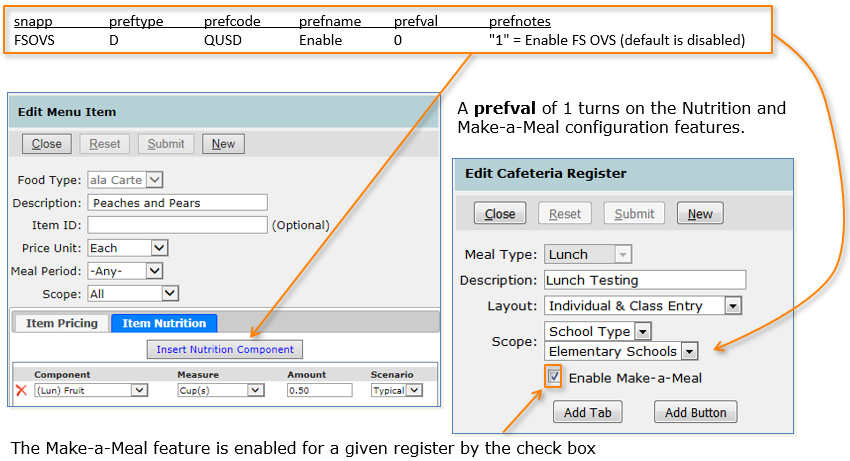
Configuring the Register
Adding Nutritional Components
Typical and Alternate Scenarios
- A Typical Scenario

How it looks in the Cafeteria
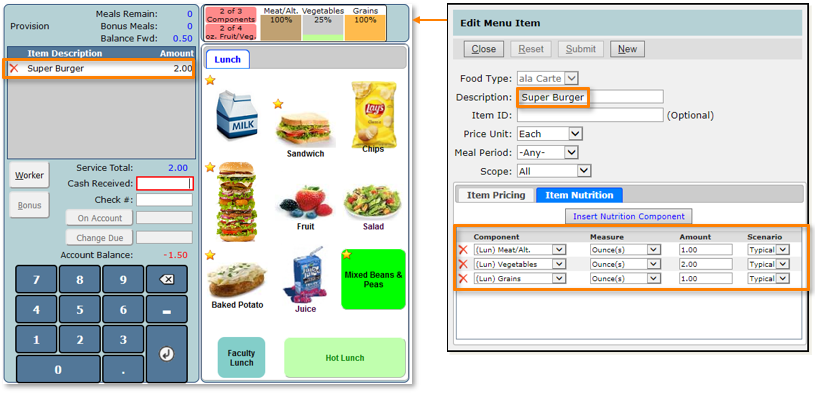
USDA requires a student to select at least 3 of 5 available meal components, and a total of 4 ounces of fruits and/or vegetables to qualify for a reimbursable meal.
Meal component information is displayed below the menu items section. In the above example, the student will need to select another item to qualify for a reimbursable meal.

In the above example, the consumer already had met the meat and grain requirements with the Super Burger. Each time an ala Carte item is selected, the nutrition panel is re-calculated and when Peaches and Pears are added, it adds a third component, fruits, and the Component Meal is created, the individual items are lined out, and the meal is charged at the regular meal rate.
A vegetable or milk choice could also have created a Component Meal, depending on the menu items configuration.
- The Alternate (Alt 1) Scenario
Some food components may satisfy nutritional requirements in more than one category. For example, certain kinds of beans and peas may be credited as either a meat/meat alternative or a legume vegetable. The example below shows how to configure such a component.
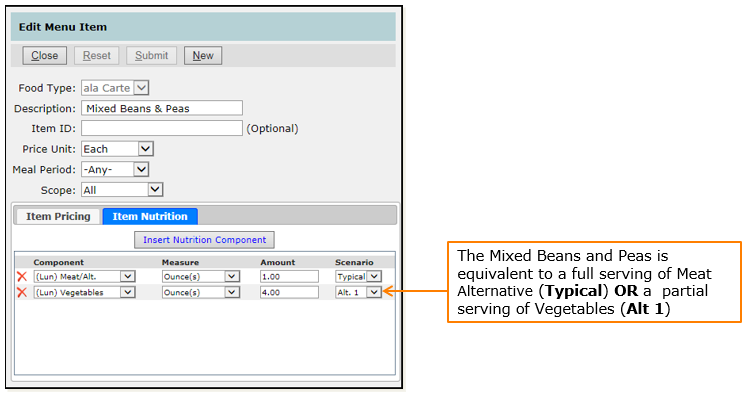
Alt. 2 would be used if a food item fulfilled more than 2 nutritional requirements.
How it looks in the Cafeteria
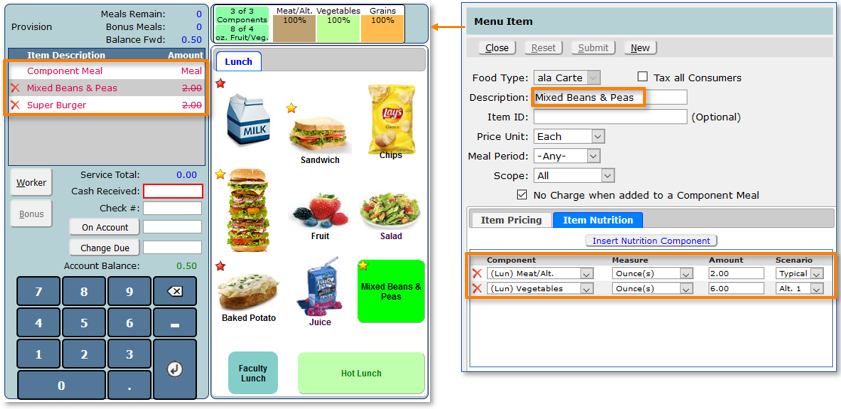
When the Mixed Beans are served with the Super Burger, because the Super Burger already contains a full serving of Meat (already showing 100%), Q takes the Alt. 1 scenario to use the Mixed Beans toward the requirement for Vegetables. The scenarios are automatically computed during Cafeteria service depending on the combination of items chosen by the student.
Many Combinations
Using OVS, Q helps the Cafeteria to put together combinations that fulfill nutritional requirements while giving consumers a wide variety of choices.
In this example, Mixed Beans is used as the Meat/Meat Alternative with Fresh Fruit and Milk meeting the Fruit and Milk requirements respectively

Additional Components
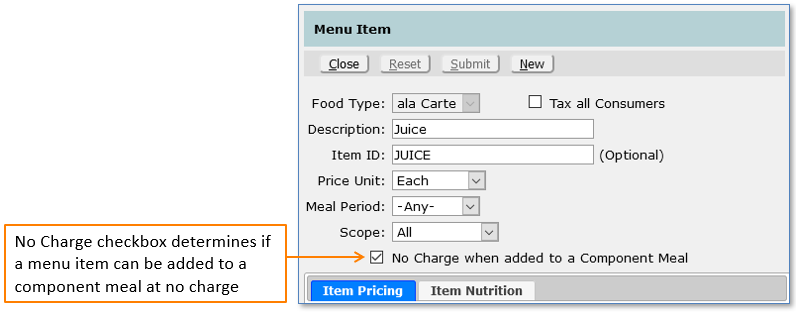
Ala Carte items can be configured to be added to Component Meals at no charge.
Selected items can be added to a transaction once per item. If an item is added more than once each additional time will be charged.
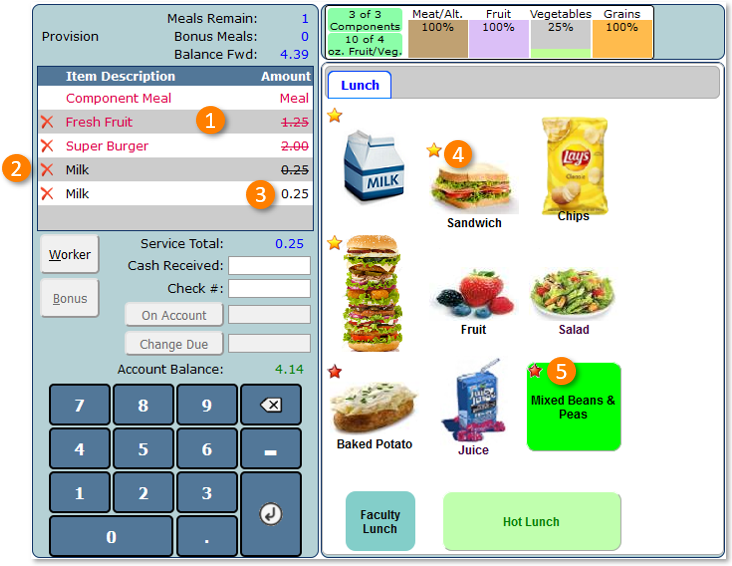
- Items in Red make up the Component Meal.
- Items in Black that are lined out are additional items added to the meal without charge.
- The second milk is charge at the normal rate since a free milk has already been added.
- Yellow starred items can be added at a cost. If adding the item changes the Component Meal calculation, the items included in the meal will change.
- Red starred items can be added as additional free items.
Note:
If items selected can be used in 2 or more different combinations to create a component meal, the most expensive items take priority.
This feature can be changed via a database preference setting in the snpref table noted above. Contact the database administrator.

While serving a student, if a meal (Lunch) item is served, the OVS process is cancelled, and the ala Carte items are served at the usual rate.
