Reports have been created for all Q application categories and can be found in every Q Menu area under Reports. Most reports follow the same format providing the user choices in three areas: Report Options, Selections and Sorts. Once a report has been configured to the user’s liking, a Report Set may be created that contains the values set for the report. Report Sets may be saved at one of three levels; district, school or user.
Q reports with the word Analysis in the report name produce pivot tables. Users can learn more about these in the Pivot Tables documentation.
- To access a report, hover over the desired menu and click Reports
- A list of reports for the application category will display

- A list of reports for the application category will display. Users can click the + signs to expand the menu to see reports available in other categories. Once expanded, folders can be minimized by clicking the - sign.

- Click any report to proceed
Q reports all have report options. When the report is initially launched, the default display has the options expanded. Options may be closed by clicking the – (minus) sign and can be accessed by clicking the + sign next to report options, or by clicking the options link on the top right-hand side of the screen.
- Examples of some Report Options – Options may vary depending on the report type.
- Title: Title of the report that may be customized to user’s choice and allows for use of specialized characters
- Date: Many report options offer the user a choice of formats and dates. Dates may be entered using any of the following methods:
- Manual entry of dates
- Date pop up boxes
- Date hot keys
- T — Today’s Date
- Y — Track Begin Date
- R — Track End Date
- + — Increment day by 1
- - — Decrement day by 1
- Some reports use validation such as a date range and expect users to enter specific values. If incorrect values are entered an error message in a red font displays alerting the user to the missing fields. The missing items must be entered before the report will launch
- Several Q reports include cascading list boxes where input is reliant on the previous entry
- Reports can also use check boxes, list boxes and radio buttons for option selections
- Report options may be reset individually or by clicking the Reset All button. To reset all options, click the Options-Reset All button located on the upper right-hand side.

Report selections can be accessed by clicking the + sign next to Selections, or by clicking the Selection link on the upper right-hand side of the screen.
Most Q reports offer a range of Student or Class selections. Selections are accessed by clicking the link next to the item name.
Student Selections

- Enrollment: Most reports default to active students.
- Clicking the link will expand the enrollment choices to include:
- All Students This Year
- Inactive Students
- Exclude Part-Time Students
- Users may click Done when selections are complete or Reset to reset selections
- Clicking the link will expand the enrollment choices to include:
- Student: Select individual or multiple students by Student ID, Last Name, or First Name by clicking the Student link to open the selection box
- Enter the Student ID or name
- Select student name(s) from a list
- Click the Refresh Available Students button to display a list of Available students. To select a student name from the list, either double-click the name or highlight the name and click the single right arrow button to move it from available students to selected students. All Available Students can be moved by clicking the double right arrow button.
- A Selected Student can be moved back to the Available Students section by clicking the single left arrow button. All Selected Students may be cleared by clicking the double left arrow button or Reset
- Click Done when all student selections have been made

- Last Name: Filters by range of Last Name
- Group: Filters by static/dynamic student groups as created in Group Editor
- Membership: Filter by membership as defined in the Student Editor
- Ethnicity: Filter by ethnicity as defined in the Student Editor
- Grade: Filter by grade level
- Gender: Filter by gender
- Counselor: Filter by counselor
- Advisor: Filter by advisor
- Program: Filter by the program the student is currently enrolled in.
Note
The program list will only display the programs the user has permission to see
- Track: The report defaults to include all tracks of the logged in school; use the track selection to limit the report to specific tracks
Individual selections may be reset by clicking on the Reset arrow to the left of the selection item or by clicking Reset within the selection drop-down menu.
To reset all selections, click the Filter Reset All button located on the upper right-hand side.

Teacher Selections

- Teachers: Teachers may be selected by:
- Entering the Teacher ID or name
- Selecting teacher name(s) from a list
- Click the Refresh Available Teachers button to display a list of Available teachers. To select a teacher name from the list, either double click the name or highlight the name and click the single right arrow button to move it from Available Teachers to Selected Teachers. All Available Teachers can be moved by clicking the double right arrow button.
- A Selected Teacher can be moved back to the Available Teachers section by clicking the single left arrow button. All Selected Teachers may be cleared by clicking the double left arrow button or Reset
- Click Done when all student selections have been made

- Other Filters: Users may also filter by Class, Term, Period, Cycle Day, Track, Course, Department, Subject, Teacher Group, and Course Group
Note
These filters are cascading, meaning that a selection may change available based on school data. For instance, if a user filters by a teacher, the list of classes will change to show only that teacher’s classes.
When all selections have been made, click Done
Individual selections may be reset by clicking on the Reset arrow ![]() to the left of the selection item or by clicking Reset within the selection drop-down menu. To reset all selections, click the Filter Reset All button located on the right-hand side.
to the left of the selection item or by clicking Reset within the selection drop-down menu. To reset all selections, click the Filter Reset All button located on the right-hand side.

Many Q Reports offer several sorting options with the ability to modify the report’s default sort options.
Report Sort choices are made in the same way as options and selections.
- Access Sort options by clicking the + sign next to Sort, or by clicking the Sort link on the upper right-hand side of the screen.
- Select the desired sort options
- Place check marks in boxes to group, page break, or subtotal the sort selection
To access additional sort items:
- Click Change Sort Items to open a list of available choices
- When the pop-up screen opens, select the desired sort item from the Available Sort Items list on the left and drag and drop it into the Selected Sort Items list on the right
- To remove a sort option from the report, select the item from the Selected Sort Items list on the right side and drag and drop it to the Available Sort Items list on the left
- Once all desired items have been added to the Selected Sort Items column, the order may be changed by dragging up or down on the sort item name until the desired order is achieved
- When all sort items have been added and placed in the desired order in the Selected Sort Items list, click Save

- Once saved, the additional items will appear in the Sort list
To reset all selections, click the Filter Reset All button located on the right-hand side

Once finished selecting the report Options, Selections, and Sorts, the report is ready to run. Q Reports create PDF files which can be saved and printed. Most reports may also be exported as an excel spreadsheet.
Note
A mail merge option has also been added to some Q reports.

Create Report
When Create Report is clicked, a popup screen will display that includes a progress bar with an option to cancel the report.

If the user’s report selections return no data, a message will display:

or

Export Report
When Create Report is clicked, a popup screen will display that includes a progress bar with an option to cancel the report. When the report is exported, the Excel spreadsheet launches in protected view. Click Enable Editing to make any changes.

Mail Merge
When the Mail Merge option is available and selected, the user is prompted to choose a document to be used for the mail merge, along with the option to email or print the letter.

The Selected Document drop-down list includes all previously created letters and the option to Add New document.

After a document has been selected, the user has the choice to email, print, or edit the document. See Message Editor documentation for information on adding or editing documents.
Email: If the email option is selected, a potential recipient list is displayed. Placing a check next to the student’s name will generate an email. Contacts can also be included in the email. In addition, there is also an option to CC to self with a secondary option to receive a CC for each recipient or for only copy only.
Once the recipients have been chosen, users may click the Review button at the top left corner to continue
 On the Review screen, users have one final opportunity to review the recipients. They can choose to go Back to Recipient Selection, Print Screen, or Send Email.
Print: If the print option is selected, the recipient list will be displayed. Placing a check next to the student's names and clicking Create Document will generate a letter for each selected student.
Edit: clicking edit will take users to the Document Editor application.
For districts using the Report Server Queue, some reports will include a Schedule button as pictured below.

The schedule option allows users to start a report without having to wait for the report to generate.
Note
All scheduled reports may be downloaded from the Scheduled Reports widget located on the homepage.
Clicking Schedule will give you the following options:
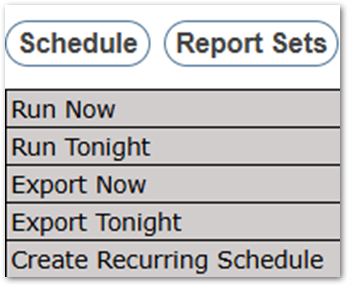
- Run Now – Creates a PDF report immediately.
- Run Tonight – Creates a PDF report overnight.
- Export Now – Creates an Excel report immediately.
- Export Tonight – Creates an Excel report overnight.
- Create Recurring Schedule - Customize a recurring schedule for this report

- Schedule For – The user for whom the report will be created.
- Report Output – Determines the output type: Print (PDF) or Export (Excel).
- Frequency – Determines if the report should run daily or monthly.
- Day(s) – The days of the week the report should run.
- Run Time – The time in which the report will run. It is best practice to choose an off-hours time that will not be interrupted by other network activities.
- Start and End Date – The date range for the report.
- Date Field Settings – Specifies the listed date fields in the report.
- The Days Offset field allows you to adjust the Selected Date by the specified number of days. A positive number adds days to the selected date. A negative number subtracts days from the selected date.
 This example would set the report "Start Date" to the date that the report is run and the "End Date" to 7 days after the date the report is run.
 This example would set the report "End Date" to the date that the report is run and the "Start Date" to 7 days before the date the report is run.
- The Days Offset field allows you to adjust the Selected Date by the specified number of days. A positive number adds days to the selected date. A negative number subtracts days from the selected date.
Report Option, Setting and Sort configurations may be saved for use in the future. This saves time as users won’t have to recreate the report settings each time they want to run the report.
Report settings may be saved at three different levels:
- District-level report sets must be configured while logged in to the district track. To create a district-level report set, the user must have the DBA box checked on their district status record. Once a District-level report set is created, it is available to all users district-wide.
- School-level report sets are set at the school level. To create a school level report set, the user must have the DBA box checked on their track status record. Once created, the school level report set will be available to all school users.
- User-level reports are created by the logged-in user and are accessible only to that user.

To create a report set:
- Click Report Sets

- Type Report Set Name in the Save Current Settings As box
- Pick a set level (user, school, or district)
- Click Save
- Once report sets have been saved, they appear in the Report Sets list
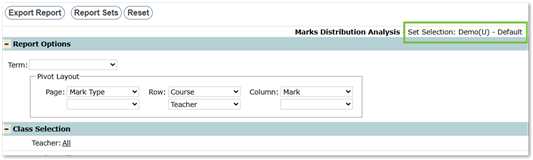
- A report may be designated the default report set by highlighting the set name and clicking the Make Selected Set Default. Report sets designated as default will be in place each time the report is launched.
- Users can identify which Report Set is in place, by checking to status bar at the top of a report.
- Users can identify which Report Set is in place, by checking to status bar at the top of a report.
- Report sets may be deleted by highlighting the report set and clicking the Delete Selected Set
To use a report set:
- Click Report Sets
- Select the desired set from the Report Sets list
- Click Load Selected Set
- Create Report

