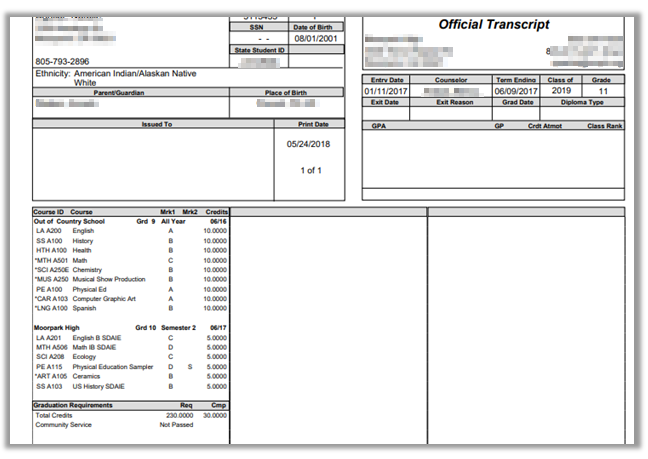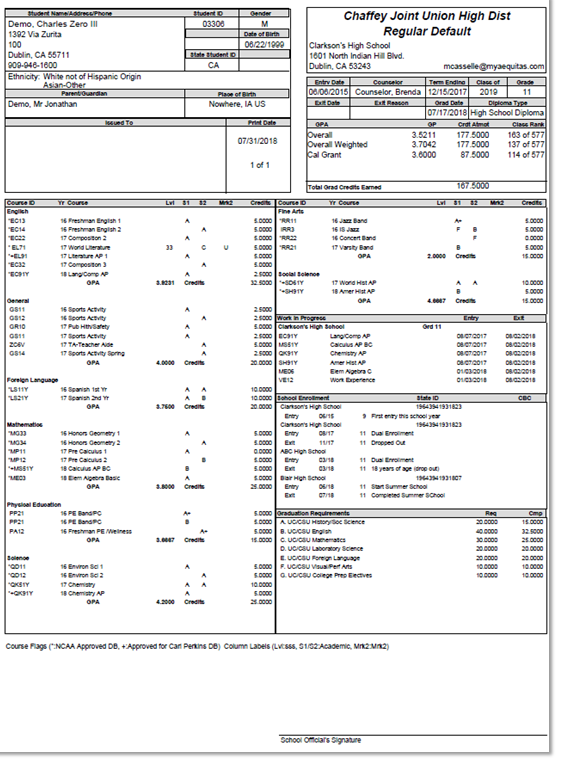
This report produces transcripts for the students. Whether official, or unofficial, it shows the student’s grades, credits earned, and credits needed.
While details specific to this report will follow, users can find general information about reports within the Reports documentation.
Academic Transcript Report is located within Reports in the Marks menu in Q.
There are multiple Report Options for the Transcript Report. The user may click Expand All to access all at once or click the + sign next to each individual option.
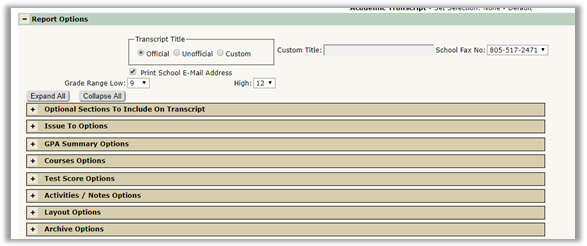
- Transcript Title– The title of the report is printed under the name of your school district in the School Information header section in the top right of the transcript. Select one of the following three options:
- Official– “Official Transcript” is typically issued to outside parties.
- Note: this is a permission item so this may not appear for all users based on their assigned permissions.
- Unofficial – “Unofficial Transcript” is typically for internal use by counselors and school administrators.
- Custom – Select this option to enter your own title in the text field marked Custom Title.
- Official– “Official Transcript” is typically issued to outside parties.
- School Fax No – if you want the fax number to print on transcript select from drop down list.
- Print School Email Address – Check to have school email address printed on transcript.
- Grade Range:
- Low – lowest grade level to print on transcript.
- High – Highest grade level to print on transcript.
In this section, the user will be able to specify all options to be included in the report.
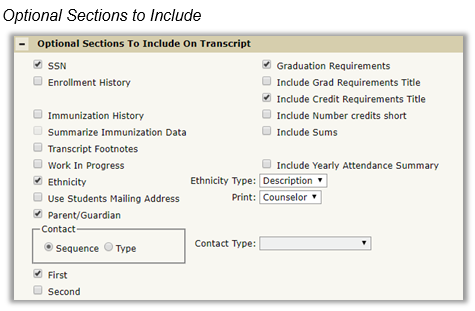
- Student SSN - Check if you want the student’s Social Security number to print on the Transcript.
- Enrollment History– Check this option to print the student’s enrollment history on the transcript. The name of the school, school state ID, College Board code, student’s entry and exit dates, grade level per exit/entry and entry exit reasons for each school will print.
- Immunization History– Check this option to print itemized immunization records from the student’s health record.
- Summarize Immunization Data – itemized immunization data may occupy excessive vertical space on the transcript due to each immunization getting a separate line. Checking this option will summarize the data to save space.
- Transcript Footnotes– Check this option to enable footnotes for individual marks reported on the transcript. Footnotes are a way to add additional information to a specific mark. Footnotes recognizes identical footnote text and assigns the same footnote number on each mark to which it applies.
- Work in Progress– Check this option to show courses in progress but not yet completed at the time and print date of the transcript.
- Graduation Requirements – Check this option to include a Graduation Requirements section in the transcript.
- Include Grad Requirements Title – Check to include name of the Graduation rule applied to the student.
- Include Credit Requirements Title – Check to itemize components of the Requirements calculation and enable the following two sub options:
- Include Number credits short – Check to add an extra column in the Graduation Requirements section that displays the graduation credits short to date (if any) for each eligibility category.
- Include Sums – Check to print at the bottom of the list the subcomponent for each eligibility category. Typically for internal use only.
- Custom Transcript Section(s)– Check this to trigger a district-defined business procedure when the transcript is previewed or printed. This procedure will cause customized data sections to be included on the transcript. This option will only appear if your district has created custom sections.
- Include Yearly Attendance Summary – Select to include yearly attendance summary
- Attendance Summary by Track – if student has attendance from more than one track in one year checking this will print attendance broken down by track.
- Ethnicity- Check if you want the student’s ethnicity to print on the Transcript.
- If Ethnicity is checked the option to select the Ethnicity Description or Ethnicity Code is available.
- Student MailingAddress - Check if you want to use the student’s mailing address if it is different than the home address. (Both of these addresses are defined in the Student Editor application)
- Print - Select to print Counselor name or Advisor name for the student.
- Print Parent/Guardian - Check to enable printing of Parent/Guardian names in the header of the transcript, just beneath the student’s name and address. Then further define what name or names will be printed using the sub options of Contact Sequence or Contact Type.
- When using Contact Sequence, you can enter the 1st and/or the 2nd contact in the student’s demographic file. A contact sequence is defined for a student in the Student Editor application. It denotes the priority level for a student’s contacts; 1st choice, 2nd choice, etc.
- If using the Contact Type – a drop-down list will be enabled. Select from a predefined list of contact types available. The Type selected will be used as the header for the Contacts printing area; otherwise ‘Parent/Guardian’ will be used.
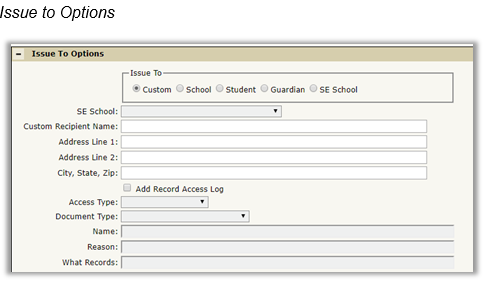
- Custom – When the recipient is an entity that is not stored in the student demographic tables or school tables, then you must select this option to enable the Custom Recipient fields. Enter the Name and Address of the custom recipient. For example, this could be the name and address of an institution, probation officer, or social worker, etc.
- School – If this button is selected the Name and Address fields on this tab will be disabled. The address of the logged-on school will be used as the recipient.
- Student – If this button is selected the Name and Address fields on this tab will be disabled. The student’s address will be used (as recorded in the Student Editor application).
- Guardian – If this button is selected the Name and Address fields on this Tab will be disabled. The address of the student’s parent or guardian will be used (as recorded in the Student Editor application).
- SE School – If this button is selected the Name and Address fields on this Tab will be disabled. Select the recipient school in the SE School field. SE School tables are used to store the names and addresses of schools both inside and outside the school district, so this is where the names of colleges and universities are likely to be stored if they are frequent destinations for graduating students in your district.
- Add Record Access Log – When this option is checked a record will be written to the student’s Record Access Log using the following selections:
- Access Type – Select from the drop down list
- Document Type – Select from the drop down list
- Name – Enter information in the text field
- Reason – Enter desired information in the text field
- What records – Enter desired information in the text field
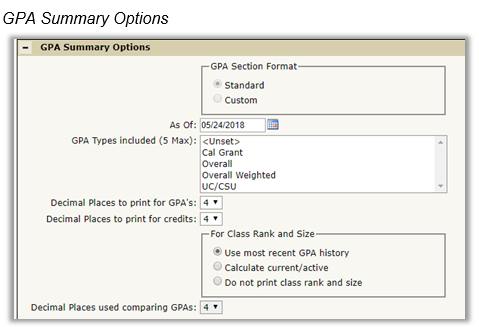
GPA Summary Options
The selected information will appear in the GPA Summary section at the top of the transcript.
- There are two formats for reporting GPA information:
- Standard—This is the default
- Custom – This option is only available if your district has configured an appropriate custom procedure
- Calculate Total Grad Credits Earned – If unchecked, the Total Grad Credits Earned will be pulled from the student's GPA History. If checked, the report will calculate an on-the-fly GPA based off the student's transcript records.
- GPA types – Select up to 5 GPA Types to be included in the GPA Summary. Hold down the Ctrl key while clicking to select or deselect multiple types.
- Decimal places to print for GPAs – Select desired number from drop down list.
- Decimal places to print for credits– Select desired number from drop down list.
- Class Rank and Size:
- Use most Recent GPA History: This is the default method of calculation, which looks only at the most recent pre-calculated historical data and retrieves it for the transcript.
- Calculate Current/Active – Class size may fluctuate between posting terms, thus affecting the class rankings between terms. Choose this option to calculate class ranking on the fly based on the current enrollment of active students in the class compared against the last GPA calculations for each student.
- Do Not Print Class Rank and Size – Check this option to leave off the student’s rank and class size.
- Decimal Places used comparing GPAs – This field is enabled only when Calculate current/active is selected. The range of decimal places available is 1-5. You may need to adjust the decimal places in GPA values in order to break ties.
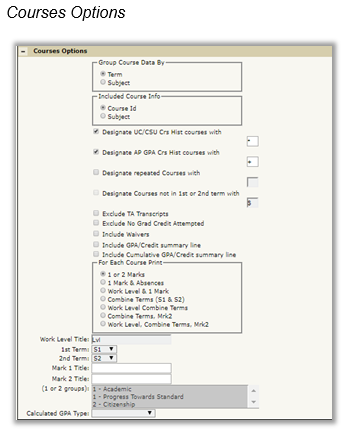
- Group Course Data by:
- Term the courses and their marks will be grouped and printed on the Transcript by term. For example, first and second semester information would print in two distinct groups.
- Subject – selected, the courses and their marks will be grouped by subject (as defined for each course in the District Courses application).
- Included Course Info - The selection here will dictate which information will accompany the Course Description on the Transcript:
- Course Identification Number
- Subject with which the course is associated.
- Designate Courses with (*) – Your school or district may want to flag Honors, Advanced Placement, Special Ed, or other types of courses for easier recognition in the transcript. Two custom course type flags are available for this purpose, identified as ‘course flag 1’ and ‘course flag 2’ (the first two in the list, defined in the District Courses application). The types of courses to be flagged are pre-defined by the authorized persons in the district configuration process and will display as an option if activated. When a course flag is selected, the end user must then enter a single special character in the field provided. This specified character will be the flag that designates the matching course type in the printed transcript.
- Designate Repeated Courses with (*) - Courses that were later repeated by the student are identified as ‘repeated courses’ and can be flagged with a specified single character. The specified character will be printed to the left of the course id, in the same manner as the designators for course flag 1 and course flag 2.
- Designate Courses not in 1st or 2nd Term - When any of the Combine Terms options are selected, enter the character to indicate courses that were not in the 1st Term or 2nd
- Exclude TA Transcripts - If this option is selected the courses in which the student was enrolled as a teaching assistant will be excluded from the Transcript.
- Exclude No Grad Credit Attempted – Check this option to exclude classes where no graduation credit was attempted.
- Include Supporting Marks – Check this to print supporting marks. A supporting mark is a mark that has been awarded on route to a mark for which a student will earn graduation credit. They do not have any Credits Earned value in themselves and are used for reference purposes only, typically when printing an Unofficial Supporting marks will appear on a separate line below the parent mark.
- Include Waivers – If this box is checked, classes flagged as ‘Waiver’ will print.
- Include GPA/Credit Summary Line - If this box is checked, a summary of the GPA and the credits/units awarded for the Term will print on the Transcript after each term. When you select this box, the Calculated GPA Type field will become enabled and must be populated. Use the drop-down box to select the GPA Type that should be reflected when this information is printed. This selection can be used along with, or independent of, the feature below, but the same GPA Type will apply to both options.
- Include Cumulative GPA/ Credit Summary Line - If this box is checked, a second summary line showing the cumulative GPA and credits/units awarded will print on the Transcript directly underneath the Term When you select this box, the Calculated GPA Type field will become enabled. Use the drop-down box to select the GPA Type that should be reflected when this information is printed. This selection can be used along with, or independent of, the feature above, but the same GPA Type will apply to both options.
- For Each Course Print- There is space for four columns per course in the Transcript. You have seven options for the data you want to be printed in those columns.
- 1 or 2 Marks – Select this option and choose one or two-mark groups in the group list below. Enter the column headings you want displayed for the Mark 1 and Mark 2 Titles columns.
- 1 Mark & Absences – Selecting this option will allow you to choose one-mark group from the Mark Types list below, to be displayed in the first column. The second column will display the student’s absence count for the class.
- Work Level & 1 Mark – Selecting this option will allow you to display the work level of the course in the first column and one-mark type in the second column. In the Work Level Title, enter a column heading to be displayed for the work level. Then select one mark from the Mark Types list below.
- For the remaining four options: Combine Terms, Work Level Combine Terms, Combine Terms, Mrk 2 and Work Level, Combine Terms, Mrk 2, please note selecting an option with Combine Terms forces "Group Course Data By: Subject" and there will be two Mark columns. The contents of the columns will be determined by the selections in the 1st Term and 2nd Term fields
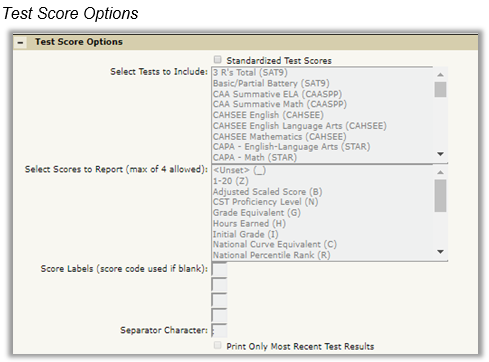
- Standardized Test Scores– When this option is checked selected test scores will print on the transcript.
- Select Tests to Include – Select the standardized tests that you wish to print on the transcript. Multiple tests may be selected by holding the Ctrl key and clicking the individual tests.
- Select Scores to Report (max of 4 allowed) – Select the score types of the tests you wish to print on the transcript.
- Score Labels (score code used if blank) – If you don’t want the database codes for scores to print custom codes may be defined here. Enter your custom codes in the four available fields. Codes will be mapped to selected scores in the list from top to bottom. Fields left blank use the default database codes.
- Separator Character – Choose a Separator Character to separate the code prefix from the score (for better readability). A blank space may be used, the default separator is a colon.
- Print Only Most Recent Test Results – Select this option to print only the most recent test results of all selected tests. This will hide the previous results of a test if the student took it more than onceActivities/Notes Options
Activities/Notes Options
The Activities/Notes options allow the optional inclusion in the transcript of Activities & Awards records and or Student Narrative records. These records are retrieved respectively from the Activities & Awards application in the Enrollment menu and the Student Narrative application in Academic History.
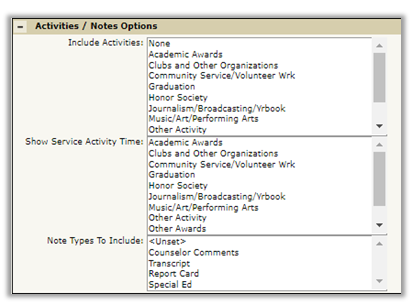
- Include Activities – Predefined Activity Types are displayed in the list. Select the Activities you want to report using Ctrl-Click to select multiple activities.
- Show Service Activity Time – Select Activities to display service times. 'Service Time' could be the time assigned for an Activity or the time completed for an Activity.
- Note Types to Include – You may choose to print notes that have been created in Student Academic History, Narrative tab. Select a Student Note Type to include, or combinations of Types (hold the Ctrl key down to select or deselect more than one Type in the list).
Layout Options
The user may set the font size and the number of columns to their desired configuation. The default setting is a font size of 6 with 3 columns which allows for the most data on one page. Selecting 2 columns with larger fonts is easier to read but most likely will require more than one page per student.
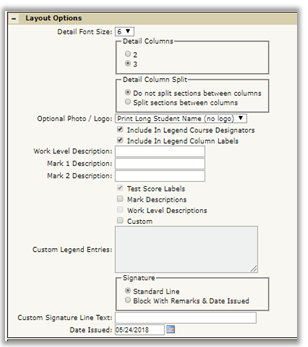
- Detail Column Split– Make selection to determine how columns are split.
- Do not split sections between columns – This setting may create excessive white space at the end of a column if a section does not fill the column.
- Split sections between columns. This setting will split a section to the next column when at least 3 rows will fit in the current column and at least 3 rows will fit in the next column, thus making better use of available space.
- Optional Photo/Logo – Select desired logo or photo from drop down list.
- Include in Legend– Due to space limitations on the printed page, single designated characters are used for course flags and labels for some other transcript elements are abbreviated. A legend printed at the bottom of the last page, just above the signature block, explains these abbreviations.
- Include in Legend Course Designators – Check to include course designators.
- Include in Legend Column Labels – Check to include
- Work Level DescriptionCheckbox – enter description for Work Level.
- Mark 1 Description – Enter description for Mark 1.
- Mark 2 Description – Enter description for Mark 2.
- Custom, when selected will enable the Custom Legend Entries text box below.
- Signature– Select which signature option is desired.
- Standard Line – Select this to display a simple signature line in the signature block on the last page of the transcript. The signature line will be labeled with text entered in the Custom Signature Line Text If the text field is left blank the label will read: ‘Signature and Title of School Official’.
- Signature block w/Remarks & Date issued– Select this option to divide the signature block into three sections with the following headers:
- Remarks – a blank area on the left for handwritten notes.
- I certify that the above information is correct – This middle section area contains the actual signature line, labeled with the text entered in the Custom Signature Line Text If this field is left blank the label will read ‘Signature and Title of School Official’.
- Date this certificate Issued – The date the transcript was issued will appear here, according to what was entered in the Date Issued field.

- Save to Student Documents– Check to Save transcript in Student Documents.
- NOTE: this is a permission item, so this area may not appear for all users depending on associated permissions.
For more information about report functions such as Class Selection filters, Create, Export, Sort, or Report Sets, etc. please see QWIKI Help – Q – Reports.