Student eligibility for free meals is determined by food service application or by direct certification. Direct certification confirms a child’s categorical eligibility for free school meals through SNAP, TANF, FDPIR, Medicaid or Other Source participation without the need for a household application. Q Direct Certification enables districts to import and match student enrollment lists distributed by Federal, State or LEA agencies.
Direct Certification is located under the Food Service menu in Q.
The Main Direct Certification window opens with 7 tabs and messages regarding Pending Notices and Address Changes:
- Direct Certification
- Certify Household Siblings
- Import
- Import Sets
- Direct Cert Notices
- Notice Editor
- Address Change Requests

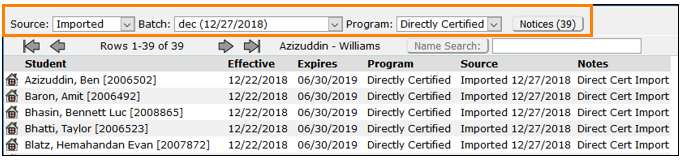
The Direct Certification tab shows a roster of all directly certified students in the current school year with tools for filtering, selecting, sorting and printing.
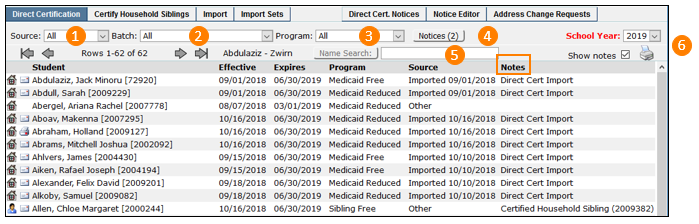
- Source – Drop down menu to filter the direct certification records by All, Imported, Application or Other.
- Batch – Filters the roster by the various Import Batches created in the Import tab.
- Program - Filters the roster by the various Food Service programs, SNAP, Medicaid, Foster, Migrant, etc.
- Notices – This button is active when unqueued notices are present and the number represents how many.
- Clicking Print loads the notices in the queue and displays a confirming message.
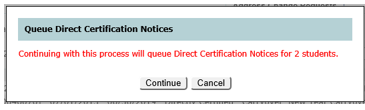
Click Continue.
- Clicking Print loads the notices in the queue and displays a confirming message.
- Name Search – enter a last name or a portion of a last name to sort the list alphabetically, beginning with the name found by the search.
- Show Note, Print
- Show Notes displays or hides the Notes column on the roster.
- Click the Printer icon to select the site scope of the roster that is currently displayed. Display creates a PDF report and Export produces a spreadsheet.

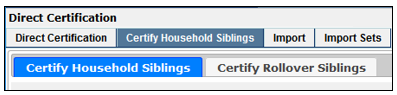
Siblings of students who receive Direct Certification benefits may also be eligible to receive food service benefits. There are two tabs that can be used to locate and certify these siblings.
- Certify Household Siblings - enables users to view siblings who may also be eligible to receive benefits and certify them as eligible.
- Certify Rollover Siblings – allows users to certify siblings of direct certification students rolled over from the previous year.
Clicking the Certify Household Siblings tab automatically launches the process to locate siblings based on their household ID as of the system date.
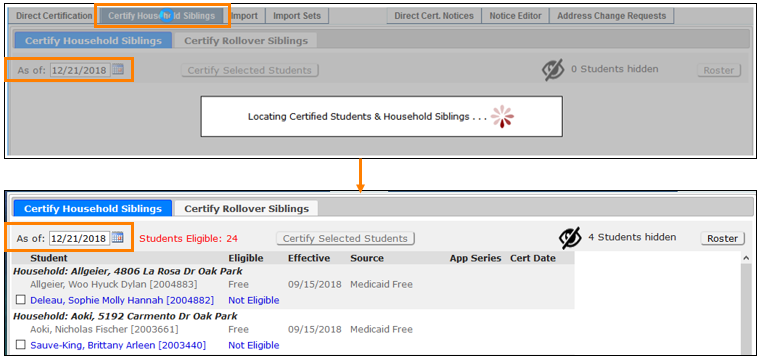
To use a different date, select the desired as of date and the process automatically launches again using that date.

To certify a household sibling:
- Place a check in the box next to the student’s name. As students are selected, the Certify Selected Student button becomes active and shows the number of student selected.
- The eligibility of both the currently certified student and any possible siblings is shown including the effective date.
- The source of the student’s status.
- The application Series ID if the status is from an application.
- Enter the effective date to be given for the selected sibling’s status.
- Sometimes household errors cause students to appear on the list that are not siblings or cannot be certified for some reason. To hide those students from the list, use the left mouse button to “grab” the student and drag them on to the black eye which will turn red when dragging the student. Release the mouse button when the student’s name is on top of the eye and the name will be removed from the list and the number of hidden students will increment.
 To view the hidden students, click the Eye. To place a student back on the roster, check their name and click Restore selected Student(s)
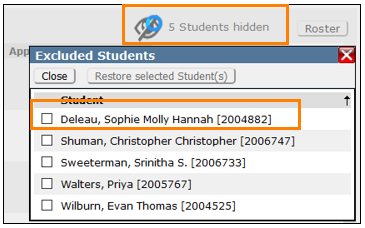
- Click the Roster button to see a report of all the students. Hidden students are shown as lined out. This report displays what is on the roster so once students are processed and removed from the roster, they will no longer show on the report either.

- Click the Certify Selected Students button to process the chosen students. Once students are processed, they will be removed from the roster. Review the pop-up message before clicking Continue.
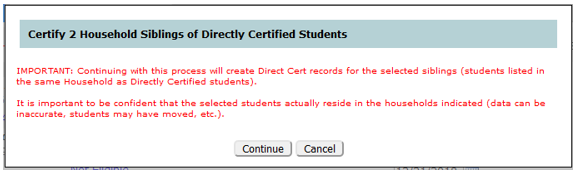
Students with existing cafeteria transactions may have their accounts retroactively affected when certified. A warning message will display if student cafeteria accounts will be affected, click Continue Anyway or Cancel.

Once the process has been completed, sibling certified students will appear in the Direct Certification tab as sibling certified along with the student ID of the originating student.

Note:
The roster shows students based on the as of date so to see students processed and removed from the listing, change the system date to before the effective date of their status.
To Certify Rollover Siblings follow the same procedures as the Household Siblings.
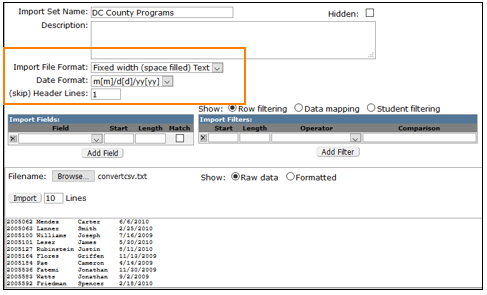
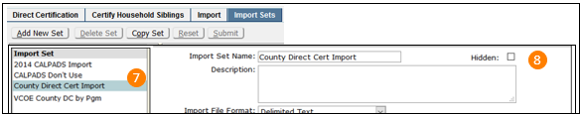
Import Sets enable districts to create import sets which match the file type received for direct certification.
- Tool Bar: Create and manage Import sets.
- Import Set Name: Define an Import Set Name for the file which will be uploaded. Description (Optional):Enter a description which allows easy identification of the direct certification file import set being created.
- Import Formatting:
- Import File Format: Select Delimited Text or Fixed Width (Space Filled) Text.
- Delimited Text: Fields which are separated by commas, carats, etc.
- Fixed Width (space filled) Text: All columns have a set width.
- Character between Fields: If Delimited Text has been selected as the Import File Format, select which character is used to separate fields.
- Character around Fields: Select which character surrounds the fields, such as the quotation marks in "1745 E. New St., Apt. 22". In a comma delimited import, the quotation marks will cause the comma in the address to be ignored as a field separator.
Note:
When Fixed width (space filled) Text is selected the Character between fields option will not be displayed.
- Date Format: Select how the dates are formatted in the file which will be uploaded.
- (skip) Header Lines: If the file contains header lines, insert the number of header lines to skip so that they are not imported.
- Import Fields: Select the Fields to import, the Position in the import file (which column number) and click the Match check box if the import field is to be matched against a field in the database.
- Import Filters:
- Row Filtering: Filter which data rows will be imported based on the column position, a comparison operator, i.e. “equal to”, “less than”, etc. and the value to compare.

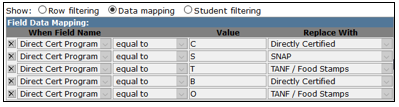
- Data Mapping: Select a field from the import file and set a condition for selection, i.e., “equal to C” and when the process finds that condition, replace the value with “Directly Certified”.
- Student Filtering: Selects students based on the matching the field and the filtering conditions, i.e., all students in grades 5 or less.

- Row Filtering: Filter which data rows will be imported based on the column position, a comparison operator, i.e. “equal to”, “less than”, etc. and the value to compare.
- Filename: Click Browse, select the file to import, choose how to Show the data, Raw or Formatted, and click Import to show the number (up to 99) of lines to display. This allows the user to review the results of the import setup.

Using a Fixed Width (Space Filled) Text file
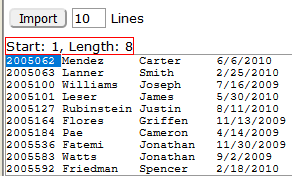
- Click Browse to locate the file and Show Raw Data.
- Drag across fields to see the start length and width in the red box at the top.
Note:
The auto calculation of field length and width is only available when Fixed width (space filled) Text is selected from the Import File Format drop down selection list.
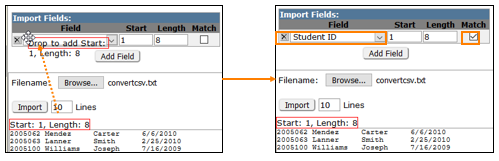
- Drag the newly created red box up into the Import Fields section, the Start and Length will be filled based on the numbers defined. Once the field start and length has been defined, select the field name from the drop-down list and click the Match checkbox if field matching to the database is desired.
- Once all desired fields have been added, click Submitto save the Import Set.
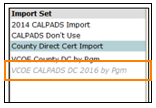
- Once submitted, import sets will display in the left panel.
- Use the Hidden checkbox to ‘disable’ Import sets that are no longer to be used.
Once checked, click Submit and the Import Set will show in grey italics and will be removed from the choices when using the Import tab.
Note:
Import Sets can only be deleted if they have not been used for an import.
Once Import Sets have been created, Direct Certification files may be imported using the Import tab.
Click Import New Batch
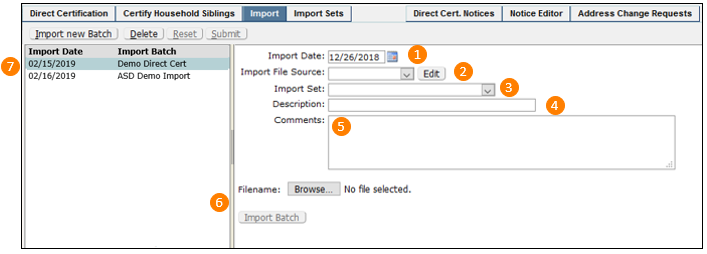
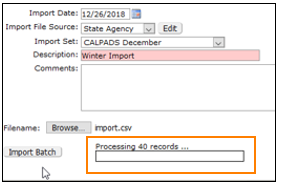
- Import Date: The import date should be equal to the date direct certification is received, or the effective date.
- Import File Source: State Agency and County Agency will be available for selection by default in the drop-down list. If the Direct Certification file is from a source other than a State or County agency, click Edit to add additional ones.
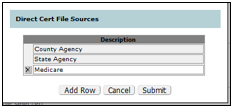
Additional sources can also be added using Lookup Codes. - Import Set: Choose an Import set from the dropdown menu. Hidden Import sets will not show.
- Description: Enter a brief description of the Import Batch. This is a required field.
- Comments: Optional Enter comments to assist you when recalling significant details regarding the import file.
- Filename: Click Browse to locate the import file and click Import Batch. A progress bar will show the files being imported.
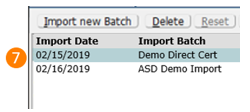
- Import batches are automatically saved and added to the left panel list when ImportBatch is clicked and the import begins.
When the import is done the list of students will display in the lower panel.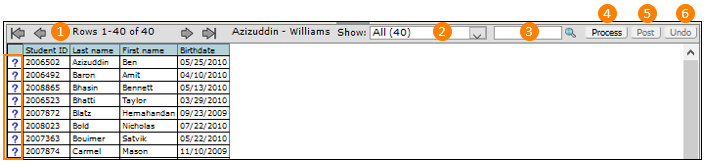
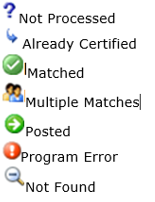
- The list displayed includes the fields that were set up in the Import Set. The question mark icon indicates that the student has not been processed. Icons will change as students are processed and posted.
- Show allows filtering of the students displayed (by the icon categories shown above) as students are processed and posted.
 To assist with sorting and viewing import lists, select an import batch from the Import Batch list and click the Excel icon to open the roster in a spreadsheet.
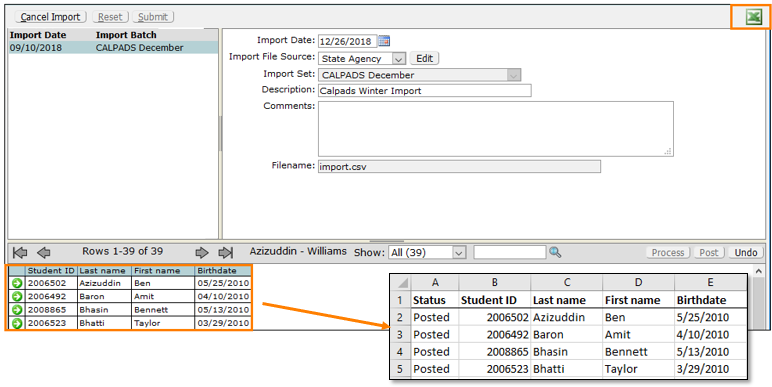
- Use Search by entering a last name or portion of a last name and clicking the magnifying glass.
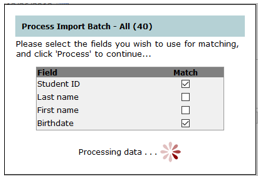
- To process the direct certification file, click Process. A pop-up message will appear displaying fields which can be used to match students. Use at least 3 fields for matching, or 2 fields if one is Student Id or State Student Id.
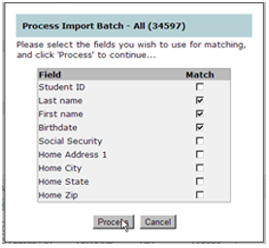
Click Process.
Use the arrow keys and the filter and search tools described above to review the student records.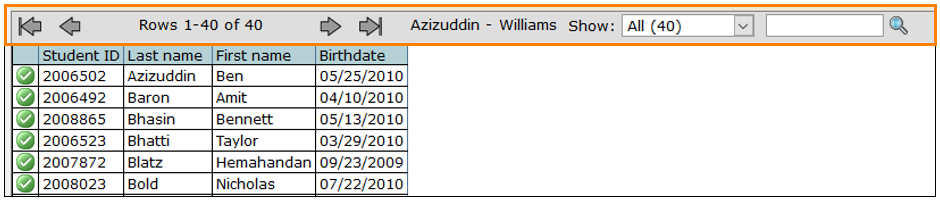
- Once records are processed, the Post button becomes available. Click Post.

• Effective Date: The effective date should be equal to the date Direct Certification is received. The date can be entered in MM/DD/YYYY format, or by clicking on the calendar icon directly to the right of the date field.
• Expire Date: Expire Date should be set to the end of the fiscal year.
• Direct Cert Program: Select the Direct Certification program from the drop-down selection list.
• Retain Unmatched Records: This feature offers the option to retain any unmatched records and displays the number of them.
• Click Post to post the imported records.
When the posting of records would create retroactive changes to transactions, a message detailing the number and the amount of the transactions is displayed. To continue click Post.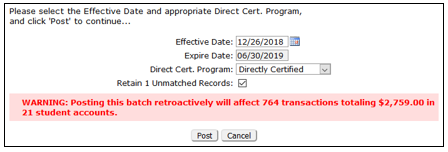
- Records which are successfully posted will be identified with green arrows. This list can be reviewed using the arrow keys and filter and search tools described above.

Posting also actives the Undo button. Undo reverses the posting. It deletes the import batch and will provide a popup messages regarding any transaction changes to student accounts.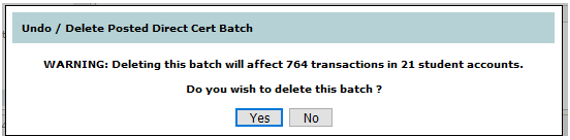
Use the Direct Certification tab to review the posted records. See the Direct Certification section above for details about filtering using the Source, Batch, and Program fields.
 Clicking the Notices button will add the notice(s) to the Queue. The number shown reflects the current Source/Batch/Program filter settings. Students that were directly certified via Free/Reduced Application are not included (they were notified via Eligibility Notice).
The Notice Editor application allows users to define Direct Certification Notices. Notices are configured in a Mail Merge format.

Click Notice Editor.
Districts may create customized Household, Student, and Applicant Direct Certification Notices.
Build the notice using the text editor and enter mail merge data fields by selecting the desired field from the Insert Data drop-down selection list.
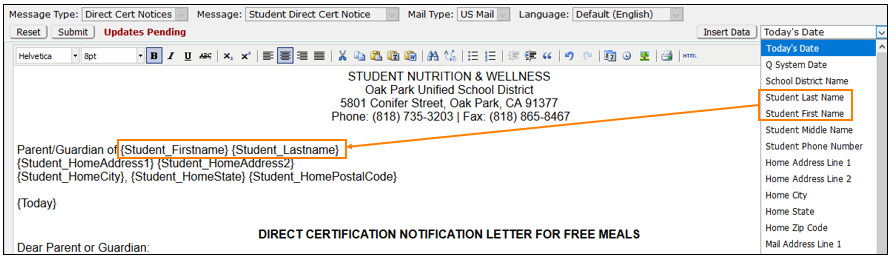
Available Data Elements vary from notice to notice as shown below so the fields from one notice should not be copied into another.
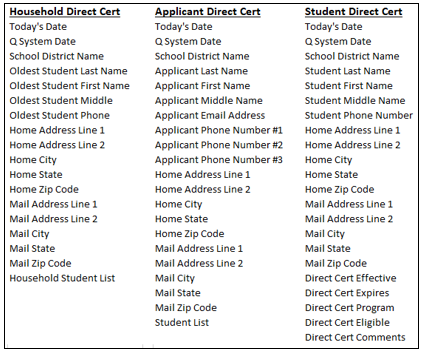
- Household Notices are compiled for groups of two or more students residing at the same household and use the address and home language of the oldest student in each household.
- Applicant Notices are grouped by Eligibility Application and are addressed to the Applicant. The student lists are identical to the Household Notices.
- Student Notices can be grouped by household if the district is confident that their Household assignments are valid and accurate.
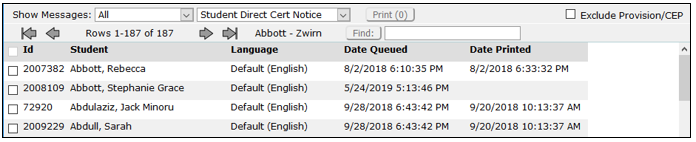
Click on the Direct Certification Notices tab. Students with queued notices are listed three ways.
- Household- Students will be grouped by household with more than one student listed. Single -Student Households can be listed using the Include Single-Student Households check box. Students who are eligible through Provision/CEP can be excluded from the list. This option is available on all the notice lists.

- Applicant- Students that are present on Free/Reduced applications. This listing is similar to the household list and includes the Application Series ID.

- Student - All queued notices are listed under Student Notices.
Note that printing Household or Applicant notices, each with multiple students, will tag notices as printed and will exclude students from the un-printed notices queue. Hopefully, this will minimize the number of notices that need to be printed & mailed.
The notice lists can be filtered by All, Un-Printed, Printed Only, and any printing done within the last 30 days of the system date.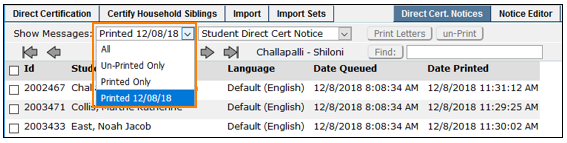
If for any reason a notice needs to be changed or removed it can be “un-printed”.
- In the Show Message drop-down menu, select a printed date.
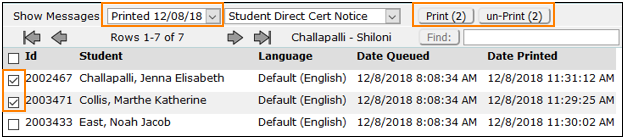
- Select the notice type and check the box next to any notices to be un-printed (or check the box in the header to select all the notices listed) and click the un-Print button. This removes the Date Printed record but leaves the notice in the queue. Checked notices can also be re- printed by clicking the Print button
Since printing notices is often done in large batches, when the un-Print feature is used, the All selection is activated in the header. This will allow un-printing or printing up to 200 notices at a time.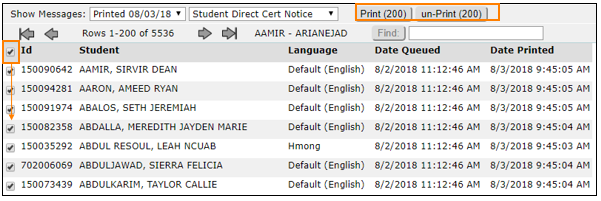
When selecting Un-Printed Only from Show Messages, the All checkbox is also activated. If there are over 1000 notices to be selected, a message pops up to enter the number to print.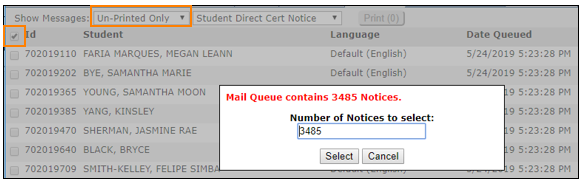
Any number of notices may be printed, but increased numbers of notices will require more time to generate. Notices are generated as .pdf documents and displayed on the screen, where they may be printed and/or saved. Large numbers of notices should be saved so they can be re-printed in case of printer malfunction.
Notice generation times vary based on web and database server load, network speed/traffic, and notice complexity so it is recommended to know the system capacities before selecting numbers over 1000.
Address Changes can be made by applicants when logged into their Food Service online account or in the Parent Portal if their Food Service and Portal accounts are linked. How the linked updates take place are dictated by the Synchronize Applicant Data preference in the Preference Editor.
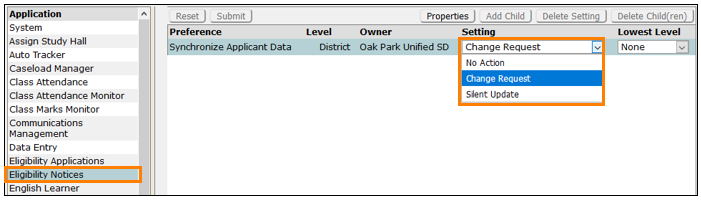
- No Action: Any changes made to Q Contacts are ignored. Q Contacts are not synchronized with Food Service Contacts.
- Change Request: Q Contact changes are recorded as Change Requests and must be verified using the Change Request function available in Direct Certification, Eligibility Notices, or Verifications.
- Silent Update: Changes made to Q Contacts are applied directly to the linked Food Service Contacts.
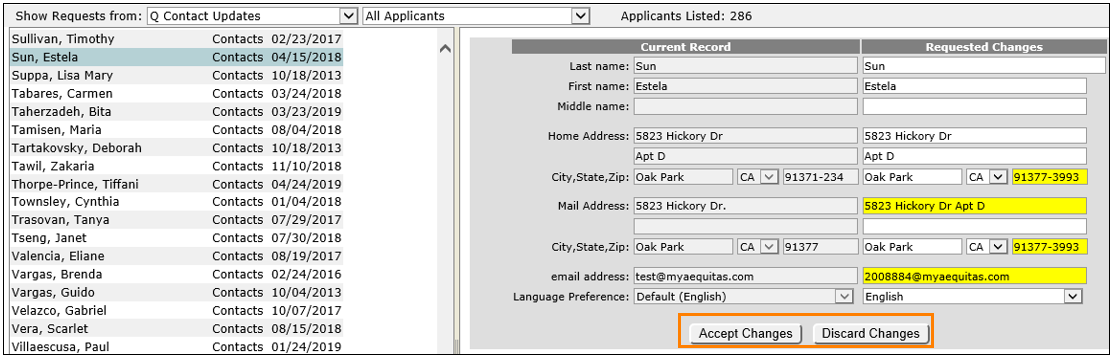
The Address Change Requests Tab opens to show requests from All Sources and All Applicants. These choices can be filtered to show specific sources:
- Online Applications (those made by applicants via their Food Service Online account)
- Q Contact Updates (those made to contact information via the Parent Portal)
- Initial Contacts Synchronization

And by whether the applicants have active applications or have queued notices. As noted above, when opening the Direct Certification app, a notice appears about the number of Change of Address requests that are pending for queued direct certification notices.
Once the desired list is displayed, click on an applicant’s name to show the current and requested information with the requested changes highlighted in yellow. Click either the Accept or Discard buttons to process. Once done, the applicant’s name will be removed from the listing pending future changes.