Application and Lottery is used to select students for registration based on a lottery selection process. It consists of 2 applications: the ‘Application and Lottery Manager’, a tool districts use to configure, manage, and run the Application and Lottery process, and an external application called ‘Application & Lottery’ for parents to apply for an enrollment spot for their child.
Using the Application and Lottery Manager, districts can configure the parent-facing application’s Landing page and may customize the application itself, adding questions they wish to use to validate applicants. The Application and Lottery Manager includes a Lottery process and Review function. Districts may add their own custom procedures into the Lottery process to validate or process data after the process is run.
The external application for parents is a unique URL. Districts may provide this URL link within ParentConnection to enable current parents access to Application & Lottery.
Application and Lottery Manager is located under the System menu in Q.
Initially districts define Lottery Sets. These sets will have a start and end Date, a lottery date and type as well as a definable number of days for applicants to accept a seat. Districts may define multiple Lottery sets and each one will have selections with a number of seats for a school, track and grade.
Between the start and end date for the lottery set, parents will be able to login to the ‘Application & Lottery’ application and complete an application for the Lottery.
During this same period, district or school staff will use the Application and Lottery Manager to review applications, verify they are complete and accept them into the lottery. It is possible for staff to manually grant a seat to an applicant.
Once all applications have been reviewed and valid ones accepted, and the application period has closed, on the Lottery Date, staff will run the lottery process. If specific students were manually granted seats, the lottery process will adjust the available seat counts per program appropriately. During the lottery process, some students will win seats, others will be put on a wait list.
Parents may view their applicant’s status in the Application & Lottery application. District staff can notify the applicant and their family using the mail merge function and produce letters or emails to send home.
Applicants will have the specific number of days specified for the lottery to accept their offer of a seat. After that number of days, the window for acceptance closes and staff will run the Lottery again. During this run, offers without response will be rescinded and then remaining available seats will be filled from the wait list. A subsequent round of notifications may be sent out using the mail merge feature.
Where to begin?
Some tabs in the Application and Lottery Manager are used for configuration, and others are used to manage the lottery and applications.
 This document moves through the process of Configuration covering the ‘Configuration Settings’ tabs shown above, followed by a section on completing applications from the applicant’s perspective, and then a section on Managing Applications and Lotteries at the end.
The App Config tab is used to configure global settings:
- Portal Landing Page Contents
- Application Preferences
- Grade Cutoff Matrix
Portal Landing Page Contents
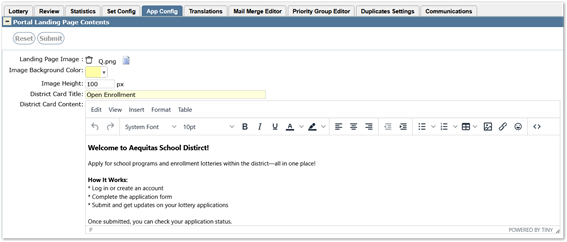
When a parent logs into the external ‘Application & Lottery’ application, settings defined here will affect what they see, including the image, title, and content.
Landing Page Image: Click to choose file to insert image file.
Image Background Color: Color will display behind image.
Image Height: Defines height in pixels for the height of the image area at the top of the login screen.
District Card Title: Landing page configuration setup name.
District Card Content: Editor used to design the district landing page content.
Refer to Message Editor documentation for help navigating the Message Editor, the tool used to edit District Card Content.
Application Preferences

Use Google Translate – To translate the Application & Lottery stand-alone application interface using Google Translate checking the Preference. Alternatively, the interface may be manually translated for select languages on the Translations tab.
App & Lottery Stand-Alone App URL: Set the App & Lottery stand-alone application URL to facilitate sending emails containing the no-login ‘Magic Link’.
Pre-Enrollment App URL: To facilitate no-long access to Pre-Enrollment from App & Lottery, set the Pre-Enrollment URL.
Grade Cutoff Matrix
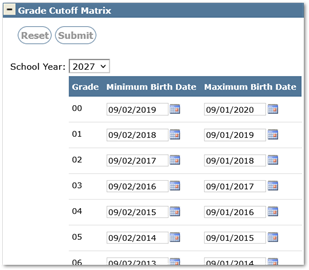
An age-based cutoff may be set for each grade by entering the minimum and maximum birthdates per grade.
Select the School Year and enter the minimum and maximum birthdates.
Set Config
Districts may configure as many different Lottery Sets as needed to accommodate different school levels, programs, camps, etc. Applicants can apply for multiple opportunities; they will then rank those selections by priority.
Completed configurations may be copied, edited, or archived. Sets may be deleted until there’s an application for it. The sequence of the sets appearing in the grid display may be changed by dragging the mover arrows up and down or sorted using the column headers and clicking ‘Save Sequence’.
Archived sets are hidden by default. To see archived sets, click ‘Show archived sets.’

Adding a New Configuration
For each scenario needed by a district, the steps below must be completed.
- Click Add to create a new set, or Copy to copy an existing set, adjusting settings such as dates, school year etc.
Properties
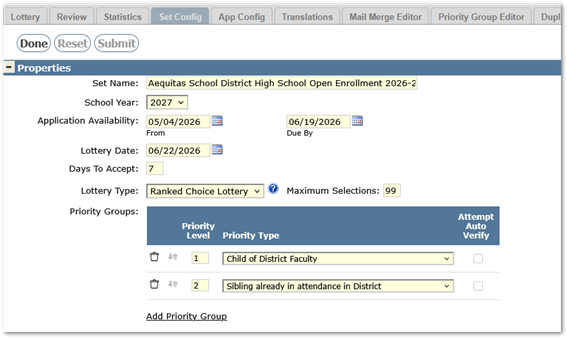
Set Name: Give the set a name. This title will display on the button ’Start [application] Now’ in the parent-facing application.
School Year: Select a school year for the lottery.
Application Availability: Enter ‘From’ and ‘Due By’ dates – during these dates, this lottery will be available for families to apply to.
Lottery Date: Date the lottery application will be run.
Days to Accept: Once the lottery has been run, this is the number of days the families must accept or reject a seat.
Lottery Type: Select from among the options:
- Single Choice
- This is the simplest form of a lottery and allows students to make only a single selection for this application
- Concurrent
- This lottery allows students to make more than one selection, and they can potentially be awarded a seat for more than one selection. This is the equivalent to having a student fill out multiple single choice applications and all of the lotteries being run simultaneously. Students who are members of priority groups have a high probability of winning a spot for each of their selections
- Ranked Choice
- This lottery allows students to make more than one selection, and the selections are ranked by each student as to their first choice, second choice, and so on up to the maximum number of choices allowed. The lottery is run in several rounds corresponding to the maximum number of ranked choice selections made by any student.
In the first round, only students' first choices are considered for placement. If a student is placed, they will be removed from the pool and not need to be run in subsequent rounds. If a student cannot be placed in their first choice due to a limitation in the seats available at their first choice, they will move to the second round.
In the second round only their second choices are considered for placement, and so on in each subsequent round.
In each round, the students are selected in a random order with the following exceptions:
-Students who have been designated as being a member of a priority group will be randomly ranked in groups corresponding to their priority group level as defined in the Set configuration.
-If any Question Weighting is specified in the Set preferences, those students who meet the criteria set forth in the Question Weighting section of the Set setup will be given multiple tickets into the lottery after any priority groups. If a student meets more than one category of preference (e.g. they get 3 tickets for an answer to one question, and 2 tickets for the answer to another weighted question) they will receive the highest number of tickets (3 in the given example). All tickets will be selected randomly but only the highest-ranking ticket will be used in that round.
In this type of lottery, a student has the chance to win one seat. As soon as a seat is won, they are removed from subsequent rounds of the lottery.
- This lottery allows students to make more than one selection, and the selections are ranked by each student as to their first choice, second choice, and so on up to the maximum number of choices allowed. The lottery is run in several rounds corresponding to the maximum number of ranked choice selections made by any student.
- Application Only
- This option is provided to support students applying for enrollment in a program that is manually managed, without running a lottery.
Maximum Selections: Set the maximum number of selections per student.
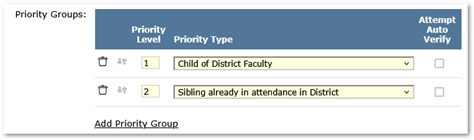
Priority Groups:
Add priority groups for consideration during the lottery, i.e. Child of Faculty member, or Sibling already in attendance, etc. The groups themselves are defined on the Priority Groups tab.
Options:
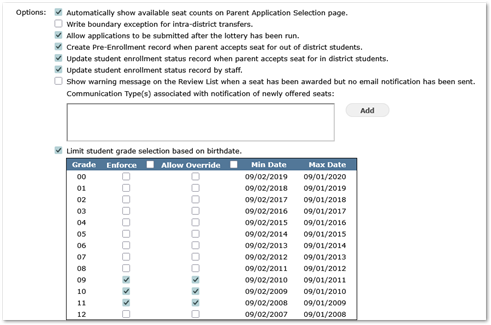
Check on the options you wish to apply:
- Automatically show available seat counts on Parent Application Selection page.
- Write boundary exception for intra-district transfers.
- Allow applications to be submitted after the lottery has been run. (Available for Single and Ranked Choice Lotteries only.)
- Create Pre-Enrollment record when parent accepts seat for out-of-district students.
- Update student enrollment status record when parent accepts seat for in-district students.
- Update student enrollment status record by staff.
- Show warning message on the Review List when a seat has been awarded but no email notification has been sent.
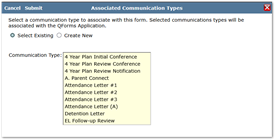
- When checking this option, be sure to add a communication type.
- Click Add and either Select Existing or Create New Communication Type:
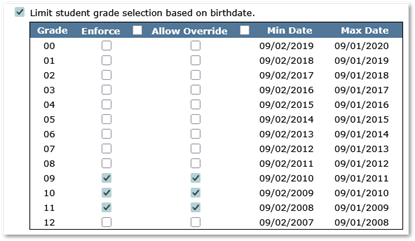
- Limit student grade selection based on birthdate.
- When checking this option on, check the Enforce and / or Allow Override columns for the appropriate grade levels.
- The Grade Cutoff Matrix is configured, per year, on the App Config tab.
Set Description: This area is set up in Message Editor format allowing formatting and styling. The information here will be displayed in the external application for parents under ‘Available Applications’.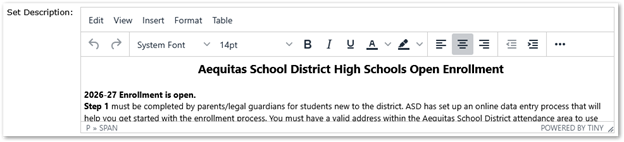
Notification Faculty Group: Notification sent when the Application is complete and submitted.
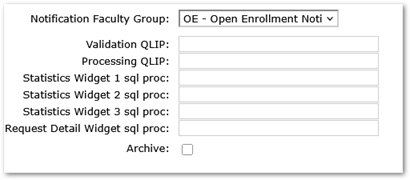
Validation QLIP: QLIPs can be used to validate data entered on the application prior to processing.
Processing QLIP: QLIPs can be used to perform actions when data is processed.
Statistics Widget 1 through Statistics Widget 3 SQL procedures: Results of the procedures entered into these fields will appear as widgets on the Statistics tab. Widget 1 will appear in the top right corner of the Statistics tab, Widget 2 will appear in the bottom left corner, and Widget 3 in the bottom right corner.
Request Detail Widget SQL procedure: A widget procedure may be used here to display a widget in the student request detail page.
Archive: Turn this option on for any set that is no longer to be used.
Submit to save changes.
Available Seats
The number of seats available for registration for each lottery are configured here. Select
Add Seats at the bottom of the page and then complete each field.
Rows may be copied by selecting a row on the left, as shown, and clicking ‘Copy Selected’ and adjusting the details.
Use the mover arrows to adjust the sequence of the rows.
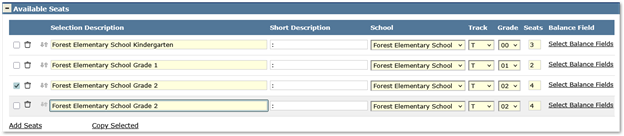
Selection Description: Displays in school selection
Short Description: Brief description for table reference
School: Select school from pulldown options
Track: Select track from pull down options
Grade: Select grade from pulldown options
Seats: Indicate the number of seats available for Open Enrollment for the Track and Grade selected. This will not limit the number of families that can apply for seats, this will be used when the lottery is run, and families are approved to enroll for those seats.
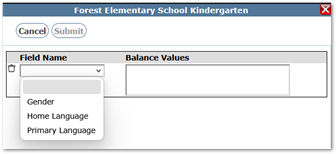
Balance Field: If there’s a need to balance a lottery on gender or language, click the link and set balance fields by selecting the field name and selecting the values to balance.
Application Designer
The Application Designer is used to create the online content that is displayed as an application for families to complete in the parent-facing ‘Application & Lottery’ application. There are multiple areas to configure to create the Application parents will complete, including Title, Contact Information, Student Information, Next Steps and Questions, any number of which may be added using the ‘Add Question’ button at top left.
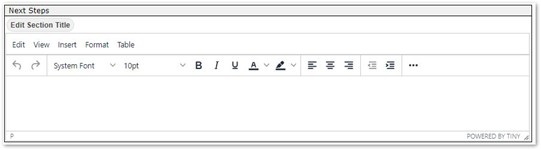
As the application opens in the parent-facing application, each section has a banner area that displays the name of that section. Section titles, and their attributes, can be edited by clicking the Edit Section Title button and opening the Message Editor. This applies to each section or question of the application design.
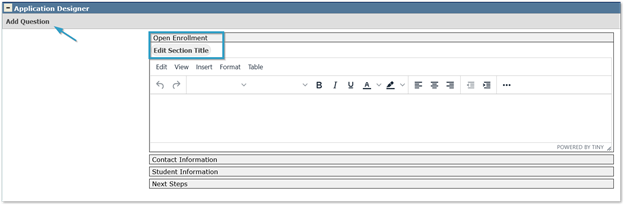
Title: This information is created using the Message Editor. Information will be displayed at the top of the Application.
Contact Information: Along with the ‘Edit Section Title’ button, users also have a ‘Set Field Attributes’ button available.
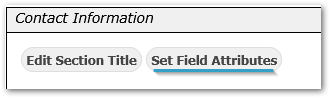
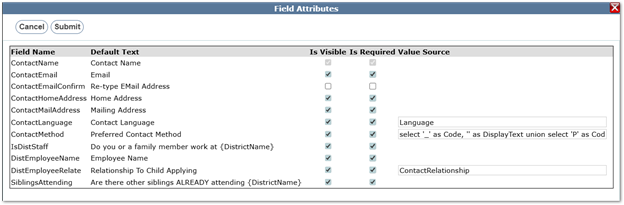
This allows for customization of what fields are available for families to complete and which of those fields will be required to submit.
The preview displays how this will look in the ‘Application & Lottery’ application.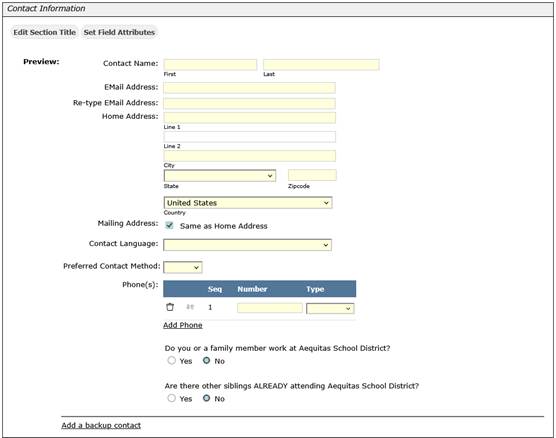
Student Information: Along with the ‘Set Section Title’ button, users also have a ‘Set Field Attributes’ button available. This allows for customization of what fields are available for families to complete on the ‘Application & Lottery’ Application and which of those fields will be required to submit.
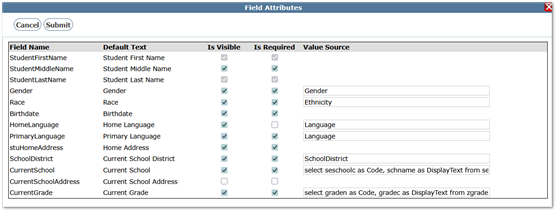
The preview displays how this will look in the ‘Application & Lottery’ application.
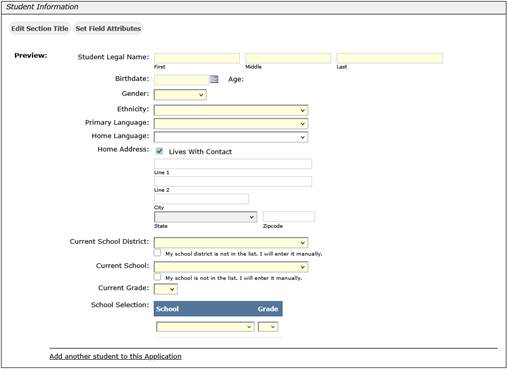
NOTE: Under Current School and Current Grade, the application will default to the school list, but users can use the checkbox to override the pulldown and enter a name manually.
Questions:
Districts can add as many questions as needed to an application. For each new question, a dialog box will be added to add the attributes of each question. This area is also used to add context boxes for Document Upload, Terms & Conditions and Signatures.
To add a question, click the ‘Add Question’ button at the top left area of the section.
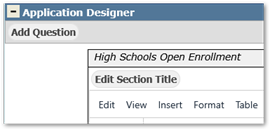
For each new question:
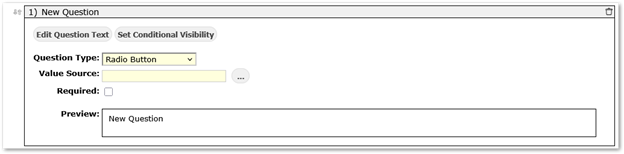
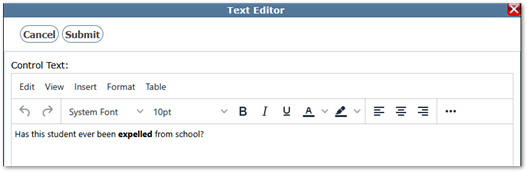
Edit Question Text: Click the button to enter the verbiage of question.
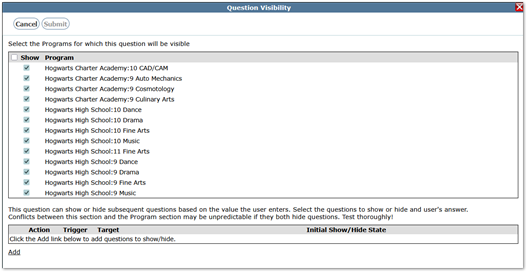
Set Conditional Visibility: Click and select the programs for which the question should show.
The question can show or hide subsequent questions based on the value the user enters. Use the Add link at the bottom to manage these settings.
Question Type: Available options are Text Box, Text Area, Drop Down, Radio Button, Checkbox list, Terms and Conditions, Document Upload and Signature.
To include options for Terms & Conditions, Document Upload or Signature, add a question and select the desired option.
Example – Document Upload
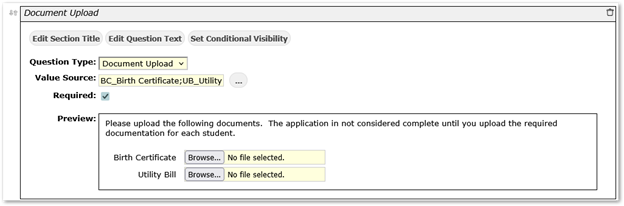
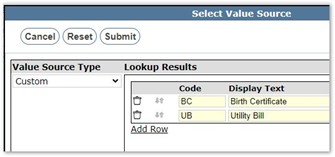
Value Source: Depending on type selected user may be prompted for value source.
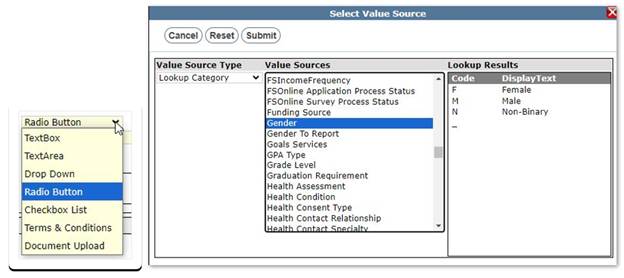
Select the Value Source from current tables or choose Custom to create a new value source. This will display custom columns for Code and Display Text.
Required: Check if the question is required.
Preview: This displays how this will display in Open Enrollment.
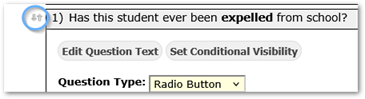
Sequence of Questions: As questions are added they will be assigned a number. The arrows to the left of that number can be selected and dragged up or down to change the order of the questions.
Next Steps
Information displays at the bottom of the ‘Application & Lottery’ Application and is customized in the Message Editor. This area can be used to provide the user with dates when the lottery will be completed and what to expect if they are selected.
Weighting Factors
Once questions have been added to the application, these questions can be used to weight the application higher. Think of the lottery as tickets, applications with higher weighting would have more tickets, or higher chances of selection. If there are multiple questions with weighting factors and a student has the appropriate answer to each of these questions, they will receive the largest of the qualifying weightings.
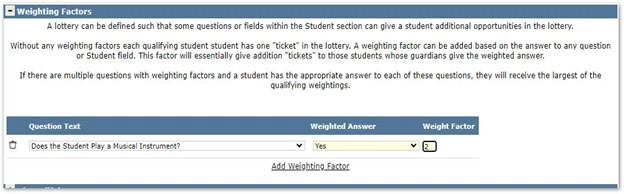
To Add Weighting factors, select the Add Weighting Factor.
Select a Question from the drop-list. Only questions that have defined answers (not text field) can be used in weighting.
Select the response that would award higher weighting to an application. The same questions can be added multiple times if different answers carry weight.
The weight factor defines how many more chances this application will have in the lottery.
Disqualifying Factors
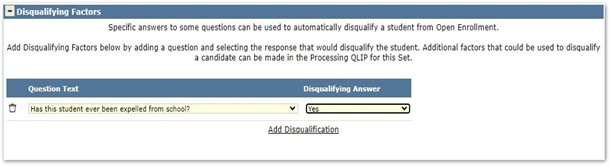
Similar to Weighting factors, disqualifying factors can be used to disqualify an application completely. Select a question and response that would automatically disqualify the student from the Lottery. If multiple responses can disqualify an application, add the question again with the additional responses.
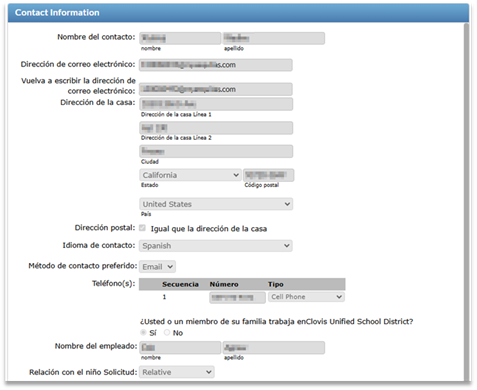
The Application & Lottery interface may be translated to other languages either by using Google Translate or manually using the Translation Tab.
To use Google Translate, set the preference on the App Config tab, under Application Preferences section.
To manually translate the Application & Lottery interface, from the Translation tab, select the desired Language from the drop-down list and for each View available, enter the appropriate translation.
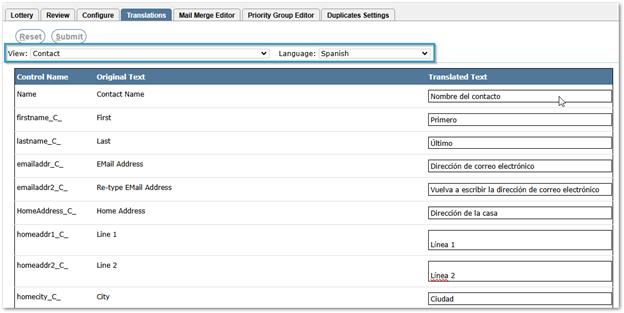
Sample view:
Documents may be created in the Mail Merge Editor to send as letters or emails to applicants during the review process.

From the Mail Merge Editor Tab, documents may be added or managed.
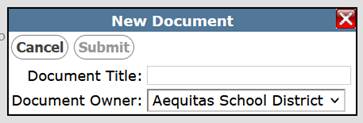
To create a new document, open the ‘Document’ drop-down list and select ‘Add New…’.

Give the document a title and select the document owner from the drop-down list. If logged into a school, the owner will default to that school, if logged into the district, it will default to the district which will make the document available for use at all school sites, alternatively a specific school may be selected.
Message Format – Select from either Letter or Email.
Language – Language will default to English but can be changed to create documents in other languages. When a language translation exists, it will show as red text in the drop-down list.
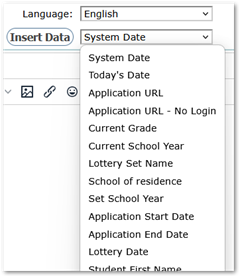
Insert Data – The set of options in the drop-list will be specific to Application & Lottery. To add data into the document, select it from the drop-list and click the ‘Insert Data’ button. The field will be inserted wherever the cursor is currently positioned.
Comm Setup– Clicking this button will enable the configuration of Communication Tracking for this document. For information on Communication Setup, see documentation.
To create the document itself, use the Message Editor interface to build the letter or email. The document may be pasted in from Word, or another editing tool.
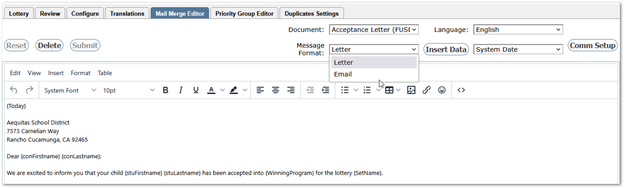
Refer to Message Editor documentation for help navigating the Message Editor.
And, for guidance on creating Mail Merge Letters in general, see the video on Mail Merge Letters where Behavior Letter is the example, but the principles and steps are largely the same.
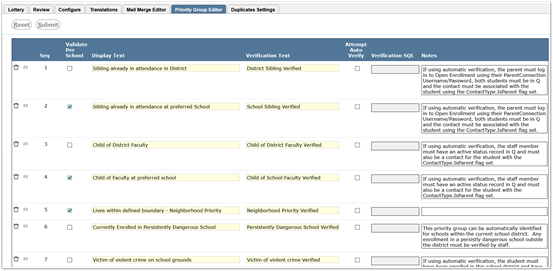
Priority Groups are used by the lottery process as a factor when processing applications. During the configuration of a lottery, specific Priority Groups are selected. A set of Priority Groups is available in the Priority Group Editor. Districts may adjust the existing groups including adjusting the sequence using the arrow icon to drag and drop a row to the desired position, checking whether to validate per school, or checking whether to attempt to automatically verify. If automatic verification is turned on, the name of the stored procedure to be used to verify the condition needs to be input into the ‘Verification SQL’ field. Priority groups may be deleted using the trash can icon, and new groups may be created using the ‘Add Priority Group’ link at the bottom of the grid and completing the row. Submit to save all changes.
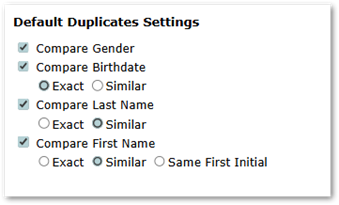
The settings on this tab are used to automatically detect potential duplicates on the ‘Review’ Tab. The criteria can include gender, birth date, last name, and first name, and can include options for exact or similar matches.
On the Review Tab, potential duplicates are displayed with a yellow background. Clicking on the ‘Resolve’ button will enable the user to review the specific data involved in identifying them as potential duplicates.
- If it’s determined that one of the students is a duplicate, the student may be marked as a duplicate and that student’s application will be set as not accepted into the lottery and will not be displayed again.
- If it’s determined that students who have been flagged as potential duplicates are not duplicates, they may be marked as ‘Not Duplicates’, and they will no longer be presented as potential duplicates on the Review tab.
Under Permission area ‘System’, the following permissions are available for Application and Lottery Manager application.
System: Application and Lottery Manager items provide access as follows:
…[Administrator] – Admin access to the application, all Tabs, all applications.
…[Application] –to the Application and Lottery Manager application.
…[AddApplication] – to manually add an application.

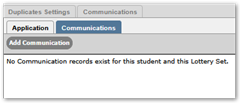
…[AddCommRecords] – to manually add Communication records on Review tab.
…[AllApplications] – provides access to all applications.
…[Configuration] –to the Configure Tab.
…[DuplicatesConfigEditor] – to the Duplicates Settings Tab.
…[EditApplication] – from the Review tab, permission to edit an application prior to a lottery being run.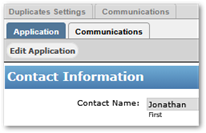
…[GrantSeat] – to ‘Grant Seat’ option on the Review Tab.

…[Lottery] –to the Lottery Tab.
…[MailMergeEditor] – to the Mail Merge Editor Tab.
…[MailMerge Add Doc] – to the Add New option under Document drop-down in Mail Merge Tab.
…[PriorityGroupEditor] – to the Priority Group Editor Tab.
…[RejectApplication] – applies to Application Only sets; will be available on the Review Tab with this permission.
…[RescindSeat] – to ‘Rescind Offer’ option on the Review Tab.

…[Review] – to the Review Tab.
…[Translations] – to the Translations Tab.
When families access the URL for Application & Lottery, the Landing Page message will display. If this is a currently enrolled family, they will login with their ParentConnection credentials. New families have the option to register as a new user.
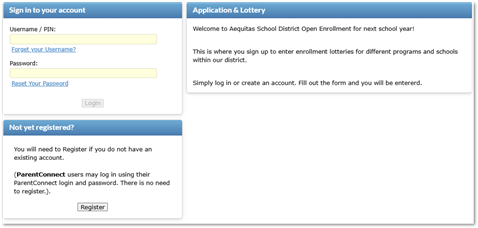
If registering as a new user, they will need to complete the Create Account screen and Submit.
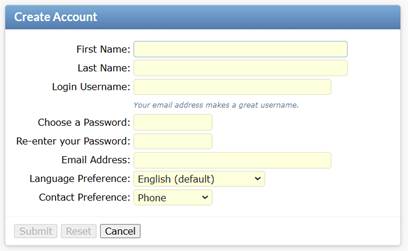
Once the account is created, they will be prompted to login. Upon login any available Application will be displayed. Each available application will display the set description and the list of seats available at each location and grade level. At the bottom of each application area there is a button to start the application process.
Select Application: Families will see all the Lottery Application options that are available. Available options are based on the dates set in configuration.
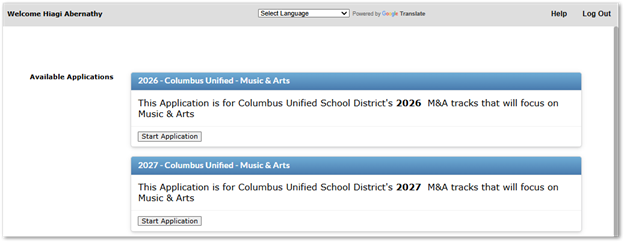
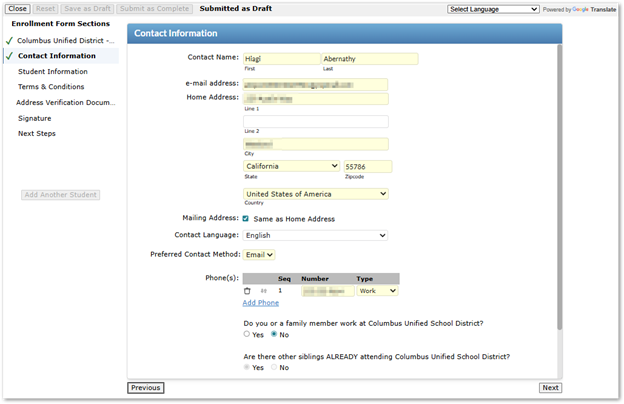
Application information will be displayed. Selecting Next at the bottom of each screen will move to the next step.
Contact Information- All highlighted fields are required. If any information is missing the Validate Page button will show at the bottom of the page. Clicking the Page Validation button all data errors will display as a message at the top of the page in red. If all data is complete users will see a Next button.
Student Information – For parents who submitted an application previously and are returning, or have existing accounts with associated students, select the desired student from the students displayed or click the New Student button on the right. Click Next at the bottom.
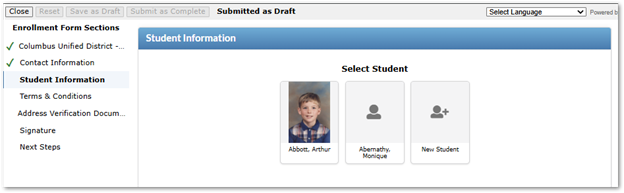
If adding a new student, complete the form:
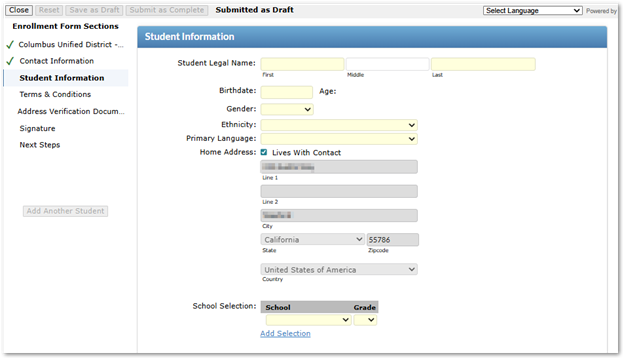
All highlighted fields are required. If any information is missing, they will see the Validate Page button at the bottom of the page. Clicking the Page Validation button will display all data errors as a message at the top of the page in red. If all data is complete, users will see a ‘Next’ button.
NOTE: The sequence of the Enrollment Form Sections follows the sequence set in the Application and Lottery Manager – Set Config Tab, Application Designer band. The text in the sections that appears for the applicant is all also customizable and configured there. The examples shown below are sample screens.
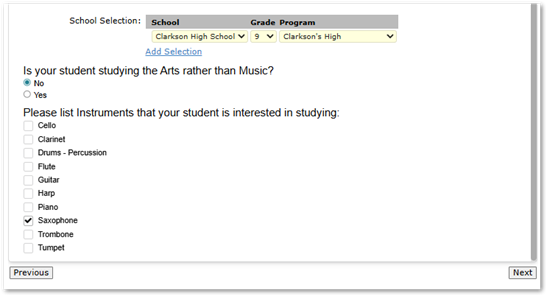
Questions - These will be displayed under the student demographic section. Questions will be displayed in the order they are set up under Open Enrollment Manager Steps.
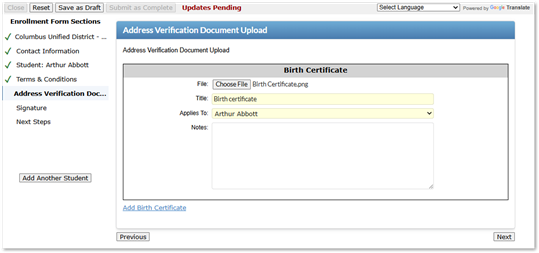
Document Upload
Required documents may be uploaded.
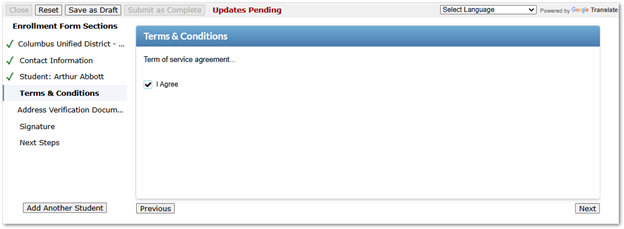
Terms & Conditions
Signature
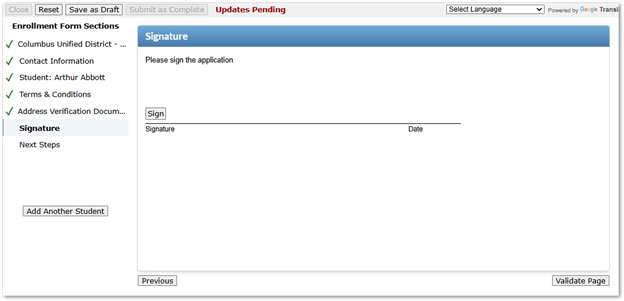
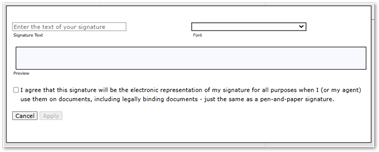
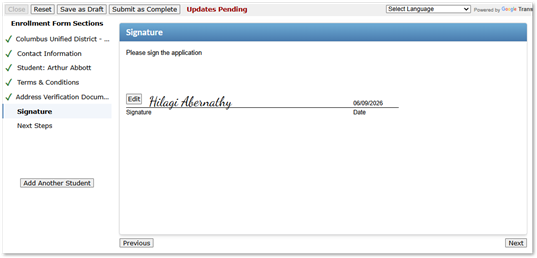
Clicking the Sign button will open a dialog box to enter signature text, select a font and click to agree. The signature will be previewed, and when ready, click Apply.
Next Steps
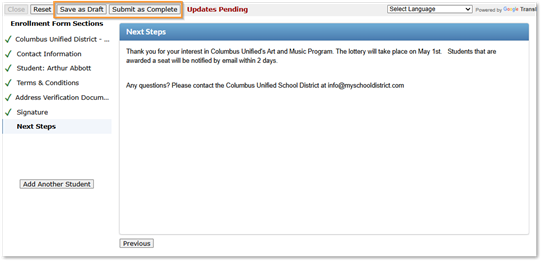
Once an application is started, applicants can ‘Save as Draft’ and continue later. When complete, click ‘Submit as Complete’.
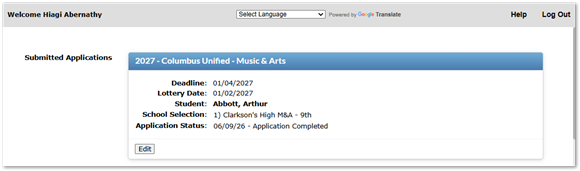
Submitted applications with their status will display on the Welcome page where Available Applications are shown.
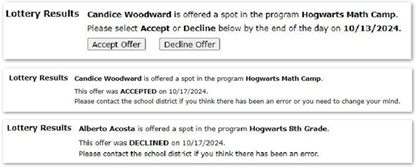
If the application is selected when the Lottery is run, the offer status will appear here and the family can Accept or Decline the offer.
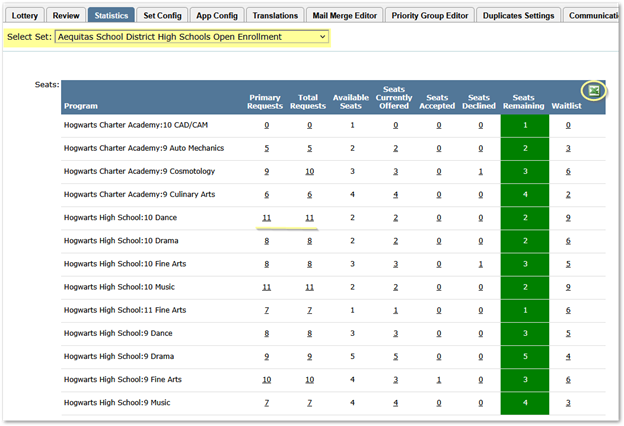
Application and Lottery Manager opens to the Statistics Tab which shows the current status of the selected set including number of seats remaining (green), the number waitlisted and the count of requests per program with their status.
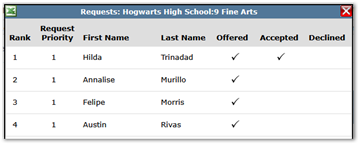
Each count is a link that shows a listing of the students with requests and their status.
Excel icons may be used to download the spreadsheet.
From the Review Tab, users may
- Verify and accept applications when they are submitted.
- Add or edit an application, with permission to do so.
- After the Lottery is run, the status of each application will show, and letters or emails may be sent to applicants.
Filters at the top of the Review screen may be used to find applications. The application record shows student / contact information, status history and application program information. Records may be edited to verify and accept the application.
Verify and Accept Applications
Once an application has been submitted by a parent/guardian, the application details will appear under the Review tab. Depending on the configuration of the application different verification options may be needed.
In this example, applications have been received and are in the process of being reviewed and accepted. After selecting the Lottery Set in the filter at the top of the tab, there is a checkbox at the top left set to ‘Show only completed applications that have not been accepted’. This enables staff to focus on the applications that need to be verified and accepted for the lottery.
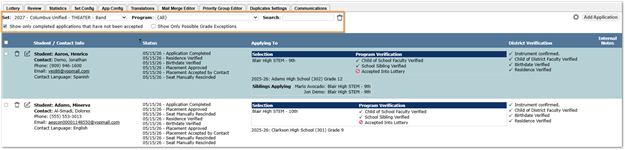
To review an individual applicant, click the Edit icon. Review the application details in the side panel, along with any uploaded documents. All information entered into the application itself can be viewed here and may be edited if the user has permission to do so.
Check the verification boxes as appropriate, as example:
- Residence Verified: All applications will need to have address
- Child of Faculty Verified: If there is weighting on staff members’ families, the application will have the name of the faculty member and that will need to be verified.
- Sibling Verified: First Name, Last Name and Birthdate are required If all data in these three fields matched a currently enrollment student exactly, in the verification area the current school and grade will be completed.
The verification checkboxes will vary by program. Some depend on the Priority Group requirements configured, and not verifying those items will mean the student will not be added into that priority group.
Enter any notes:
- Internal Note: These are only displayed within the Application and Lottery
- External Note: These display within the Application and Lottery Manager and display for parents and applicants in the ‘Application & Lottery’
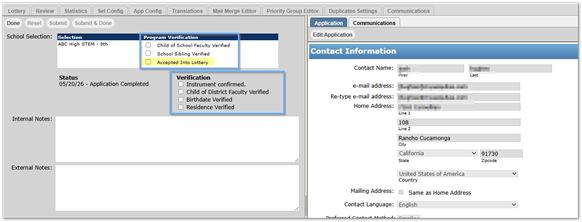
Once all verification is complete, check ‘Accepted into Lottery’ at the top for each appropriate lottery. Submit to save changes. The application is now available for the Lottery.
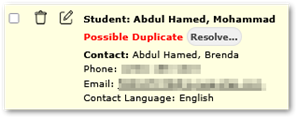
Potential duplicate applications will be flagged as ‘Possible Duplicate’, shown with a yellow background and will need to be reviewed and resolved. See Duplicate Settings Tab for detailed information on the settings involved.
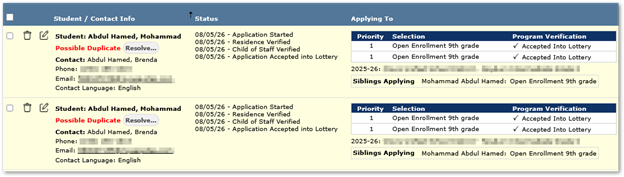
To view details and compare the potential duplicates, click the ‘Resolve’ button.
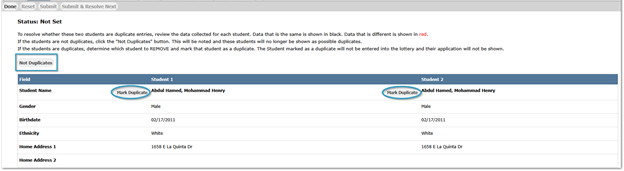
After reviewing the details, either mark one of the students as a duplicate or indicate they are not duplicates by clicking the ‘Not Duplicates’ button. The student marked as a duplicate will not be entered into the lottery.
When applications have been reviewed and accepted and the window has closed for applications, and the Lottery date has arrived, to run the lottery:
From the Lottery Tab, select the set. The set details will appear, as shown, including the number of Requests or applications per program in the set. The ‘Available Seats’ may be adjusted at right for specific programs, but all other data is part of the Configuration and may not be edited on this tab.
When ready, click the Run Lottery button.
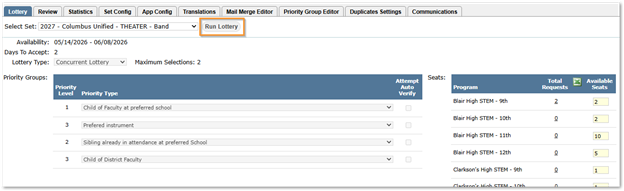
Once the Lottery is run, review the results and choose whether to discard or commit results.
When a lottery has been run, options to discard or commit results appear.
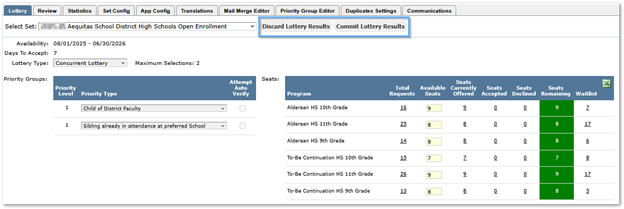
Staff can discard and re-run the lottery as many times as they like before committing results. Once the results are committed, status will be updated, and parents will be able to view the application status.
- Seats Currently Offered: Accepted in lottery and offer sent to applicant, awaiting
- Seats Remaining: Available seats after all pending and accepted seats subtracted from the original number of seats available.
- Waitlist: If there were more requests than available seats those applications will be added to the waitlist.
- Denied: Application declined due to disqualifying
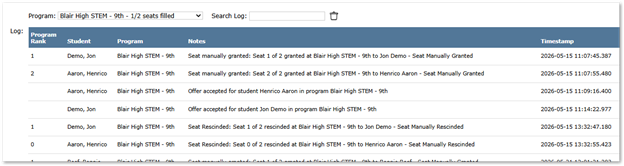
Log
Log information is searchable. This log shows the application ranking in the lottery and notes on results once the lottery was completed.
Next Steps
After the Lottery results are committed, on the Review Tab, more filter options become available. Use the checkboxes to select the set of applicants pending offers, as example. Once selected, click the ‘Mail Merge’ button at upper right to generate acceptance letters or send emails.
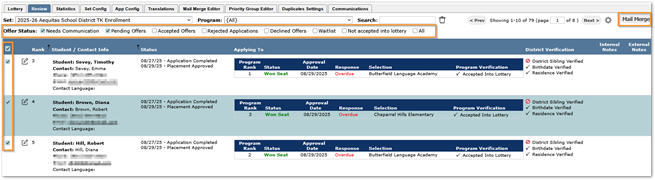
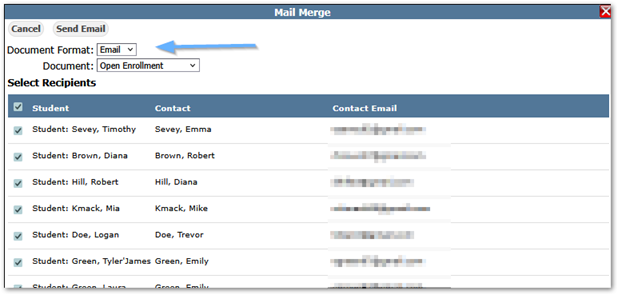
From the Mail Merge dialog, select Document Format: Letter or Email, and choose the Document. Adjust the selected recipients if needed and click ‘Print Letters’ or ‘Send Email’ depending on Format selected.
See Mail Merge Editor Tab information for help with creating documents.
In the configuration of the Lottery Set, a specific number of days for acceptance was defined. When that time elapses, from the Lottery Tab, an option to ‘Fill All Program Seats From Waitlist’ button will appear.
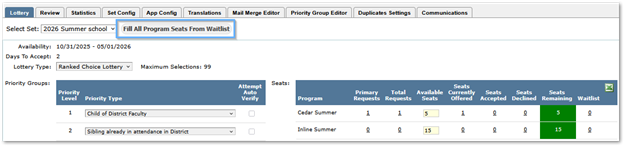
Use it to fill the remaining seats from those on the wait list.
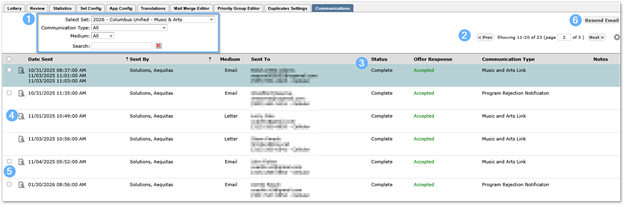
The Communications Tab shows the log of all communications with applicants.
- Records may be filtered or searched, sorted by clicking the column headers.
- Paging options are available at top right, including the cog to set the number of records per page.
- Information displayed includes details showing date sent, by whom, to whom, Status and Offer Response.
- View the communications by clicking the magnifying glass icon.
- Records may be selected using the checkboxes in the left margin.
- To resend email, select the record(s) and click the ‘Resend Email’ button in the top right corner.