The Master Schedule Manager provides a convenient place for users to build, view and edit information in the Master Schedule.
- Edit Master Schedule makes it easy to update room numbers, change section sizes, teacher names, mark definitions, attendance flags, etc. for several classes at one time. New sections may also be built.
- Master Schedule Repair allows users to switch the course names and mark definitions for courses even after students have been scheduled and attendance has been posted.
- Meeting Pattern Setup allows the creation of meeting patterns for schools with multiple cycle days
- Placeholder Teacher Setup allows the creation of placeholder teachers to use when building the Master Schedule before hiring of teachers is complete.
Master Schedule Manager is located under the Schedule menu in Q.
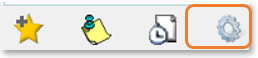
To access the application Preferences, click the gear icon located at the bottom of the Master Schedule Manager application.
There are three preferences that may be set by the user:
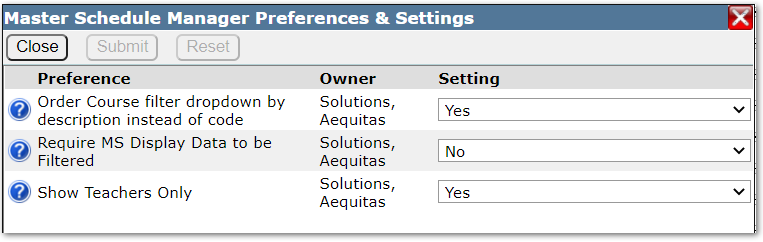
- Order Course filter dropdown by description instead of code –When this is set to Yes the courses will be displayed by the course description instead of the course code.
- Require MS Display Data to be Filtered—When this preference is set to Yes, the user is required to select at least one filtering option before retrieving the master schedule. If it is set to No the entire master schedule will load when the Master Schedule Manager is launched. If the school has a large master schedule this could cause the screen to load slowly.
- Show Teachers Only—When this preference is set to Yes only those faculty members who have the teacher flag set on their staff record will display. If the preference is set to No all users with a status record at the logged in school will display in faculty drop down lists.
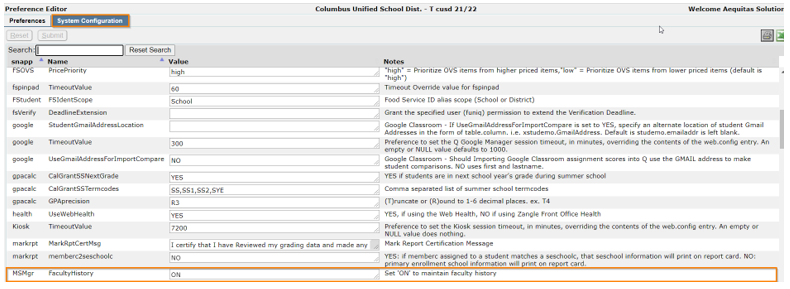
Two additional preferences are available for the Master Schedule Manager under the System Menu in the Preference Editor, they are best set when logged in to the District track. Under the Preference tab the Master Schedule Manager ‘Expected GPA Units per Year’ and ‘Expected Grad Units per Year’ preferences control which courses are listed in the Master Schedule Manager Repair tab and whether a warning window displays when building sections where the number of Expected Units per Year earned by a course, differs from the number set in the preference.

Teachers may be changed on courses after school has begun but first the preference, ‘Faculty History’ (for snapp MSMgr), must be set ON. You must be logged in to the district track to access the preference located in the System menu, Preference Editor on the System Configuration tab.
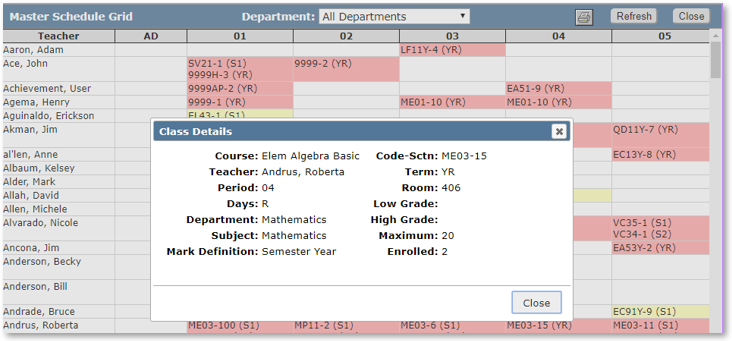
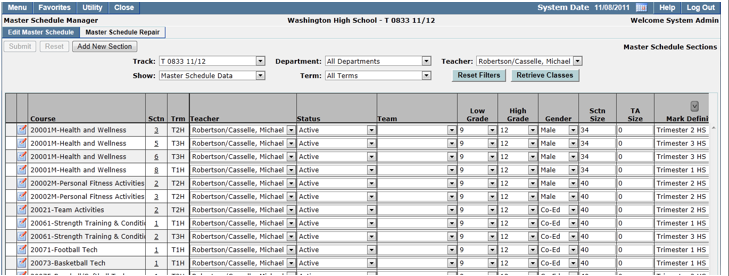
When the Master Schedule Manager is launched clicking the link, Master Schedule Grid, opens a Grid view of the master schedule which may be filtered by department. The grid may be printed by clicking the printer icon. Clicking on a course displays details about the class.
- There are five potential tabs in the Master Schedule Manager:
- Edit Master Schedule
- Master Schedule Repair
- MS Placeholder Staff (will only display if placeholder teachers exist)
- Meeting Pattern Setup (will only display if there are multiple cycle days)
- Placeholder Teacher Setup.
- When launched, the application defaults to the Edit Master Schedule tab.


- When launching Edit Master Schedule users can filter the Master Schedule data for any combination of the following:
- Track –If the logged in school has multiple tracks you can select desired track.
- Department—Select a department and Retrieve Classes to display all classes for courses in the selected department.
- Course—Select Course and Retrieve Classes to display all sections of the selected course.
- Note: Set the preference to display courses by course code or course description.
- Term—Select Term and Retrieve Classes to display all sections in the selected term.
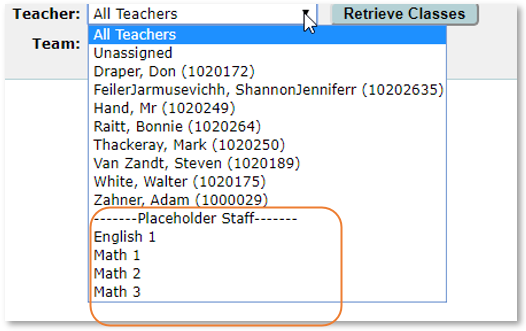
- Teacher—Select Teacher name to display all sections taught by selected teacher.
- Team—Select Team and Retrieve Classes to display all sections attached to selected team. This is a great tool for verifying the correct team has been added to sections.
- The order in which the schedule information displays may be selected using the drop-down options in the Order By filter.

- It’s also possible to view classes using multiple filters. If you want to see all foreign language classes in the master schedule but want to view them in teacher and period order, select both filters before clicking Retrieve Classes.
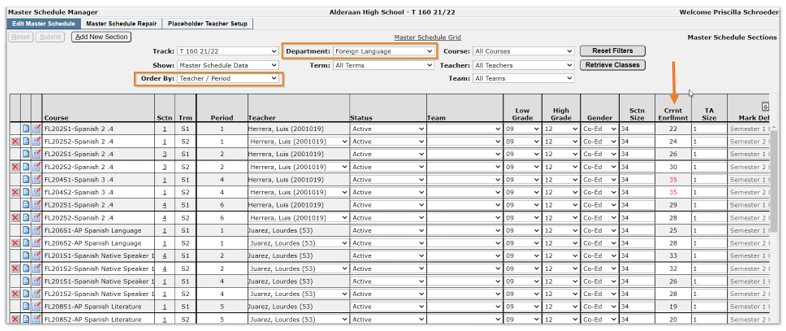
- Current enrollment figures display for classes. If the number is red, it indicates there are more students scheduled in the section than the defined section size.
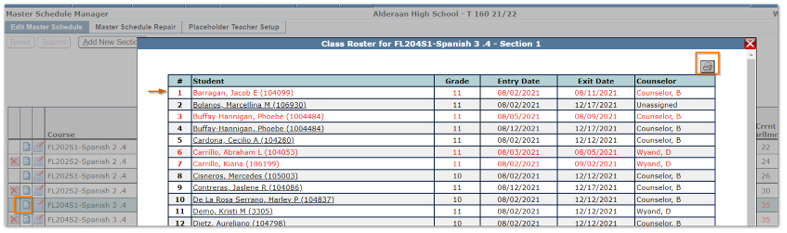
- Clicking the notepad icon next to a class displays the class roster. The student names listed in red are students who are no longer scheduled in the class. Entry and exit dates are listed. If you click the student’s name, the link will take you to the Student Schedule application for the selected student. The roster may be printed by clicking the printer icon.
There are three different views available of the Master Schedule.
- Master Schedule Data.
- Meeting Data.
- Extension Data.

- Set desired data filters.
- Select Retrieve Classes.
 When Show Master Schedule Data is selected the display includes the following columns (use the scroll bar at bottom of screen to view all the columns):
- Course Name—The course name may be switched when in edit mode. This can be helpful if the wrong course code was used but you want to keep the class roster, attendance and any marks and grade book assignments intact.
- Section (Sctn)—The section number may be edited.
- Term (Trm)—Once students are scheduled in a section the term code may not be changed.
- Cycle Day-Pd—Once students are scheduled the cycle day may not be changed.
- Teacher—Teacher names may be switched from the dropdown list before school starts. Once school is in session teachers may be changed in edit mode.
- Status—indicates whether a class is active and or inactive.
- Team—Teams may be added to sections using the dropdown.
- Low Grade—The course default low grade is defined in District Courses but may be changed for individual sections of courses here.
- High GradeThe course default high grade is defined in District Courses but may be changed for individual sections of courses here.
- Gender—The default gender for a course is set in District Courses but may be changed here.
- Section Size (Sctn Size)—The default section size for a course may be set in District Courses and the Track Course Setup application, however, individual section sizes may be adjusted here.
- TA Size—The default TA section size for a course may be set in District Courses and the Track Course Setup application, however, individual section sizes may be adjusted here.
- Mark Definition—Mark definitions may be set or changed here.
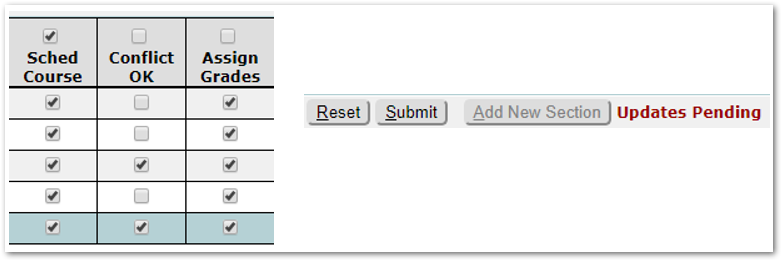
- Scheduled Course (Sched Course)—Check this box to allow the course to be scheduled by the Loader and/or Walk In Scheduler.
- Conflict OK—Check this box to allow students to be scheduled in multiple classes in the same period.
- Assign Grades—Check this box to allow marks to be posted for this class.
- Post To History—Check this box to allow marks to be posted to academic history.
- Variable Credit (Var Credit)—Check this box to allow teachers to enter credit attempted and awarded amounts in Class Marks.
- Time Tracker—Check this box to enable the Time Tracker application for the section.
- 4 Course flags (may be customized by district).
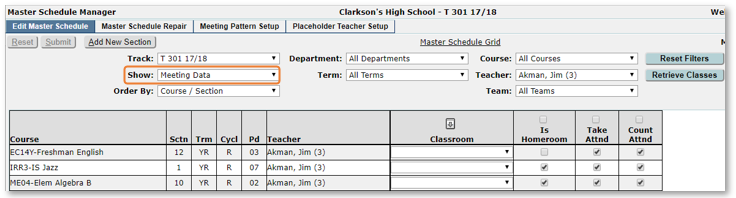
Meeting data view allows you to view and change attendance flags, homeroom designation and room numbers for displayed sections. Changing room numbers may be done for individual classes or use the auto fill feature to change multiple classes at once.
When you first open the Master Schedule Manager after NYInit has been run, if you see a message saying ‘No schedule’, check the meeting data view, if courses display that’s a clue the schedule did copy over from the previous year. Once term begin and end dates are defined in the Track Editor, the master schedule will display in show master schedule data.
- When Show Meeting Datais selected the display includes the following columns:
- Course
- Sctn
- Trm
- Cycl day
- Period
- Teacher
- Classroom
- Is Homeroom
- Take Attendance
- Count Attendance.
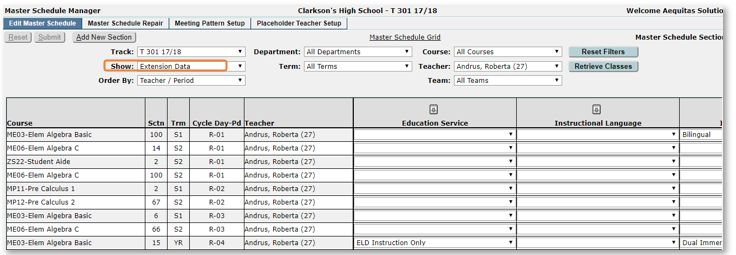
- When Show Extension Data is selected any extension data (xmstsched) added by the district displays.
- Most extension fields come from the Course record when defined at the district level. However, for California State Reporting there are some fields that need to be populated in the Master Schedule Manager extension fields. They are:
- FundingSource
- FundingProvider
- LocalAssignmentOption
- HighQualityCTE
- OnlineInstructionType
- MiddleSchoolCore.

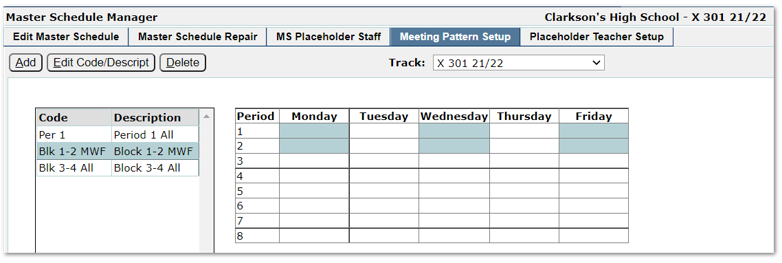
The Meeting Pattern Setup tab only displays for schools that have at least one track with multiple cycle days. If the school has only one cycle day and uses bell schedules to determine which classes meet on which day, the Meeting Pattern Setup tab will not be shown. If the Master Schedule Builder has been used for the track any meeting patterns defined in the Builder will display under this tab. When meeting patterns have been defined it’s much easier to build sections for multi cycle day schools.
The names of the periods and cycle days display in Grid form.
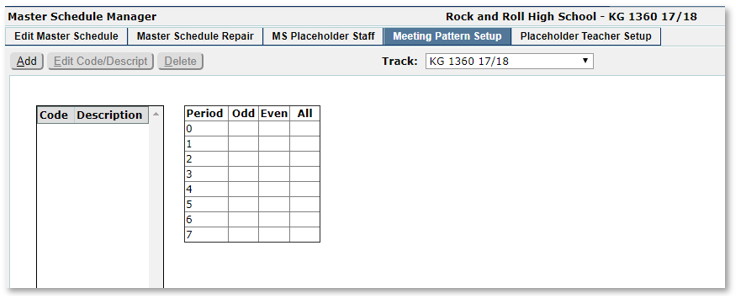
To create meeting patterns:
- Click Add.
- Define Code and add Description.
- Click the periods on the grid that match the meeting pattern.
- Submit.
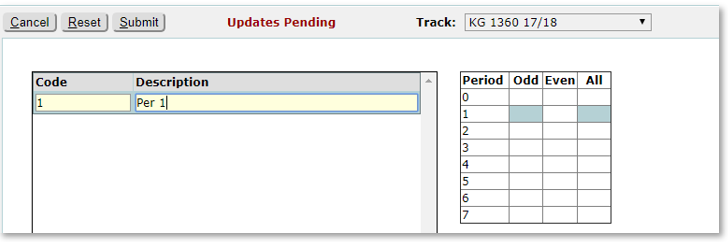
- Meeting Patterns may be created for sections that will meet over two or more periods.
- Continue until all periods are defined.

The Placeholder Teacher Setup allows the addition of placeholder teachers to use when building the Master Schedule. For example if new English teachers will be hired but you don’t have the teacher’s name, you can define an English placeholder teacher. When building the Master Schedule, assign the classes to the placeholder teacher and switch them when the new teachers are hired.

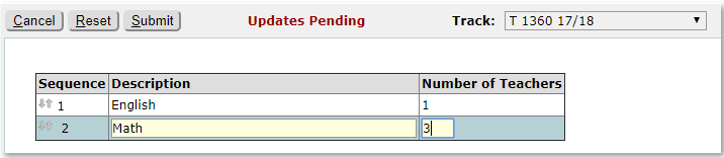
To create a placeholder teacher:
- Click the Placeholder Teacher Setup tab.
- Click
- Add a description and the number of teachers.
- Submit.
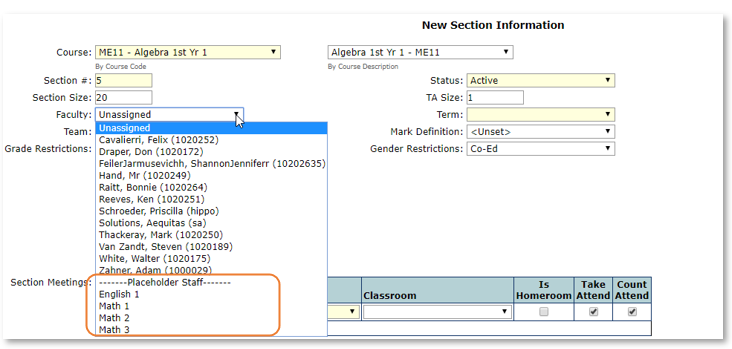
When building sections, the placeholder teacher names appear on the bottom of the faculty list.
The Master Schedule may be filtered on Placeholder teachers using the teacher filter.
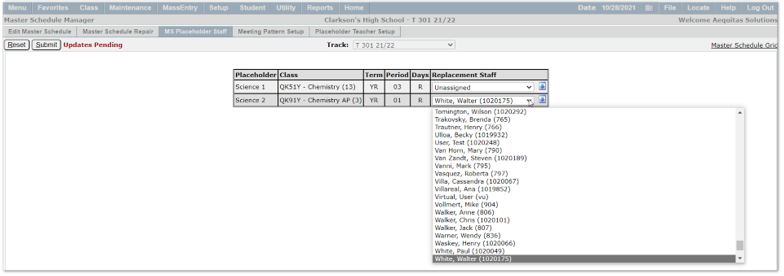
When Placeholder teachers have been added and assigned courses, a new tab appears in the Master Schedule Manager, MS Placeholder Staff. Placeholder teachers are listed as ‘Unassigned’ staff.

To replace the Placeholder teacher with the actual teacher’s name:
- Click MS Placeholder Staff tab.
- Select replacement staff from drop down list.
- Submit.
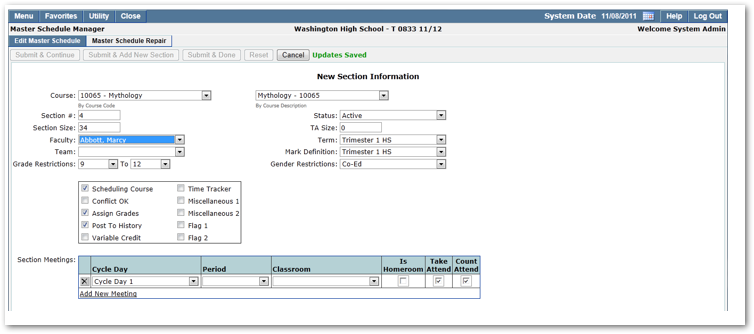
Adding a New Section
When adding a section as in other Q applications, the yellow fields are the required fields. If the track has cycle days and meeting patterns have been created, the Add Meeting pattern link is included next to add new meeting.

- Select Edit Master Schedule tab
- Click Add New Section

- Select the desired Course from the Course drop down list, or Course Description drop down list
- If you know the course number, you may type in the code.
- Information associated with the course in District Courses defaults on the section screen.
- Sections may be built with faculty left unassigned and edited later using Edit Master Schedule.
- If Placeholder teachers have been added they may be assigned to classes.
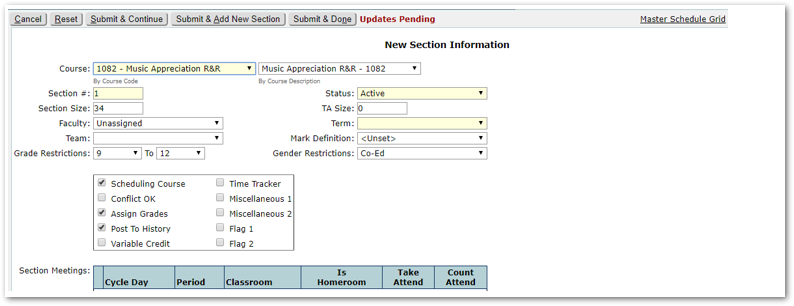
- The system automatically assigns the next available section number once the course has been selected.
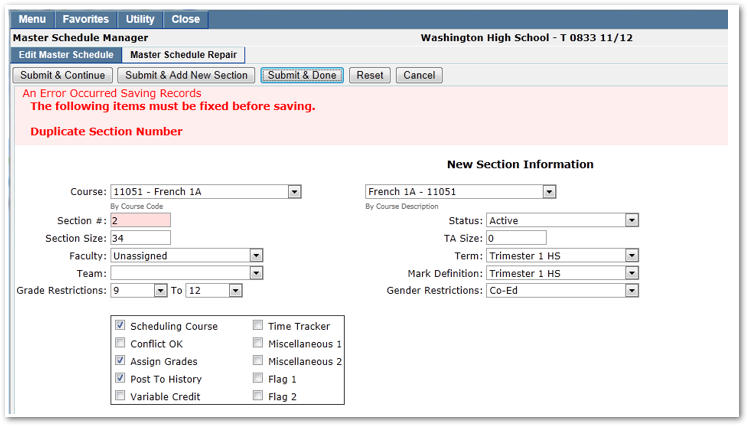
- The user may enter a section number of their choice instead of accepting the system assigned number. Caution: If the selected section number is already in use, an error message will display when saving the section.
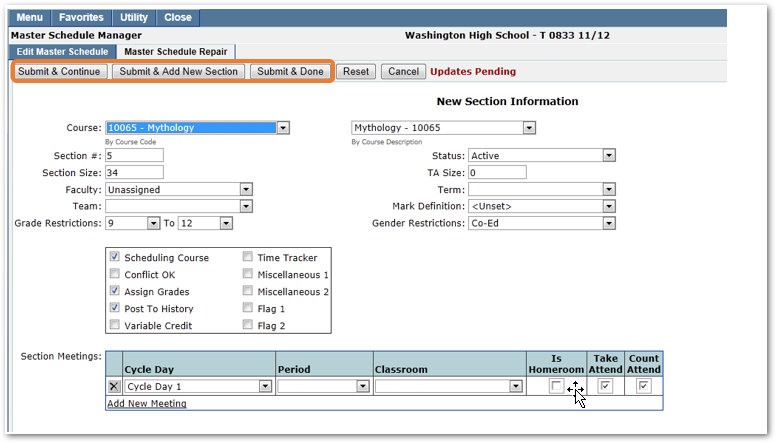
Once all information has been entered for a section there are three Submit options:
- Submit & Continue.
- Submit & Add New Section.
- Submit & Done.
Submit & Continue
When this option is selected:
- The new Section is saved.
- A blank New Section information screen opens allowing the user to continue building the master schedule by choosing a new course.
Submit & Add New Section
Select this option when building several sections of the same course.
- The new Section is saved.
- A New Section screen opens:
- Pre-populated with default course information for the course just added.
- New section number is automatically selected.
- User can keep original teacher or choose new faculty.
- User must add new period and classroom.
Submit and Done
When this option is selected:
- Section is saved.
- User is returned to Master Schedule Manager screen.

Tracks that have defined Meeting Patterns may choose from Add New Meeting and Add Meeting Pattern when creating sections.

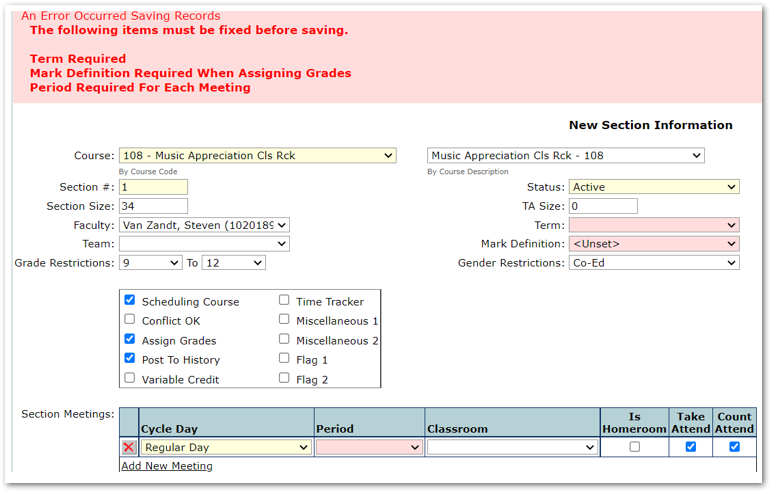
When creating new sections the system displays an error message when saving records if key information is missing. In addition to the error message, the missing fields are highlighted making it easy to spot and correct the missing information.
When creating new sections the system displays a warning message in situations where there is a potential problem with the course, selected term and selected mark definitions. When this warning is displayed if you are positive there is no issue with the number of credits awarded, you may click continue to add the section. You may also check the box, ‘Please Don’t Show This Warning Again’ to prevent it from appearing when subsequent sections are added. 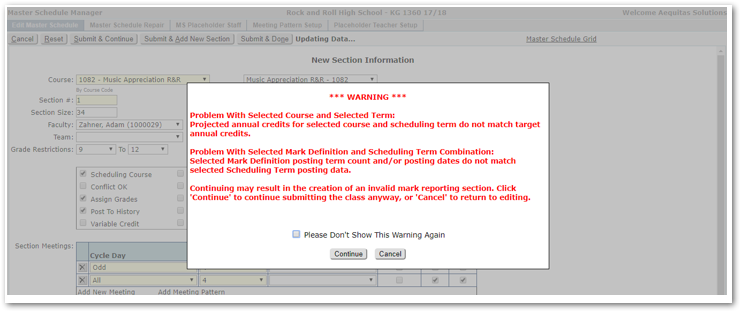
Sections with no students scheduled may be deleted using the Master Schedule Manager.
- Open Master Schedule Manager
- Select ‘Edit Master Schedule’
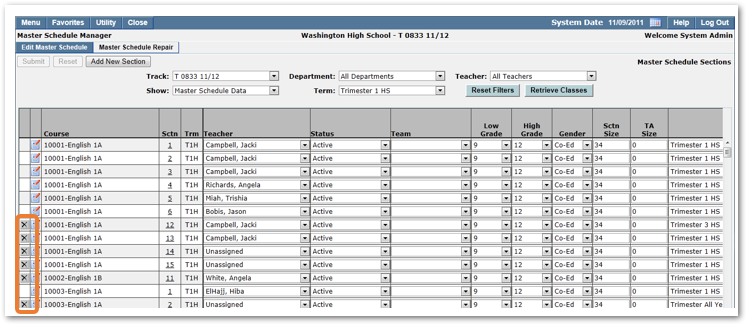
- Courses with an X next to them may be deleted
- Click the X to delete the section
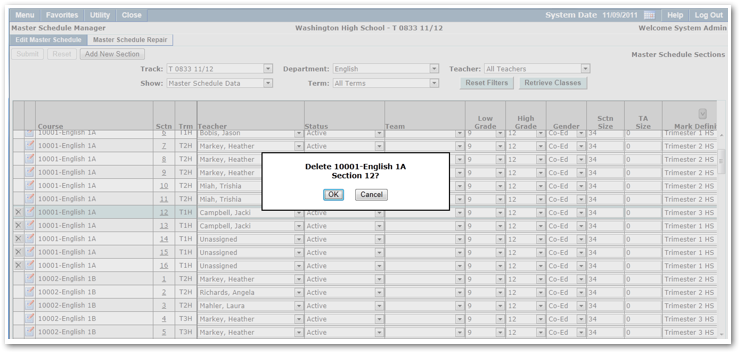
Select OK.
From the Edit Master Schedule tab with Show Master Schedule Data selected you can edit information on the Master Schedule including course section numbers, teams, high / low grades, gender, section size, mark definitions and flags. Room numbers, attendance flags and the Homeroom designation may all be edited by selecting the Show Meeting Data.
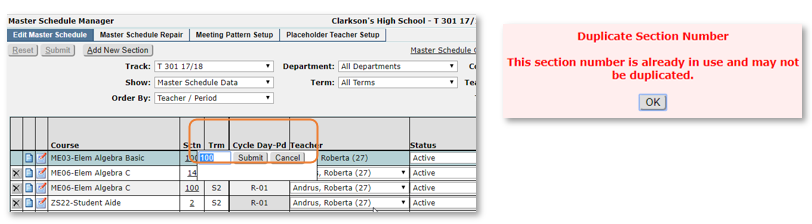
- To change the section [Sctn] number of a course:
- Click the Sctn field and enter a unique section number for the selected course.
- An error message displays if the selected section number is already in use.
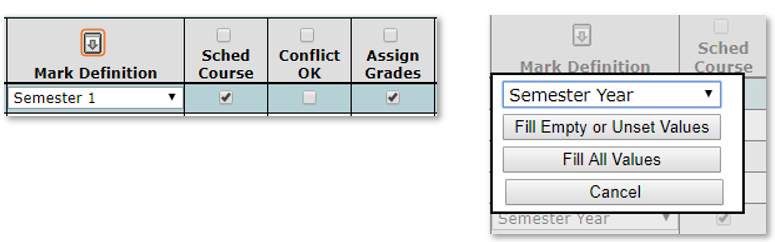
Changes to mark definitions, classrooms and some extension fields may be made for several sections at a time using the fill option.
- Select the arrow at the top of the column.
- Select a value from the drop-down list.
- Choose:
- Fill empty or unset values
- Fill all values
- Cancel
- Click your choice to fill values as selected.
- Changes may be made to columns with checkboxes by selecting each individual checkbox, or by checking the box at the top of the column to select or deselect all sections in the column.
- Click Submit to save changes, Reset to cancel.
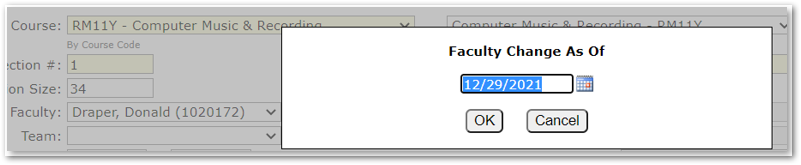
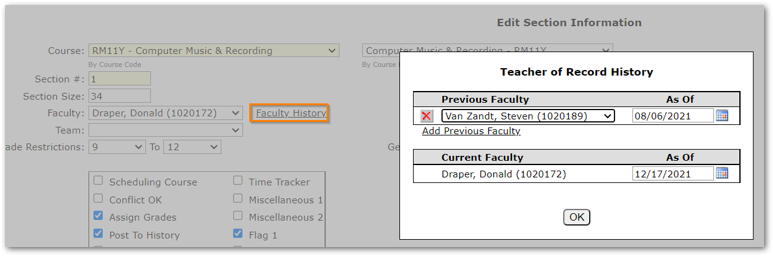
Teachers may be changed on courses after school has begun. When a teacher change is made the new teacher’s name immediately shows on all class reports including class rosters, grade book, report cards and attendance rosters. The only report that shows the teacher history for a class is the Grid Master Schedule report with the Show Faculty History and Teacher Date Range options selected. Teacher changes may not be made for future dates.
To change a teacher on a class, from the Master Schedule Manager Edit Master Schedule tab:
- Click on notepad icon for class.

- Click the Faculty drop-down list to select a new teacher.
- Once the new teacher is selected a pop-up box displays with a date box to enter the change as of date (Note: future dates may not be used, the date must be the current date or before).
- Teacher history of the class may be accessed by clicking the Faculty History link.
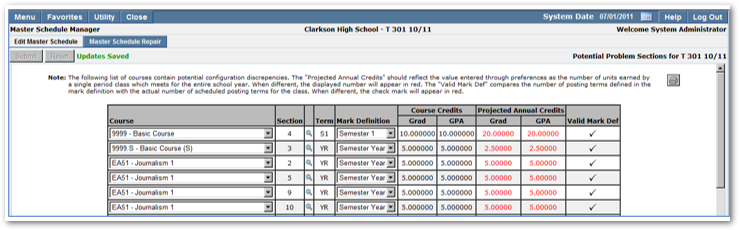
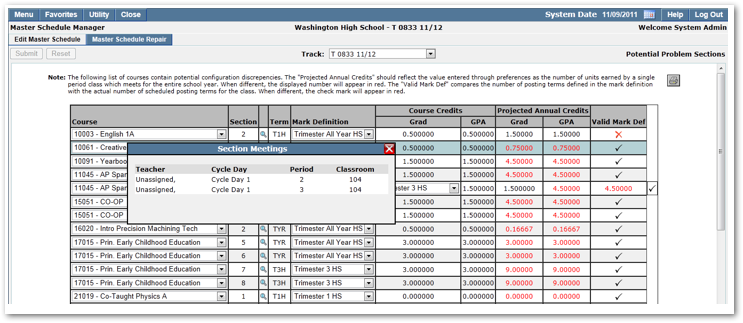
The Master Schedule Repair Tab displays a list of courses with potential configuration discrepancies. The application allows users to switch the course names or mark definition for courses even after students have been scheduled and attendance has been posted. This functionality is helpful in circumstances where a credit discrepancy is discovered after classes have already begun.
Accessing the Master Schedule Repair Application

- Select Master Schedule Repair tab when the Master Schedule Manager opens.
- The number of Expected Units per Year earned by a course as defined in the Master Schedule Manager Preferences & Settings determines which courses are displayed in Master Schedule Repair.
- Courses displayed are sorted by course code.
- The courses listed may be printed by clicking the printer icon in the upper right-hand corner of the screen.
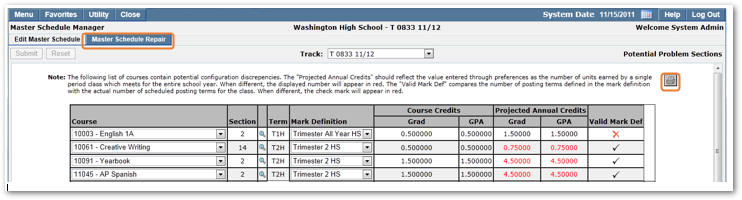
- Mark definitions and course codes may be changed using Master Schedule Repair.
- A red X in the Valid Mark Def field indicates an incorrect or missing Mark Definition.
- Click the magnifying glass icon located to the right of the Section field to view section information. When clicked, a pop-up window with the Teacher Name, Cycle Day, Period and Classroom assigned to the Course displays.
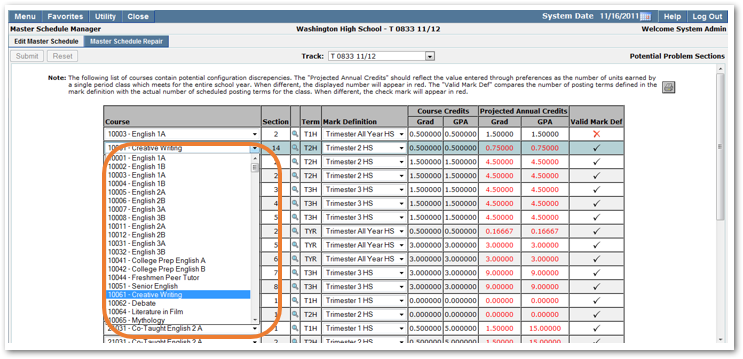
- Click Arrow next to Course to be changed.
- All courses listed in school course directory display.
- Pick desired course from list.
- Click Submit after all selections have been made to save your changes. To reset your selections, click Reset. This will undo any changes made since the last save.
- Once corrections have been made the courses will no longer appear in the Master Schedule Repair list.