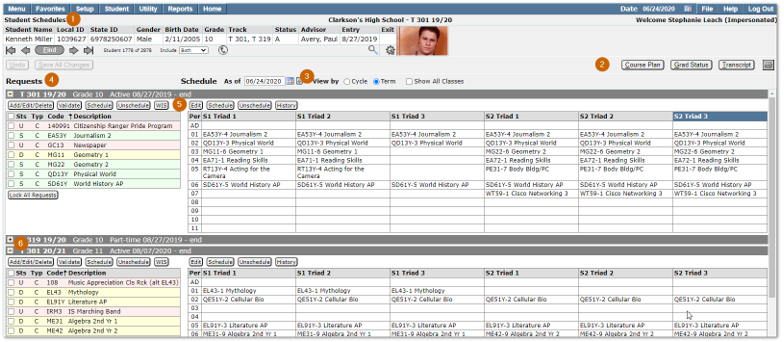
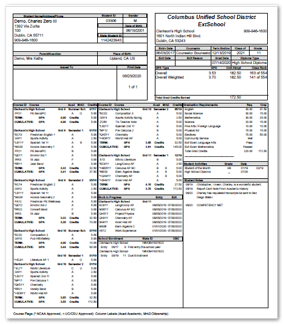
Student Schedules is a student banner application that displays a student’s course requests and schedule for enrolled tracks. Student schedule changes are made here, with a Walk-In-Scheduler available to schedule new students. The application includes buttons providing users direct access to the Student’s Course Plan, Grad Status, Transcript, and schedule change History as well as the ability to print the Student Schedules Report.
Student Schedules is located under the Schedule menu in Q.
Several preferences are available in Student Schedules and may be accessed by clicking the gear icon located on the left-hand bottom of the page. Preferences available to staff may vary depending on district configuration.
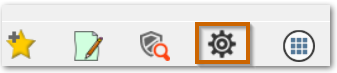
Select desired setting and click Submit to save preferences. User Preferences may be changed at any time.
Show Total Student Count – When this preference is set to Yes, an additional column displays in the Section Scheduler showing the total student count in each section. For tracks with a large master schedule having this set to Yes may slow down the performance when opening the Section Scheduler.

Teacher Load Includes TAs – When this preference is set to Yes, the teacher load in Section Scheduler will include students scheduled as TAs in the teacher’s student load count.
Print Schedule Changes – When a student schedule is changed this preference controls whether the student Schedule Change report is printed automatically, not printed or if the user is asked if they want to print the report each time a schedule change is made.
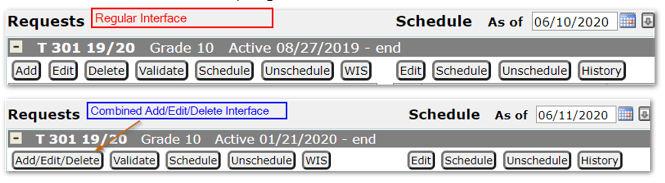
Use Combined Add/Edit/Delete Interface for Requests – When set to Yes, the enhanced Add/Edit/Delete option is used for Course Requests.

- Banner App – Student Schedules is a Student Banner application. Information on configuring and using the student banner may be found in Help under Q – Student Banner.
- Course Plan, Grad Status, Transcript and Printer buttons
- Click the Course Plan button to access the Student’s Course Plan.
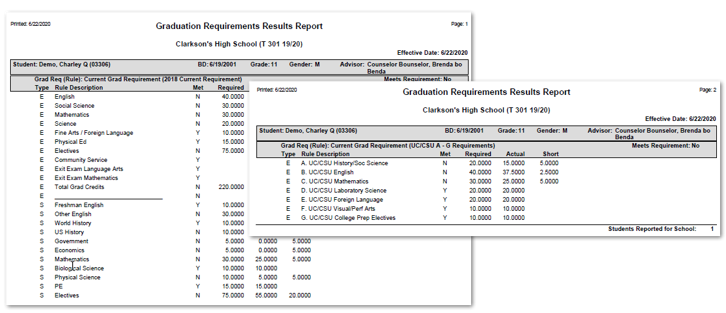
- Click the Grad Status button to create a Graduation Requirements Results Report for the student. The report automatically includes multiple requirement rules that have been calculated for the student and provides the ability to either print it out or keep it open while adding and editing course requests.
- Click the Transcript button to print the student’s transcript.
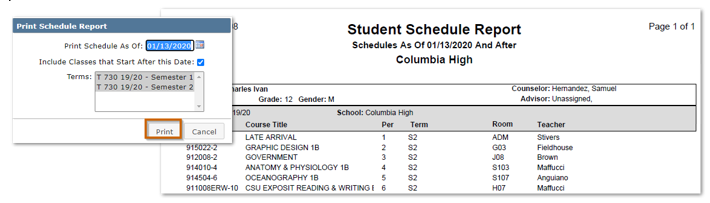
- Click the Printer icon to print the student’s schedule as of the specified date with the option to include classes that start after that date.
- Click the Course Plan button to access the Student’s Course Plan.
Note: If an ExDefault report set has been configured for the Academic Transcript and/or Student Schedule reports, the options selected in the default set will print.
- Student Schedule display options:
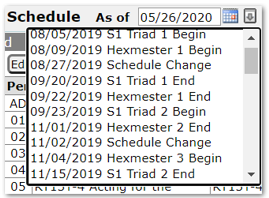
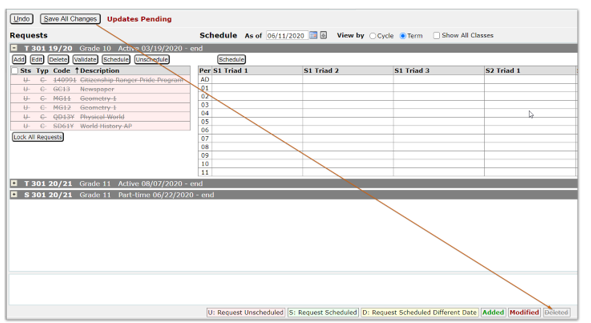
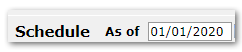
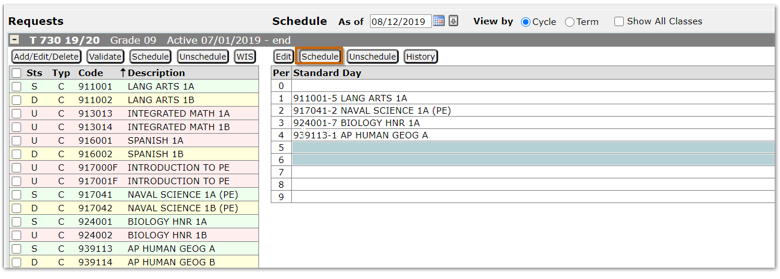
- Schedule As of – The date defaults to the system date but may be changed by typing the desired date, using the calendar pop up or selecting from the drop-down list. The list displays term begin and end dates, as well as dates of any student schedule changes. The As of date controls what is viewed in the student schedule as well as acting as the default date when schedule changes are made.
- View by cycle day – When this option is selected, tracks that have multiple cycle days display a column for each cycle day.

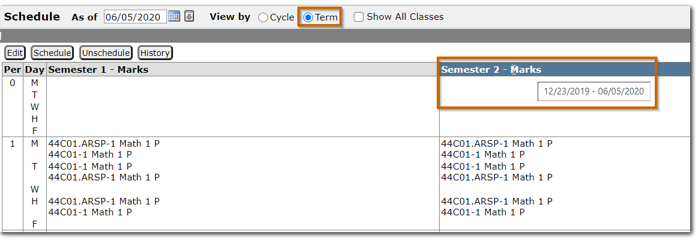
- View by term – When this option is selected, a separate column displays for each term with the current term indicated by the theme color. Term begin and end dates display when the mouse hovers over the term.
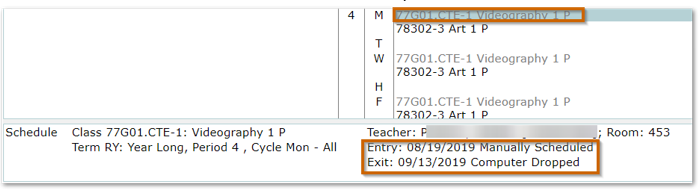
- Show all Classes – When this box is checked, classes which have been dropped by the student display in a lighter color. Clicking the class reveals the dates the student was scheduled in the class with the teacher name and entry and exit reasons.
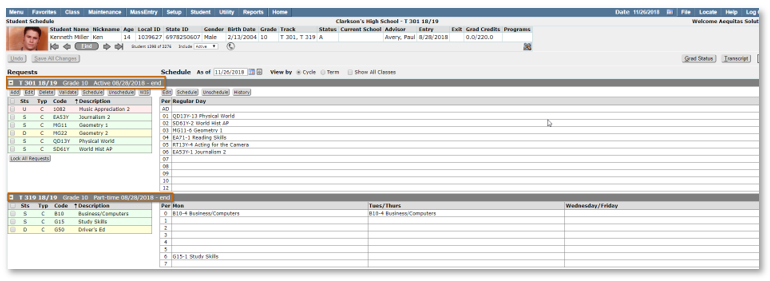
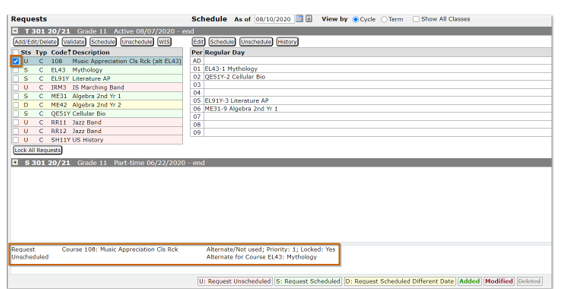
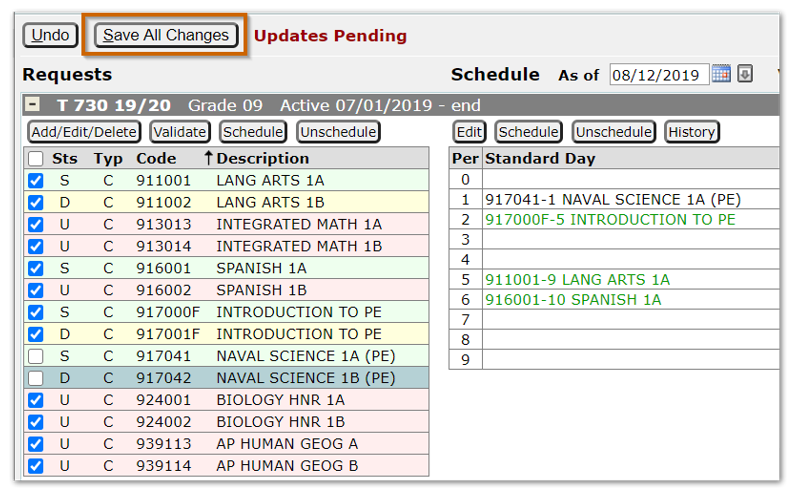
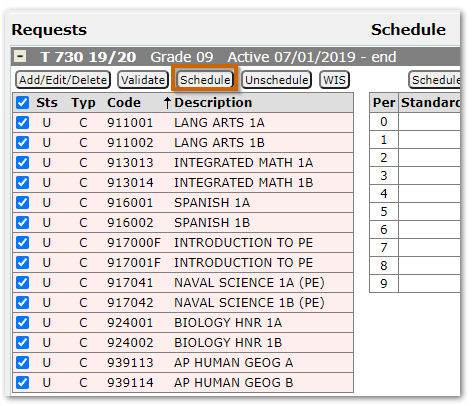
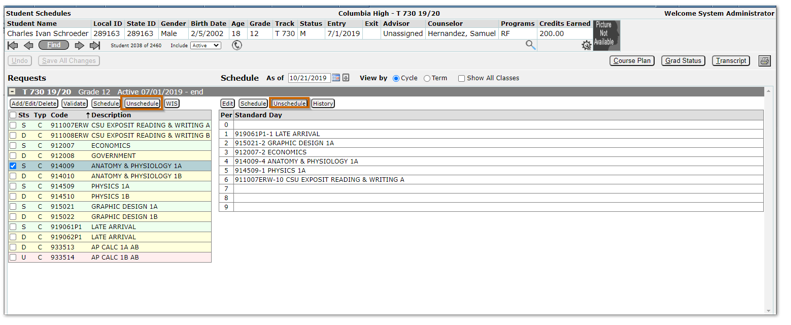
- Requests and Schedule – Course Requests are listed on the left-hand side of the screen with the student’s scheduled classes listed on the right-hand side. Requests are color coded with the key located at the bottom of the screen letting users know immediately if the request is currently scheduled, scheduled on a date other than the As of date, or unscheduled.

Additional information may be viewed by selecting the request or scheduled class and looking at the bottom of the screen to see the schedule status of a request, schedule dates for a class with teacher, entry, exit codes and who made the last change to the schedule.
- Action buttons – Located at the top of the Request and Schedule sections. There are separate action buttons for the request side and schedule side. The request buttons change depending on the user's yes or no answer to the Preference: Use Combined Add/Edit/Delete interface for Requests.
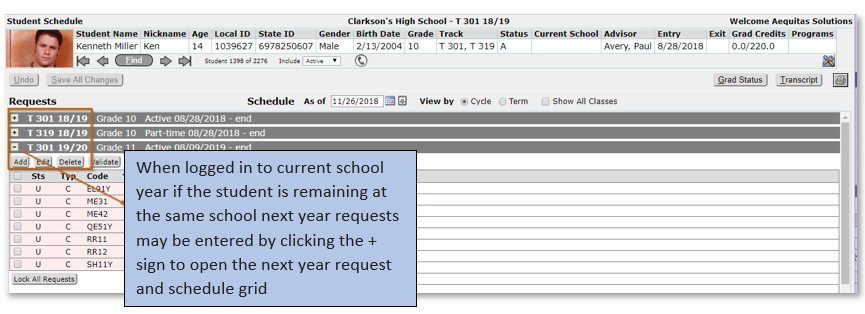
- Schedules – Display for all tracks in which the student is enrolled. Click the + sign to open a schedule and the – sign to collapse a schedule. Changes may not be made to schedules in another school track without logging in to that school. However, if the user has permissions, changes may be made to other tracks of the logged in school.
If a student is remaining at the current school for the next school year, users may enter requests while logged in to the current school year, instead of changing tracks to the future school year. All of the student’s enrollments are available by scrolling down and clicking the + sign to open the request and schedule grid.
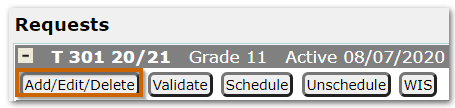
A preference is available for users to select the Combined Add/Edit/Delete or legacy interface. Users may toggle back and forth between request entry options without disturbing any data.
Combined Add/Edit/Delete
The Combined Add/Edit/Delete course request interface combines the three legacy course request options in one screen. The same request parameters are available to add to the student’s requests however, instead of having to click each individual request to add a parameter they may be added to all course requests at the same time on one screen.
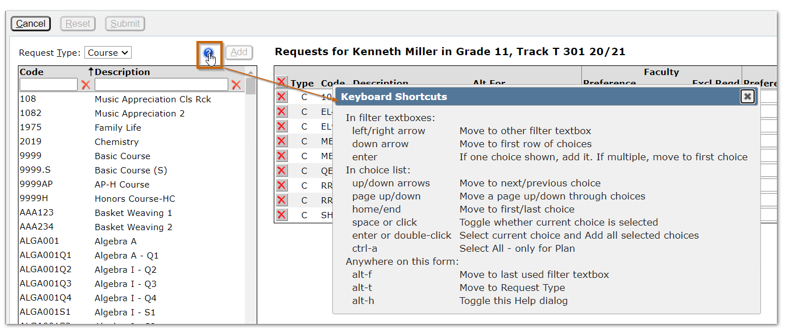
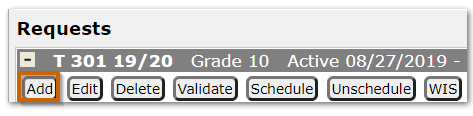
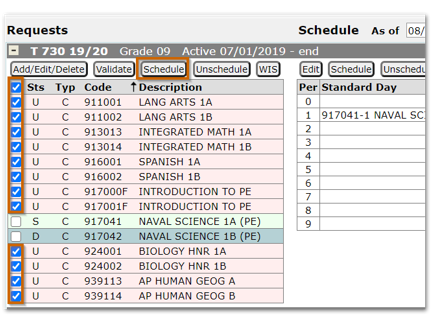
Course requests are accessed by clicking the Add/Edit/Delete button in the Requests area of Student Schedules.
- When the button is clicked the screen displays the student’s current course requests. If the student has been assigned a Course Plan, the Request Type defaults to Plan and displays all grade level courses in the student’s assigned Course Plan. Click Add All to add all of the displayed Plan requests to the student. If there are courses in the student’s plan that are not offered at the enrolled track they will display in red.

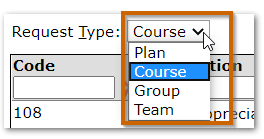
- If a student has no Course Plan or if the Plan requests have already been added for the student, when the Add/Edit/Delete button is clicked the Request Type defaults to Course. The user may also select Group or Team request types from the drop-down list.
- After selecting the request type a list appears with all available request choices. Requests may be added to the student by double clicking on the course name. Keyboard shortcuts are also available for entry. Click the blue question mark icon to display a legend of available keyboard shortcuts
- Request Parameters may be added to all courses using this screen. Parameters added from the orignal request interface display here and may be edited.
- Request Priorities may also be added/edited.

- Delete – Click the X to delete the request, clicking the X at the top will delete all requests.
- Alt For – Alternate course for the request may be selected from the drop-down list of courses.
- Faculty Preference – Select faculty name from list, check Excl to indicate Do NOT schedule with selected faculty member. Leave the Excl box blank to request the teacher. Click Reqd to make it a hard preference.

- Term Preference – Select term from drop down list.
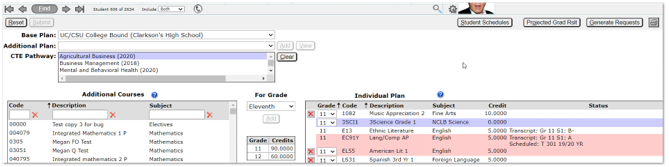
- Partial Course Term — If the course selected spans more than one term, select the partial term requested. (in our example the student needs to repeat just one term of the year long Cellular Bio course and has added a partial term request for Semester 1)

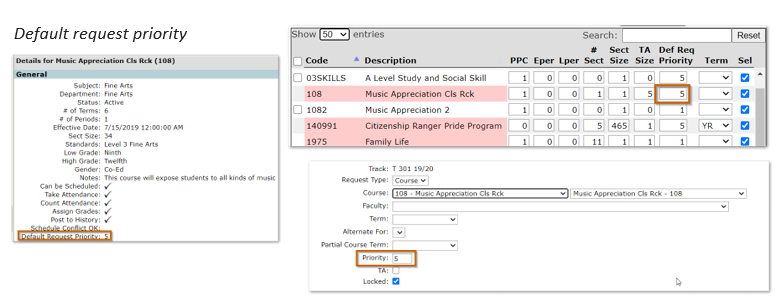
- Priority – Default priorities may be set for courses in District Courses and the Track Course Setup apps. Priorities for individual courses for the student may be added/edited here.
- TA —Check box to indicate request is a TA request.
- Lock – Check to lock request.
Click Submit to update request screen
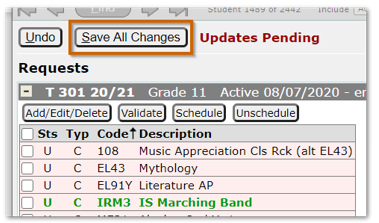
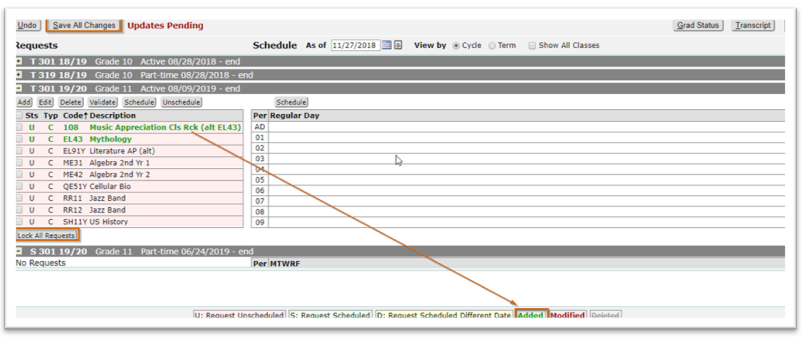
- The new requests appear in green as Added requests on the main Student Schedules
- To retain the requests click Save All Changes.
- Requests may be discarded by clicking Undo
Request Status
The request status may be viewed at the bottom of the Student Schedules screen by clicking the box next to the request. This can provide helpful information about the request after the Loader is run.
Legacy Interface
The legacy request interface offers users 3 different ways to add requests.
Course requests are added by clicking the Add button in the Request area of Student Schedules.
The request screen opens displaying three options:
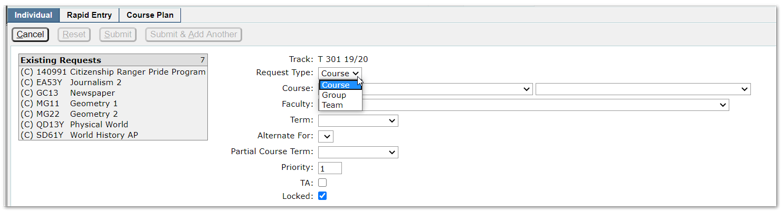
- Individual
- Rapid Entry
- Course Plan.

Individual
The individual tab allows users to enter requests for courses, groups, or teams. Course requests are added using either the course code or course description. Clicking Submit and Add Another allows several requests to be added before making a final save. The student’s existing requests display on the left-hand side of the screen.
To enter requests using the individual tab:
- Select Request Type from dropdown list, Course, Group or Team
- When adding requests, the individual course is selected using either the course code drop list on the left or the course description on the right.
Once the Course has been selected, additional parameters are available to refine the selection.
- The following parameters may be placed on requests:
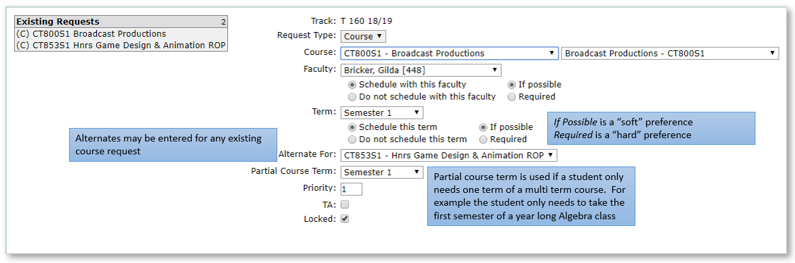
- Teacher—Select a faculty name from drop-down list and select either Schedule with this faculty or Do Not schedule with this faculty.
- Term—Select a term from the drop-down list and select either Schedule this term or Do not schedule this term.
- Teacher and Term preferences default to “soft” preferences, which means the Loader will attempt to satisfy but will schedule the request even if the selected preference is not available. A “hard” preference will prevent the request from being scheduled if the preference cannot be accommodated.
- Alternate For – An alternate course may be added to an existing request.
- Partial Course Term—If a student only needs one term of a multi term course, select the desired term from the drop-down list. (example: student failed first semester of Algebra. Algebra is a year-long course, when adding the request if Semester 1 is selected from the Partial Course Term dropdown list, student will only be scheduled in the first semester of the year-long Algebra class).
- TA—Check this box if the student will be a teacher assistant in the course.
- Priority—When the Schedule Requests in Priority Order box is checked in the Loader Options, the Loader uses the priority to determine the order course requests are scheduled. (if request priority is 1 it will schedule before courses with higher number priorities). A default Course Priority may be set for courses in District Courses to be used district wide. Individual tracks may edit the district set priority to one of their own choosing in the Track Course Setup
- Click Submit & Add Another to continue adding requests.
- Submit & Add Another stays on the add request screen allowing the user to continue adding requests.
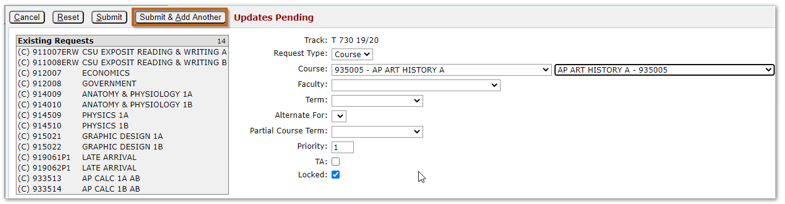
- When all new requests have been entered, click Submit.
- The requests appear in the request list in green as added requests.
- To retain the requests, click Save All Changes.
- Requests may be discarded by clicking Undo.
Rapid Entry
Rapid Entry allows the user to enter multiple courses at a time. The student’s existing requests are listed on the left-hand side of the screen allowing the user to see what has already been requested.
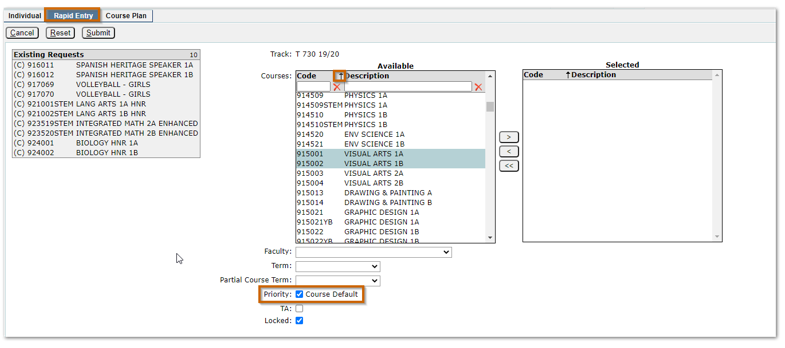
To enter requests using the Rapid Entry tab:
- Click Rapid Entry.
- All Track courses display in the list and may be filtered by code or description.
- The arrow determines if courses are sorted by Course Code or Description
- Courses may be selected by double clicking on the course or selecting the course and clicking the single arrow.
- Request parameters are available, highlight course and select desired parameters.
- The Course Default priority as set in District Courses or Track Course Setup will be used unless the user unchecks the box and adds a priority of their choosing.
- Once all desired selections are complete, click
- After Submit is clicked, remember to click SAVE all Changes on the Student Schedule Screen.
Course Plan
The Request ‘Course Plan’ tab works in tandem with the Student Course Plan. The Student Course plan contains everything from the Base Course Plan and may have changes from the base plan.

- The course Plan dropdown will only show if there are no items in the Student Course Plan for the grade level. The plan names listed will display Plans created by the track followed by district created plans at the bottom of the list.
- The user may select whether to set the request lock flag for new requests.
- The “Clear Locked Requests” setting defaults to Off.
- The setting of the lock flag (Lk) displays for existing requests so the user can see what the effect of ‘Clear Unlocked Requests’ and ‘Clear Locked Requests’ will be.
In the example below the student does have a Base Course Plan assigned and the Course Plan dropdown does not show as a result.
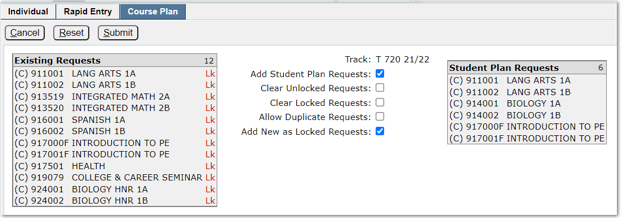
If the student has no Course Plan, requests may be added using a course plan as follows:
- Click Add.
- Select the Course Plan tab
- Select desired Course Plan from drop-down list.
- Once the plan is selected the corresponding Course Plan Requests for the student’s grade level display.
- Click Submit to add Course Plan Requests to student.
- Screen returns to main Student Schedule Screen.
- Click Save All Changes to Save.
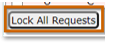
- Locked—Requests entered using a Course Plan default to unlocked, while those entered through Student Schedules default to locked. If the student has any unlocked requests, the Lock All Requests button displays. Click the button to set all requests to locked.
After New Year Initialization (NYInit) has been run, if a student has a status record in the next year at the logged in school, the user may add requests for the next year using any of the 3 methods: Individual, Rapid Entry or Course Plan.
Delete Requests
- Select requests to delete by checking box next to the request (all requests may be selected by clicking top box).
- Click Delete.
- Note requests are lined out, indicating they are to be deleted.
- Click Save All Changes to permanently delete the requests.
Students may be scheduled and unscheduled from classes using Student Schedules. A Walk-In Scheduler (WIS) is also available. When changing a student’s schedule the date shown in the Schedule As of date acts as the default change date but may be adjusted when the schedule change is made.
Courses may be manually scheduled for a student by either adding a Course Request or by selecting an open period in the student’s schedule. Regardless of the method chosen, the Section Scheduler screen opesn where the course selection is completed.
Schedule Courses using Requests
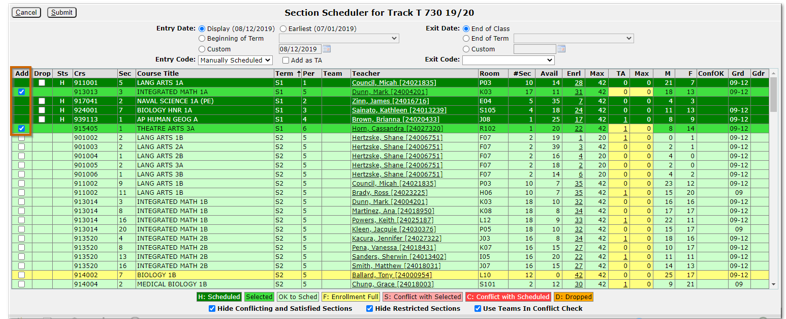
When using course requests to create a student schedule, course requests are added and then selected and scheduled by selecting available classes from the Section Scheduler.
To schedule a student using course requests:
- Select the course request(s) to be scheduled.
- Click the Schedule button on the request side of Student Schedules.
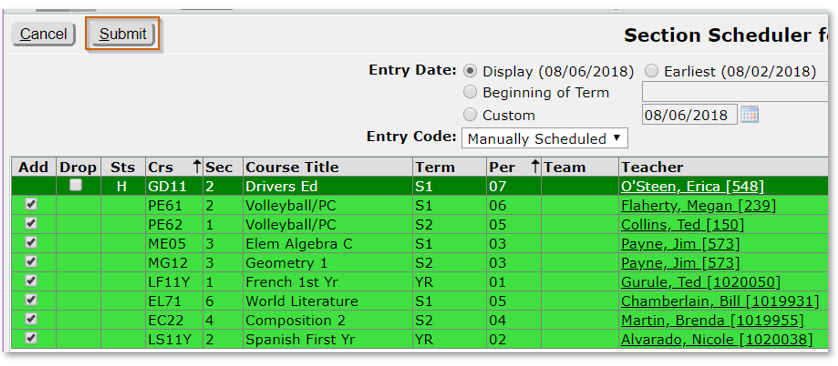
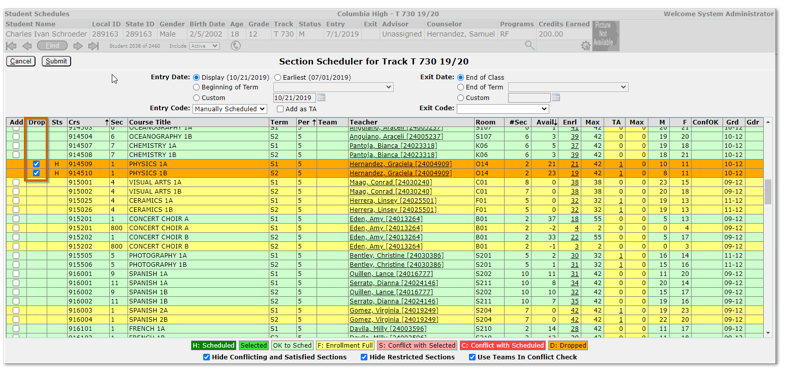
- The Section Scheduler grid opens.
- Sections where the student is already scheduled display in dark green, conflicting sections are red and full sections are yellow.
- The default sort for the grid is by ‘Crs’ however, it may be sorted on any column by clicking on the column headers. The grid may also be sorted on multiple columns by selecting the first column to sort by, then while holding the Shift key, select the next column. In the example below the first sort was ‘Course Title’ and the second ‘Period’.
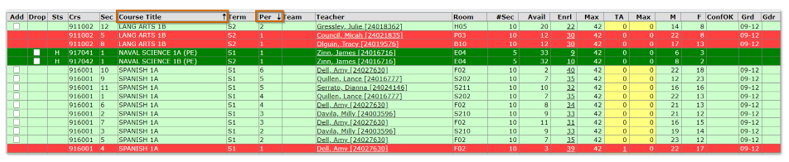
- Additional information is included in the Section Scheduler to assist the user in choosing the best course section for the student’s schedule.
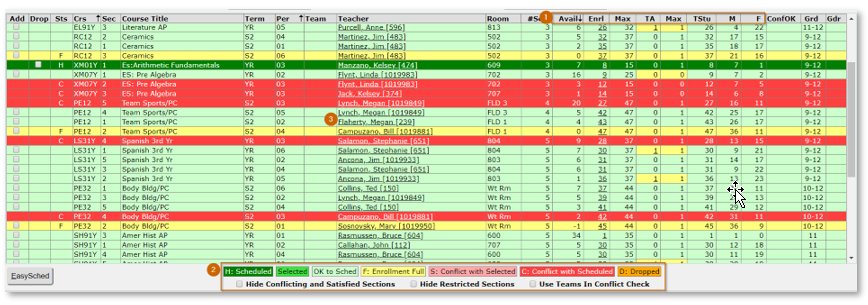
- The enrollment counts are listed for each section showing:
- Available seats.
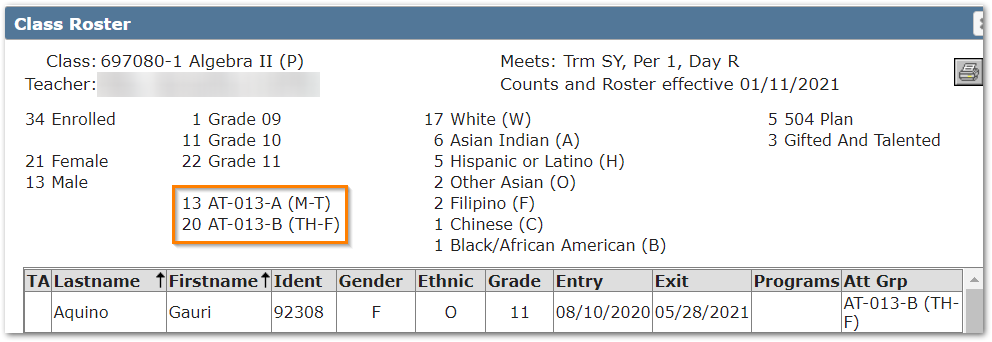
- Number of students currently enrolled in section. Clicking the link for Enrl students opens a pop-up student roster for the class. The display includes tallies of students by gender, grade, ethnicity, special programs and attendance groups (if Class Attendance Groups are in use)
- Maximum number of students defined for section.
- Number of TA seats available.
- Number of TA seats defined for section.
- Total Student count (this column is optional and controlled by preference).
- Male students.
- Female students.
- Color Coding to indicate section status for student and filters with the ability to hide:
- Conflicting and Satisfied sections.
- Hide Restricted Sections (if section ‘Grd’ does not include student’s grade).
- Use Teams in Conflict Check.
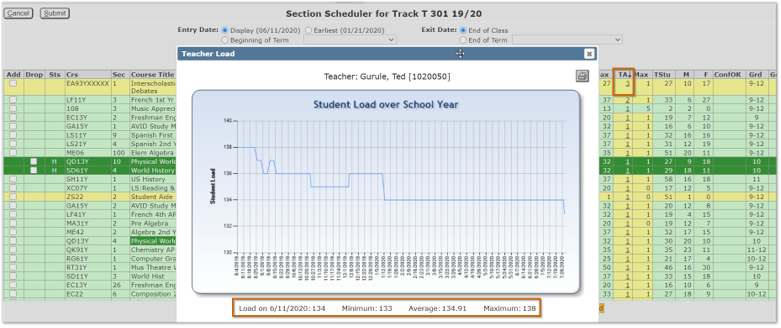
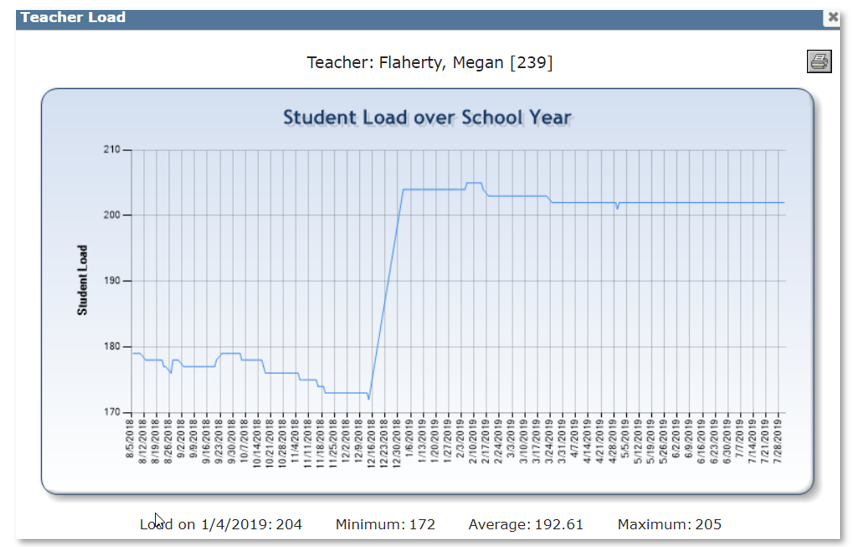
- Clicking a teacher name displays a pop-up screen with the teacher’s student load over the School Year.

When the section scheduler opens, place the student in selected class
- Select Entry Date.
NOTE: The enrollment counts displayed in the Section Scheduler reflect the counts as of the Display date, the counts do not update if the schedule entry date is changed here. To see updated counts you must change the Schedule As of date on the main Student Schedules screen which will then act as the display date.
- Display – Student Schedules As of date (defaults to system date unless changed prior to opening Section Scheduler).
- Earliest – beginning of class or student’s track entry date, whichever date is earlier.
- Beginning of Term – select desired term from drop down list.
- Custom – allows user to enter date of their choice using calendar.
- Entry code – defaults to Manually Scheduled, when Pre-Scheduled is selected as the entry code the student will be locked in the selected section(s) even if the Loader is run multiple times.
- Select the desired classes by clicking the box next to the sections.
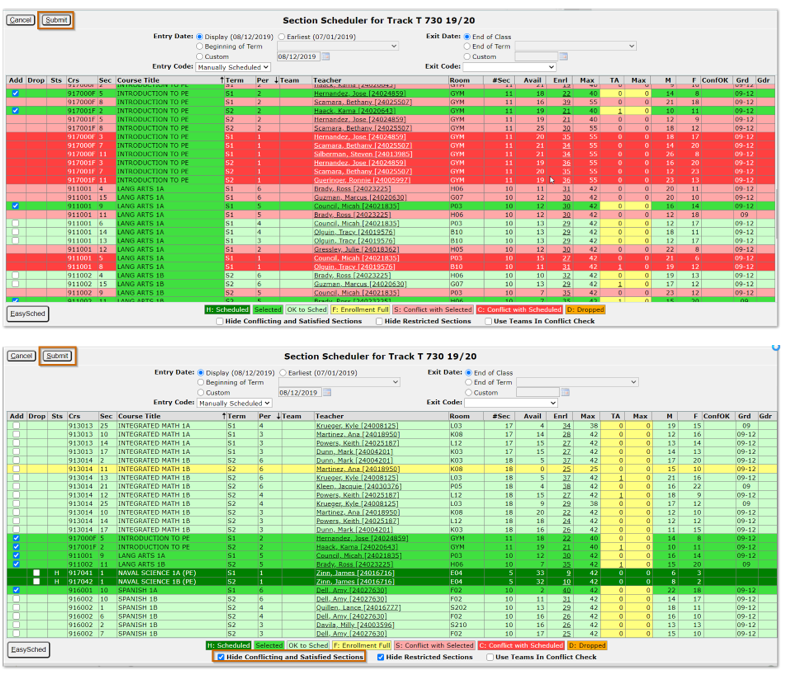
- When all courses have been selected and submitted, they appear in green in the student’s schedule.
- Click Save All Changes to finalize the student’s schedule.
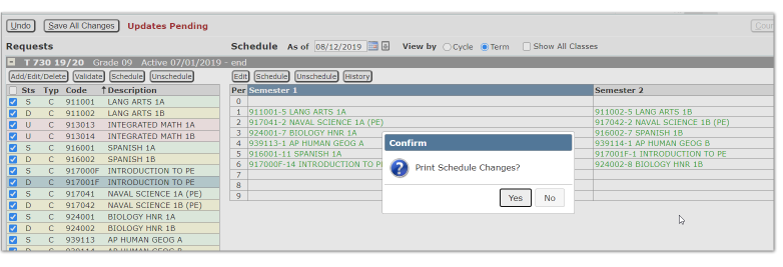
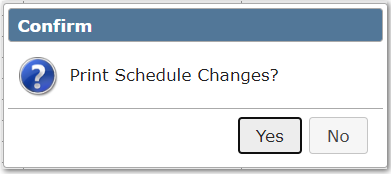
- Schedule Changes may be printed by clicking Yes.
- The preference for the schedule change print report option may be set by clicking the gear icon located on the bottom left of the Student Schedule screen.
The Walk-in Scheduler (WIS) acts as a mini loader, scheduling one student at a time. All class rules and loader options set in the Loader Setup application are honored by the WIS. A student must have course requests to use the WIS.
To use the Walk In Scheduler:
- Enter course requests for the student.
- Click the WIS button.
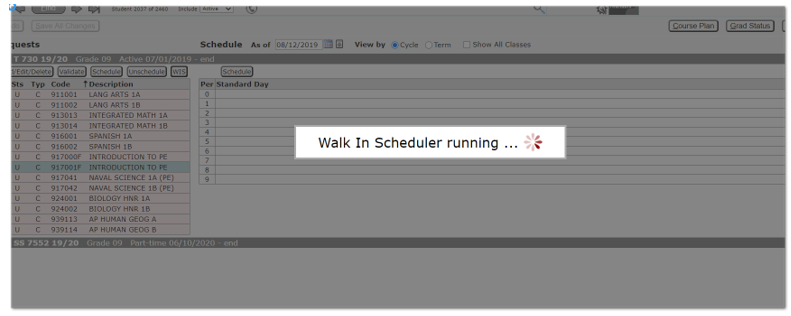
- Click Save All Changes to finalize the schedule.
To use the Easy Schedule option:
- Enter course requests for the student.
- Select all course requests.
- Click Schedule button on requests side of screen.
- The Section Scheduler screen displays, instead of selecting the individual sections for each course request, click the EasySched button on the bottom left of the screen.
- EasySched selects the best sections to fill the student requests taking in to account the available seats. EasySched does NOT follow any course rules or loader options.
- Click Submit.
- Click Save All Changes on the main Student Schedules screen.

When a student has an empty period a course may be scheduled in the period by double clicking on the period and clicking the Schedule button on the Schedule side of the screen. It is also possible to schedule classes in multiple empty periods by holding the Ctrl button when clicking to select empty periods.
When two or more periods are highlighted, the Section Scheduler displays all available course sections in each highlighted period, allowing the user to select a class for each period.
To schedule the student in empty periods:
- Highlight period.
- Click Schedule button on schedule side of Student Schedules screen.
- Section Scheduler displays available courses for selected periods.
- Select desired class by placing check mark next to class in Add column.
- Click Submit.
- When returned to Student Schedules screen, click Save All Changes.

Unschedule Course Using Request or Course
Courses may be unscheduled using either the course request or selecting the course name from the student schedule.
- Select the request or course to be dropped and click the corresponding Unschedule button.
- The Section Unscheduler screen opens.
- The Exit date defaults to the display date but may be changed.
- Select the Exit Code.
- Information for the course displays including if there is any attendance tied to the course.

- Click Submit.
- Click the checkbox to delete attendance.


Adding and Dropping Courses in One Step
Student Schedules gives the user the ability to change a student’s schedule adding and dropping classes in one step.
To add and drop a class:
- Select the class to be dropped from the student’s schedule.
- Click Schedule button.

- The Section Scheduler displays with the student’s scheduled courses displayed in green.
- Select the section to be unscheduled. It turns orange indicating dropped.
- Find and select the replacement course.
- Once selected it turns green.
- The dropped class receives an exit date the day before the entry date of the added class.

- Click Submit.
- The screen returns to the student schedule where the new course is displayed in green indicating an added class.
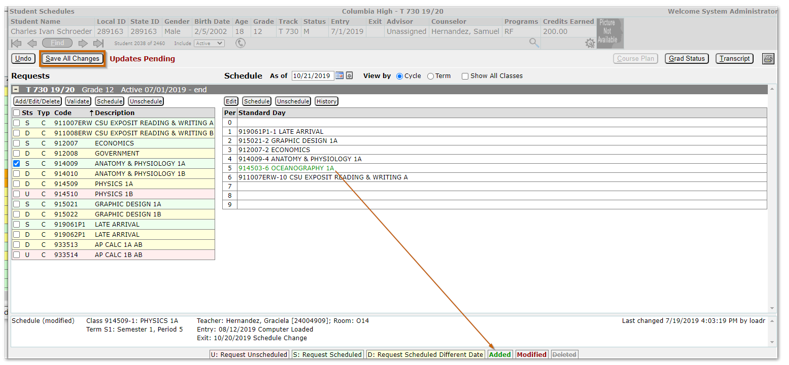
- Click Save All Changes to finalize the schedule.
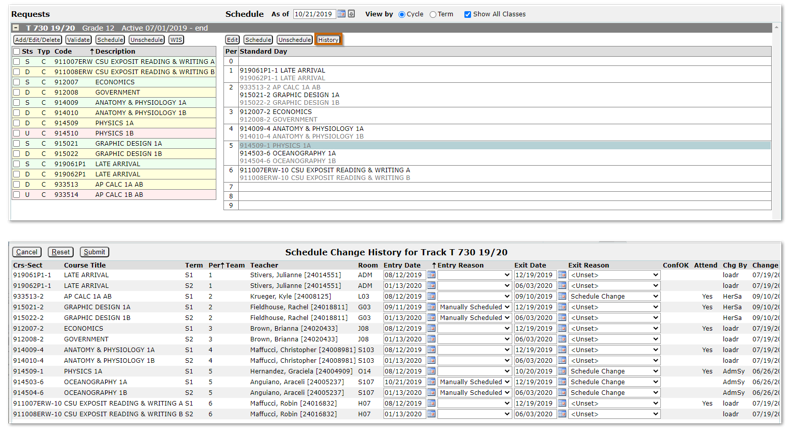
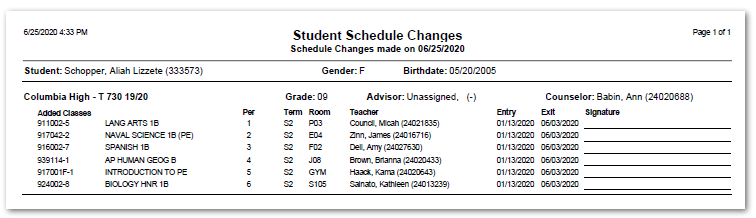
The student’s schedule history for the current year may be accessed by clicking the History button. Clicking the button displays the change history for all courses originally scheduled, added, and dropped during the year.