The Q Inventory system is designed to be a general-purpose system for keeping track of any kind of inventoried item.
The Inventory Type of ‘Textbooks’ is preconfigured with the Inventory application. All other inventory types must be configured using Inventory Setup. See the documentation on Inventory Setup.
Inventory is located under the School menu in Q.
Textbook Management has the following components which are all defined and configured using the Inventory Setup application.
Titles
Each Title (identified by a unique ISBN) has the following attributes:
- Title
- Author
- ISBN
- Revision
- Cost
- Replacement Cost
- Subject
- Vendor
- Notes
- Library of Congress #
- Catalog #
- Copyright Year
- Publisher
Books
For each Title, there are Books in inventory:
- ID (the bar code value, unique for each book)
- Title
- Author
- ISBN
- Status
- Condition
- School
- Location
- Classroom
- Owner
- Date Acquired
- Date Retired
- Notes
Check In/Out History
For each Book there is a history of check in and check out:
- Date checked out
- Date checked in
- Student or Faculty checked out to
Course Associations
Each Title may be associated with one or more courses to assist in checking books out to students based on their schedule.
Orders
Orders are associated with Titles:
- Date Ordered
- Status
- Quantity
- Fulfilled
- Vendor
- School
- Staff
- Notes
Order Fulfillment
Keeps track of order fulfillment:
- Title
- Quantity Ordered
- Quantity Fulfilled
- Date received
- Number received
- Status
- Notes
Vendors
- Company name
- Two lines of address, City, State, Zip code, Country
- Account #
- Contact name, phone # and Fax #
- Notes
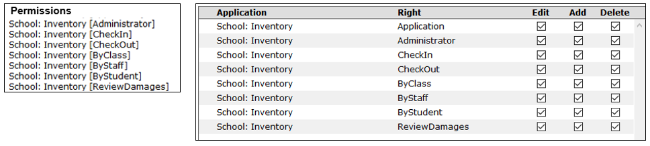
Access to each tab and its contents is managed by Permissions in the Permissions Editor and the associated Role Restrictions.
Inventory Setup has two preferences.

- Post damages to SBA
This preference must be set to “Yes” to connect to SBA to record damages and allow online payments. Shown below are the difference displays.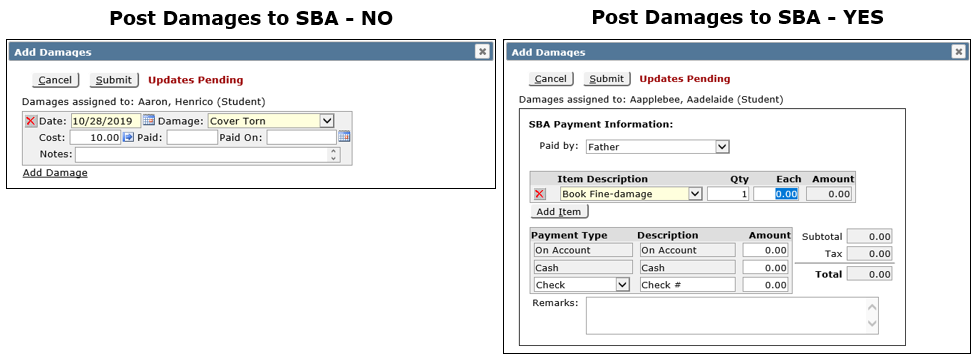
- Show picture of current holder when checking in/out
In the Inventory Application, this preference controls whether the student picture displays at checkout.
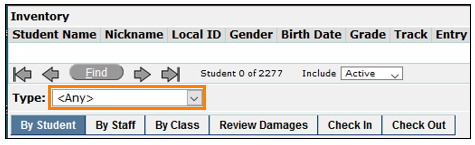
The Inventory menu contains 6 tabs. The ‘Type’ field is a drop-down menu that contains the inventory types configured using Inventory Setup. Selecting the type field before using a tab will filter for that type during the use of that tab. Setting it to <Any> allows the application to find any book or item that matches the unique Item ID regardless of type.

The inventory app opens to ‘By Student’ by default.
- Select a type at the top and use the 'Find' features to locate a student.
- Once the student is located, click the ‘Check Out’ button and a ‘Check Out’ popup appears.
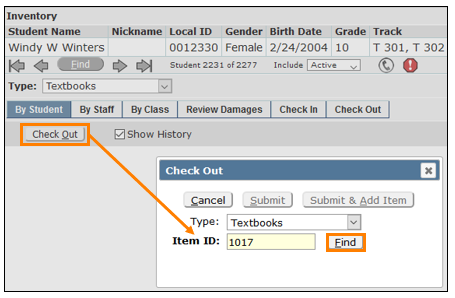
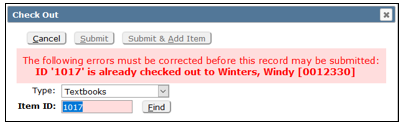
- In the ‘Item ID’ field, scan in or manually enter the Item ID of the book or item being checked out to the student. Click ‘Find’. If the item cannot be found or is already checked out, a warning message appears.
- If the item is found and available, the ‘ID Type’, ‘Title’, and ‘Author’ fields will automatically display the information in an open check out form.
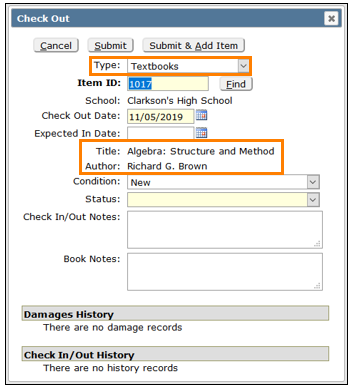
- The required fields, ‘Item ID’, ‘Check Out Date’ and ‘Status’, are highlighted in yellow. ‘Expected In date’, ‘Condition’, ‘Check In/Out’ and ‘Book Notes’ are optional
- The check out form also includes sections for viewing the damages and check in/out histories.
- Click ‘Submit’ to save the record or ‘Submit & Add Item’ to check out another book or item to the student.
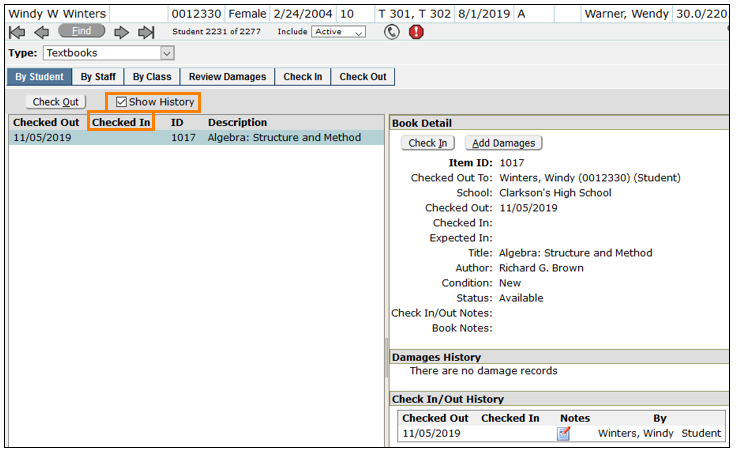
- When saved, the screen returns to the student page showing the checked out book with ‘Book Detail’, ‘Damages’ and ‘Check In/Out History’. The ‘Show History’ checkbox turns the ‘Checked In’ column details on and off.
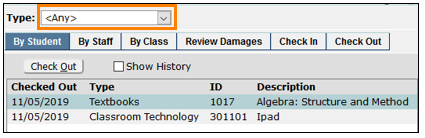
- To view all inventory items that a student may have checked out change the ‘Type’ to <Any>.
To check out items to staff, click the ‘By Staff’ tab and the banner changes to the Staff Banner. Follow the same processes described above for By Student.
- Select the ‘Inventory Type’.
- Find the staff member.
- Click ‘Check Out’ and scan or enter the Item ID.
- Fill out the ‘Check Out’ form and click ‘Submit’.
To check out items to whole classes, click the ‘By Class’ tab and the banner changes to the Class Banner.
- Select the ‘Inventory Type’.
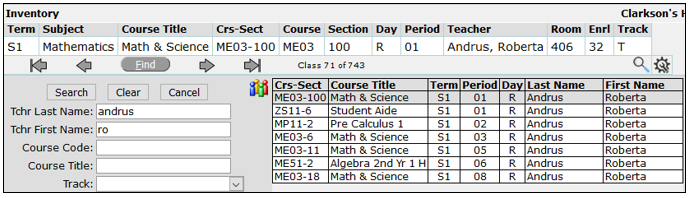
- Find and select the class (section)
- When a class is selected, By Class shows the class roster. The roster list includes a column that indicates the number of checked out items for the student. The camera icon to the left of the student’s name pops up the student’s picture. When a student’s name is highlighted, details of the student’s checked out items are shown in the right pane that contains 4 sections.
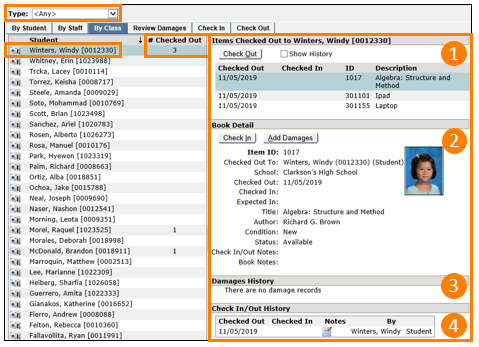
- The ‘Items Checked Out’ details pane shows all the items the student has checked out depending on the selection in the ‘Type’ dropdown at the top of the page. The check out form displays any items associated with the class and has a check box to be able to check out items that are not associated with the class. Additional items can be checked out scanning or typing into the ‘Item ID’ field or by highlighting an item associated with the class to reveal the available IDs and selecting an ID.
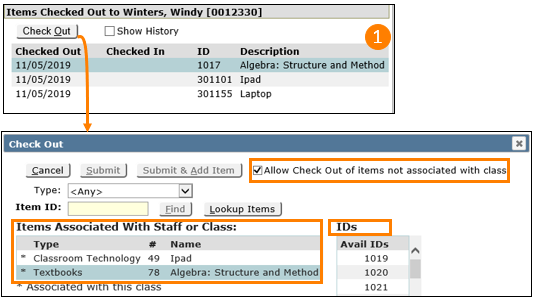
Shown above, Textbooks is highlighted and the ID’s that are available to the right. Clicking on an ID opens a form to check it out. Highlight each student in the roster and check out the book or item with the method of choice.
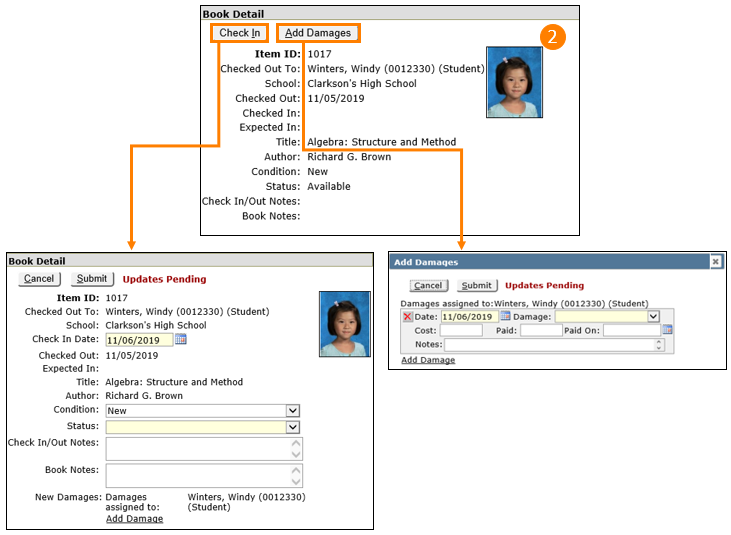
- The ‘Book Detail’ pane shows the book or item details and has choices for either checking it in or adding a damage record.
- Damages History shows the details of all damages. Damages can only be viewed in this section.

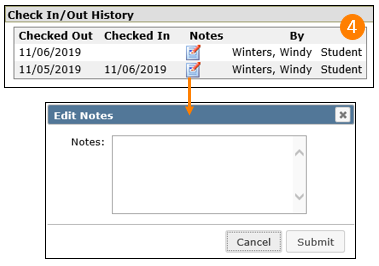
- Check In/Out History shows the history of the book’s or item’s check-ins or check outs. This data cannot be edited here, but notes can be added to each line item.
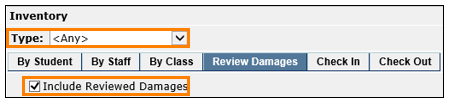
The Review Damages tab displays all the damage records for the chosen inventory ‘Type’ selected at the top of the Menu. Use the checkbox to include the display of both reviewed and unreviewed damages.
Note in the example below that the ‘Type’ is set to <Any> which displays textbooks and classroom technology devices. When a book or other item is highlighted, detail panes open with the listed ‘Damages’, ‘Book’ or ‘Item Detail’ and ‘Check Out History’. Click ‘Review’ to display the Review Damages window for the highlighted item.
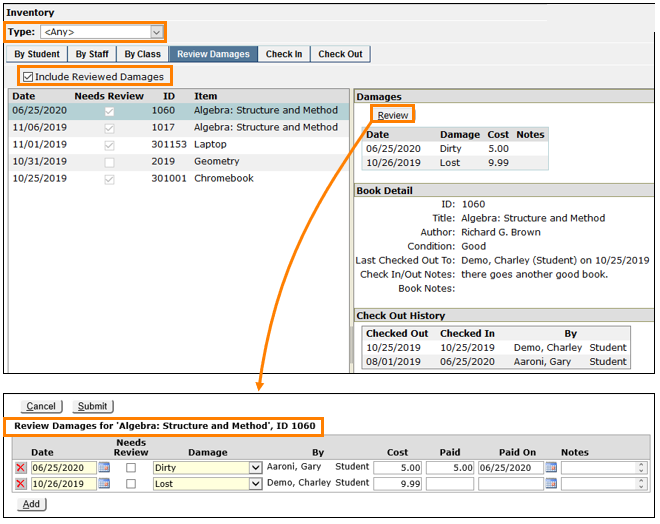
In the header, the book or item name and ID is displayed with its damage history shown below. Damage details can be edited or deleted in this screen by clicking the Red X.
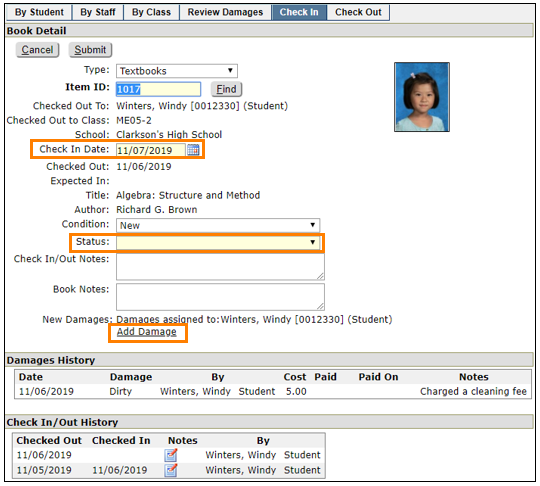
Check In
Click the ‘Check In’ tab to open the check-in window. The ‘Type’ field in ‘Item Detail’ will be the same as the ‘Type’ selected at the top.
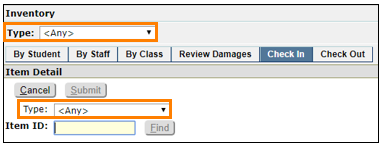
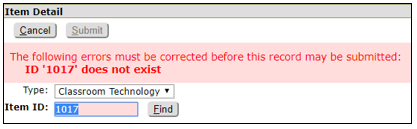
If Q Inventory is used for multiple types, setting the type to “<Any>”, as shown here, means that Q will find any book or item with the entered ID regardless of type. If on the other hand, if Classroom Technology is set as the type and a textbook ID is entered, an error message is generated. To correct this, select the correct type for the Item ID.
When the correct book or item is located, the check in screen is displayed. The required fields are highlighted. ‘Item ID’ is entered automatically, the ‘Check In Date’ defaults to the actual date and what appears for ‘Status’ is configurable in Inventory Setup. All other fields are optional.
‘Damages History’ and ‘Check In/Out History’ are shown and at the bottom. Damages can be added by clicking the ‘Add Damages’ link. Notes can be made to ‘Check In/Out History’ items by clicking the notepad icon.
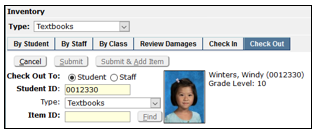
To check out books or items click the ‘Check Out’ tab. As soon as the ‘Student ID’ field is scanned or entered, the student’s name, ID and grade level are shown. If the “Show picture of current holder when checking in/out” preference is set to ‘Yes’, the student’s picture will also show.
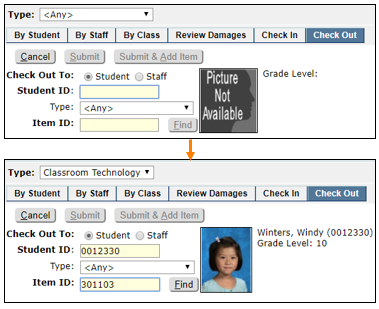
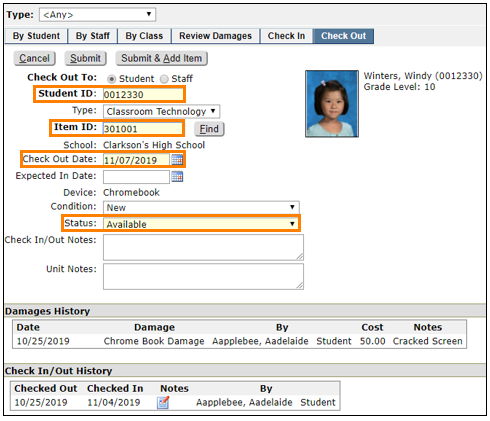
Scan or enter the Item ID and a checkout window appears. The information returned depends on the ‘Type’ setting described in ‘Check In’. The highlighted fields are required and auto populated. The default ‘Check Out Date’ is the actual date and the ‘Status’ field that shows by default is based on the status configuration in Inventory Setup.
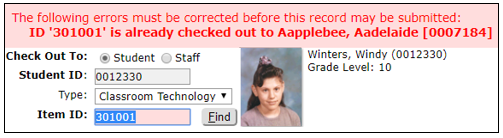
If an item is already checked out an error message will identify the student or staff member and provide a picture.
Fill in the other fields as needed. The Damages and Check In/Out Histories are viewable and notes can be made on the Check In/Out History entries.
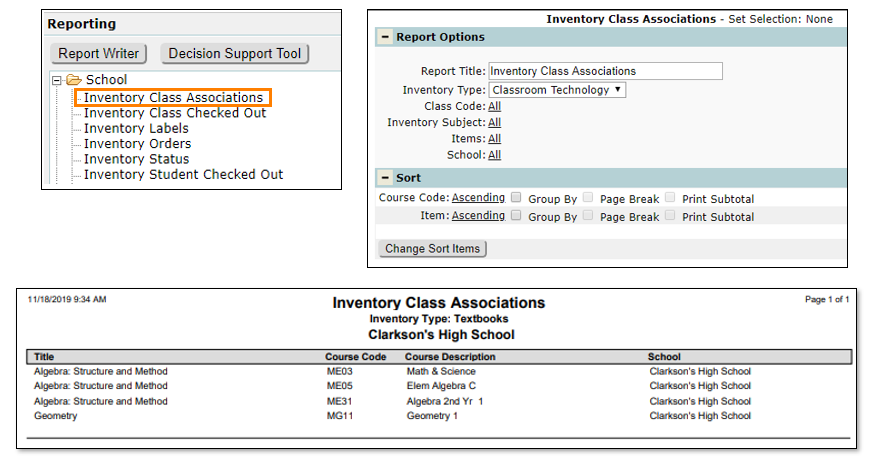
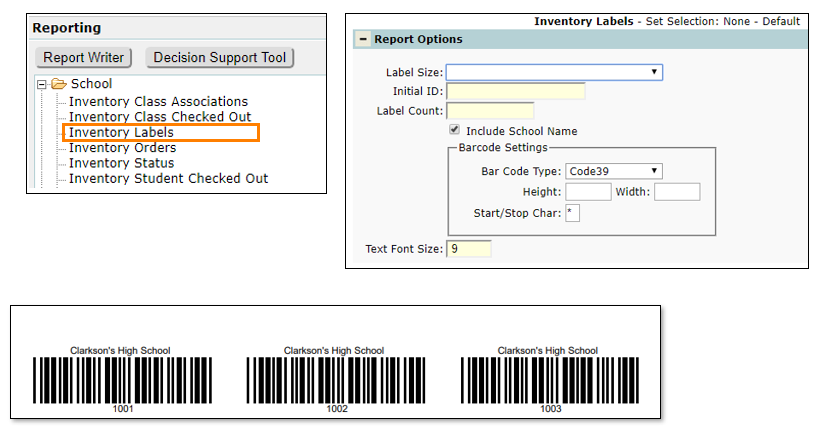
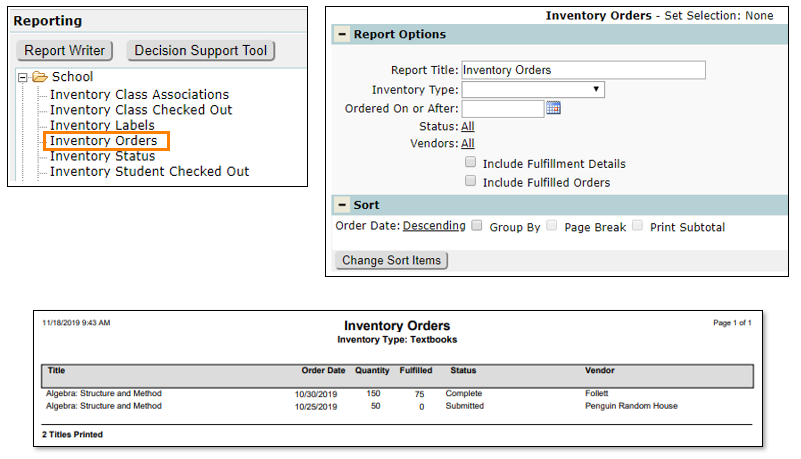
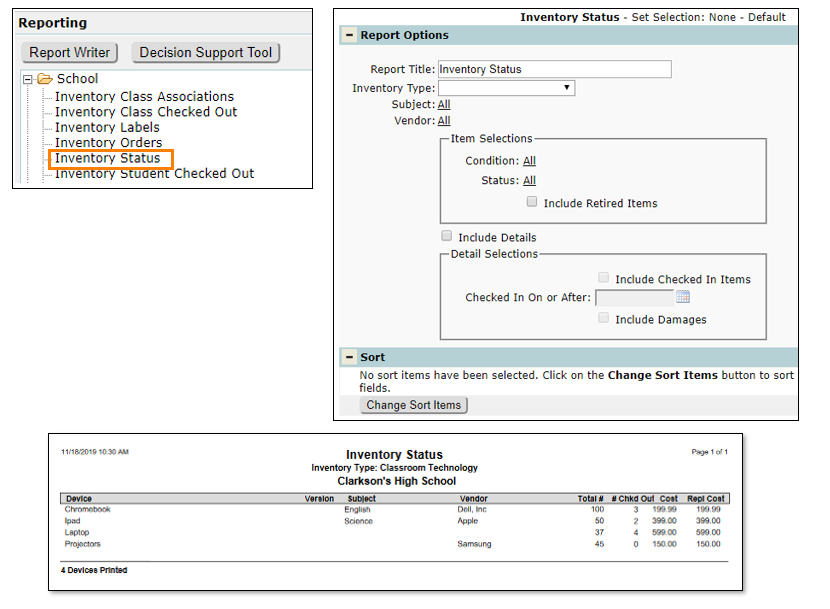
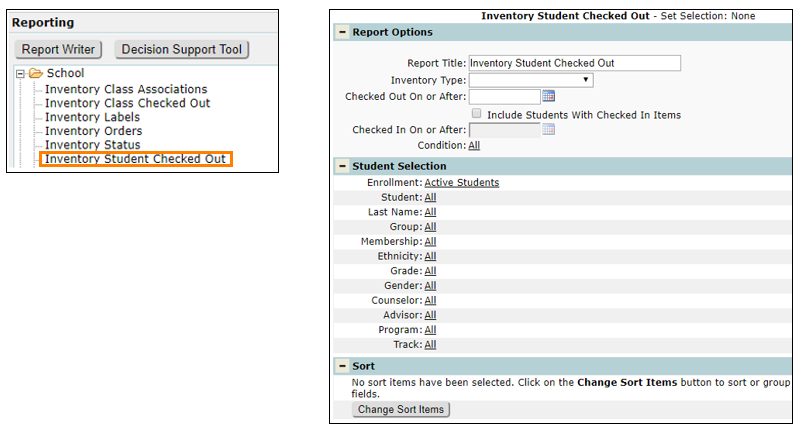
There are 6 inventory reports under the School Menu. Each report provides information about a selected inventory type and is available in PDF or Excel formats.

- Inventory Class Associations - shows the titles or items that are associated with courses at each school.
- Inventory Class Checked Out - reports the course, ID, title or item, checked-out date and condition, by student.
- Inventory Labels – designs and creates barcode labels.
- Inventory Orders – shows detailed information about the order history and status.
- Inventory Status – provides a list of titles or items associated to subjects, how many are checked out with vendor and cost information.
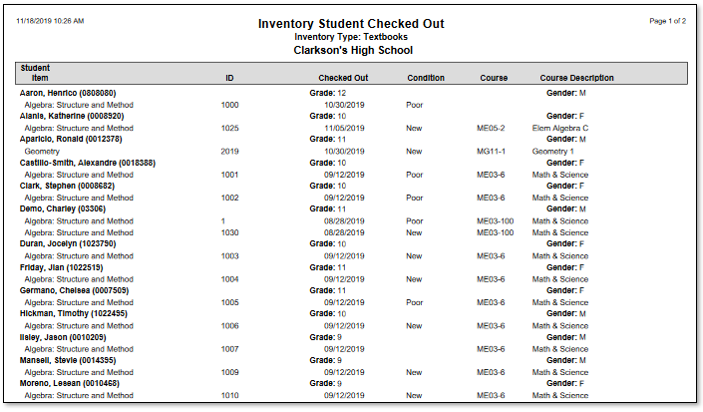
- Inventory Student Checked Out – reports detailed information by student about titles or items checked out including item ID, check-out date, condition, and course.
- Shown below are the report setup menus with the report and sorting options and a sample of each report.