Student Course Plan application enables users to create or refine student course plans on a student-by-student basis. Course Plans support multi-year, individualized learning plans for students. A student’s Course Plan may begin as a set of core courses from a Base Plan but for each student may be tailored to meet their specific educational goals either directly by the student or by faculty. Counselors or other staff using the Student Course Plan application may view the student’s Projected Graduation Results based on their current individualized learning plan.
A student’s Course Plan may be created with:
- A Base plan
- Additional Plan courses
- Selected individual courses
- One or more CTE Pathways.
‘Base plans’ often consist of core courses required over the years in school, i.e. Grades 9 – 12 of General High School curriculum. ‘Additional Plans’ may be used to add common sets of curriculum electives over the same period, i.e. Music, STEM, etc. CTE Pathways are used to track student participation, enrollment and progress toward CTE Pathway completion.
When a student’s Course Plan is defined, it may be viewed through Student Profile in the ‘Course Plan’ area. Additionally, Student CTE Pathways application enables editing of CTE Pathway records. The Student Course Plan Report may be used to print a record of all aspects of the student’s Course Plan.
Student Course Plan is located under the Schedule menu in Q.
The Student Course Plan is a student banner application. Information on configuring and using the student banner may be found in Help under Q - Student Banner.
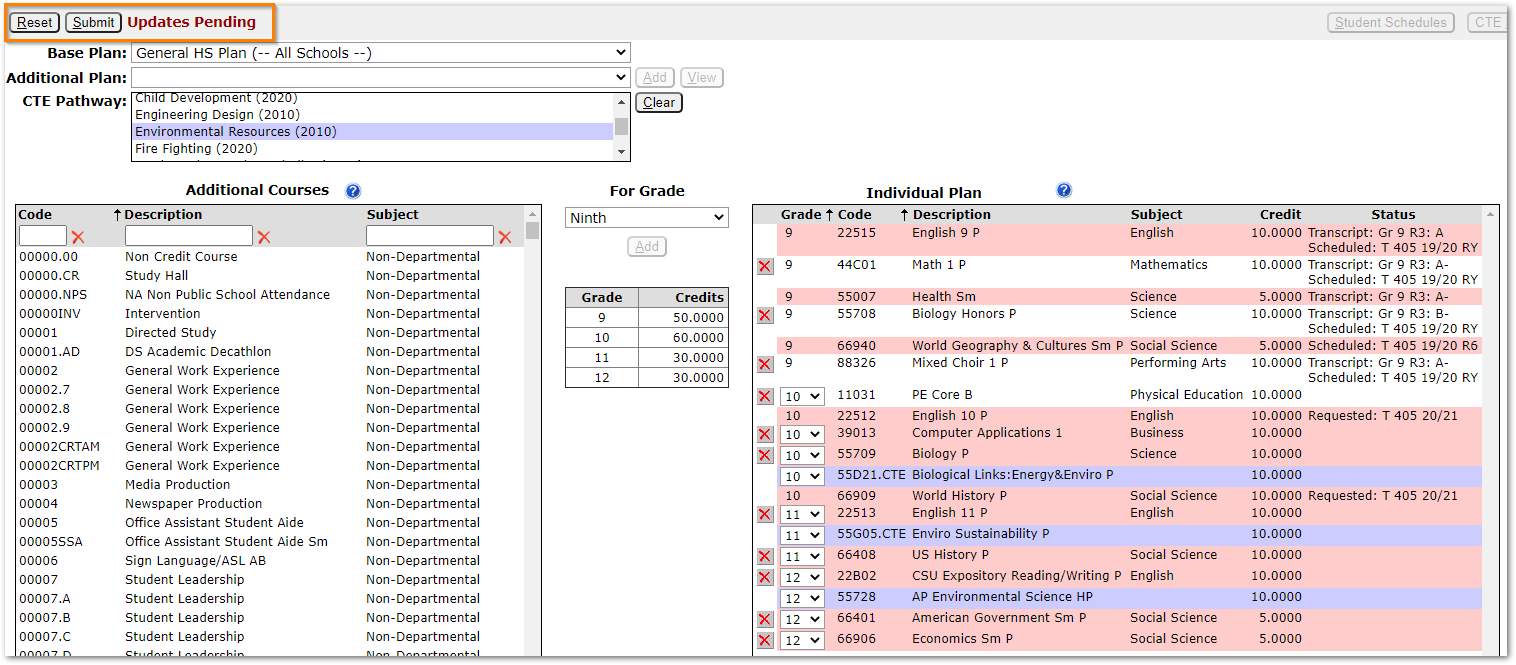
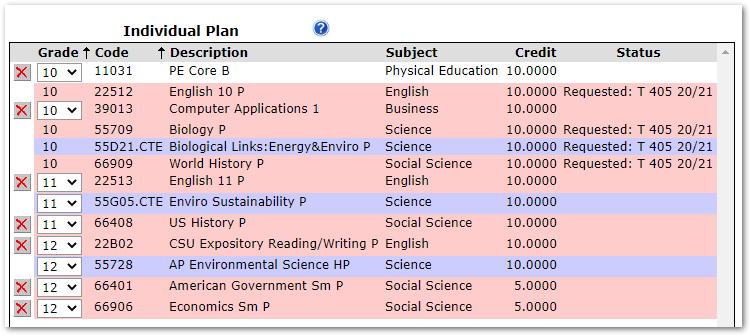
Use the Find feature to select a student. The student’s selected ‘Base Plan’ and ‘CTE Pathways’, if they have any, will show at top with specific courses on the right under ‘Individual Plan’. The Status of the courses is shown and may include: Transcript, Schedule, and Request status. Additional courses that may be added to the student’s individual Course Plan are listed at left. 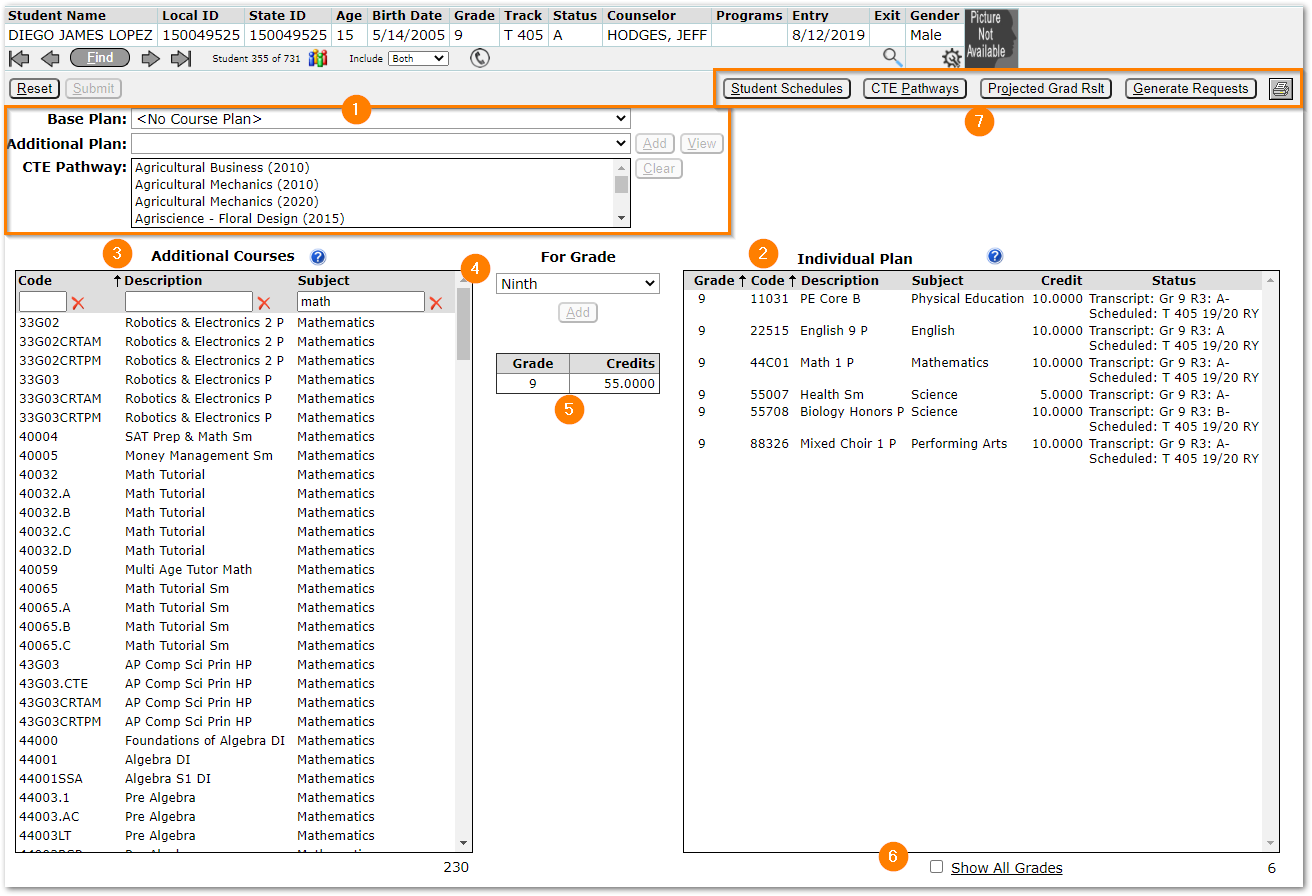
- Plan and CTE Pathway selection options – Select options for Base Plan, Additional Plans, and one or more CTE Pathways. The sample student shown does not yet have a Base Plan assigned.
- Individual Plan – This area shows the student’s currently scheduled courses and will show courses associated with any plans or CTE Pathways selected.
- Additional Courses – Filter the list to select from available courses to add to the student’s individual Course Plan.
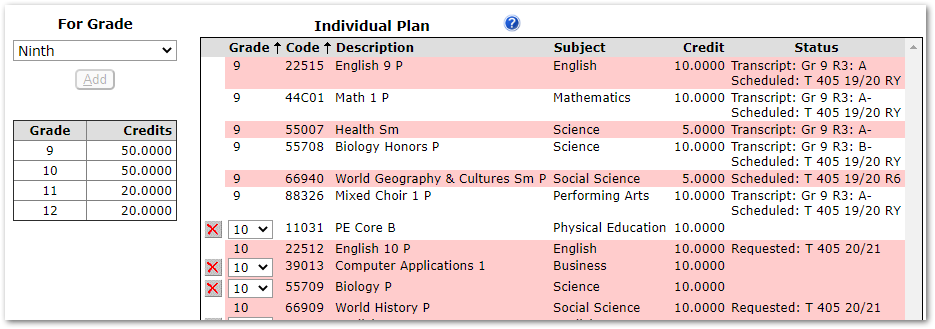
- The For Grade setting defaults to the student’s current grade but may be changed to enable the user to select courses for future grades. When a course is selected from the list on the left and applied to the Individual Plan, the grade value in the Individual Plan will be set to the value defined in the ‘For Grade’ field.
- The Grade | Credits grid shows counts of credits by grade level for the courses in the Individual Plan.
- Show All Grades checkbox may be checked to view the Individual Course Plan for prior grades.
- Navigation buttons may be used to work with the selected students:
- Student Schedules – will launch the Student Schedules application to the selected student.
- CTE Pathways – will launch the CTE Pathways application and select the current student if they have a CTE Pathway.
- Projected Grad Rslt – For students with an assigned Graduation Requirement, this will show the student’s projected graduation result based on posted transcript records, currently scheduled classes, and future course plan courses assuming qualifying marks. The results may be printed.
- Generate Requests – Generate course requests for the current track grade and track. To generate requests for a future year, login to the future track.
- Printer Icon – Select to run the Student Course Plan Report for the selected student.
Navigation Help
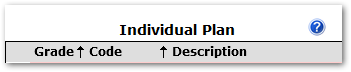
Individual Plan Help
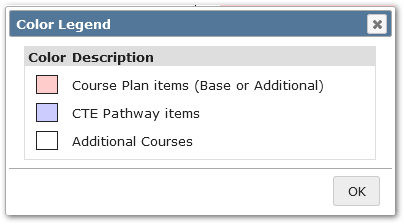
Click the question mark symbol to open a legend explaining the meaning of the color coding in the Individual Plan.
Available Courses Help

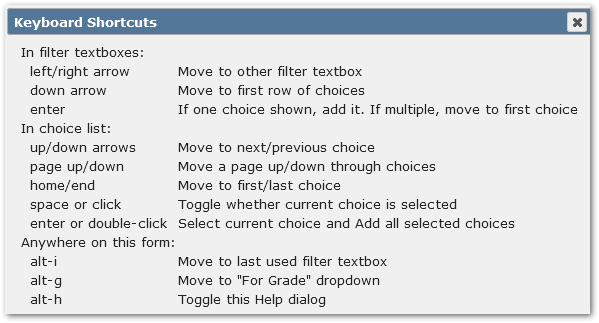
Click the question mark symbol to open a page explaining keyboard shortcuts for navigating Additional Course selection.
To create an individual plan for a student, use the Find feature to find the desired student.
Base Plan
To select a Base Plan, open the drop-down list at top left. It will show a list of Course Plans available. Plans may include school-specific plans or district-wide plans that apply to all schools.
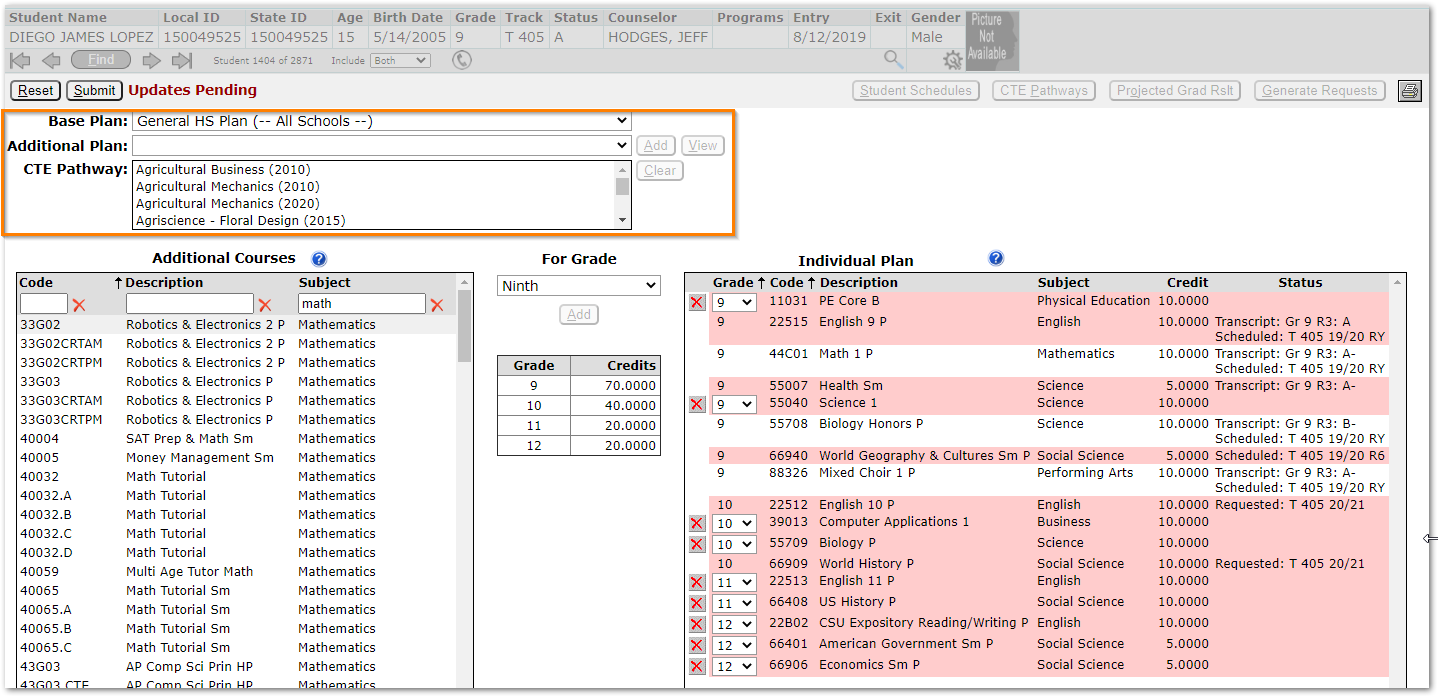
When ‘General HS Plan (All Schools)’ was selected, courses were added to the Individual Plan at right. Courses from the Base Plan appear in pink. The student’s status in classes appears in the right-hand ‘Status’ column.
Our sample student was part way through Grade 9 when we applied the Base Plan. As a result, he is already scheduled in a set of classes and has first semester grades posted in his transcript. This information appears in the ‘Status’ column.

For our student, there are two Grade 9 classes which are not scheduled. These two classes may be deleted using the red X, or they may have their grade changed, using the grade drop-down. Since our student is taking ‘Biology Honors’, we will remove ‘Science 1’, and since he is taking Health, we will move PE Core B to 10th Grade. The results show all 9th grade classes are now set with status, and the PE Core class is set for 10th grade.
Additional Plans
Additional Plans may also be selected and added for the student. To view courses in an Additional Plan, select the plan and click the View button.

When View is clicked:
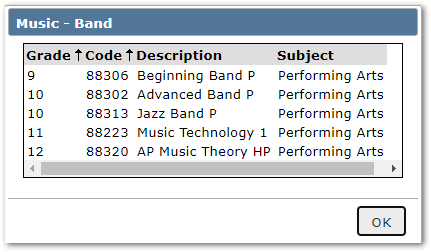
The courses for the selected Additional Plan may be added to the student’s Individual Plan by clicking the Add button. Courses added as part of an Additional Plan will appear in the student’s Individual Plan at right with a pink background color (see legend).
Adding Individual Courses
Individual courses may be added to the student’s Plan by:
- Selecting the grade level for the course request from the For Grade drop down
- Selecting a course from the Additional Courses list on the left
- Click Add
- After all selections have been made click
Items added to the student’s Individual Plan may be deleted by clicking the X.
Requests that are part of the student’s Base Course Plan can only be deleted from the Student Schedules application or by changing the student’s Base Plan.
To remove a Base Plan and associated courses, select <No Base Plan> as the replacement plan.

CTE Pathways
CTE Pathways may be selected from the CTE Pathway drop-list. Scroll through the list and select the desired pathway. In our example, we’ll select ‘Environmental Resources’. 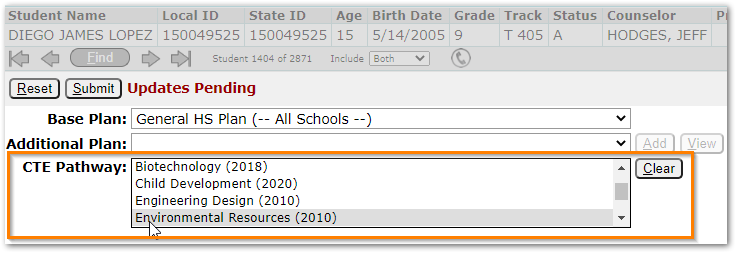
As soon as the CTE Pathway is selected, the ‘Select CTE Pathway Courses’ dialog appears. CTE Pathways may have multiple possible classes per level depending on the district CTE Pathway definition, etc. Only one class per level is required to be selected and set. Courses the student has transcript marks for will appear with their grades already set and additional transcript information will display. 
- Select the student’s CTE Pathway courses by setting the Grade level the student plans to take the class and click Submit.
- Each student will need at least one course from each CTE Pathway Level.
- Check the appropriate Waiver flag if the Introductory course is being waived for this student.
If adjustments need to be made at a later time to courses in the student’s CTE Pathway, use the Student CTE Pathways application to edit the student’s CTE Pathway.
The CTE Pathway courses will appear in the student’s Individual Plan now, in purple, as shown.
- Click Submit again to save the student’s Individual Plan with their CTE Pathway.
Additional CTE Pathways may be added following the same steps.
To remove a CTE Pathway from the student’s Individual Plan, with the CTE Pathway highlighted, click the Clear button. The purple pathway courses will be removed from the student’s Course Plan. Click Submit to complete, saving the change. This will remove the Student CTE Pathway record for the student completely.
Show Grades Options
Student Course Plan defaults to showing current and future grades. To view courses for prior grades in the current school click ‘All School Grades’, or to see all courses for all grades across all schools, click the ‘All Grades’ radio button at the bottom of the Individual Plan.

Changes Pending
Schools may make it possible for students to change their Course Plan through Student Connection.
NOTE: For districts who utilize the full features of Student Course Plans to support individualized learning plans, including enabling students to edit their own Course Plan in Student Connect, students should NOT also be allowed to enter course requests in Student Connect. Their course requests will instead be generated based on their Course Plan.
A Student Course Plan preference controls whether to allow students to update their course plans with or without review by a faculty member. When the preference is set to require review, and a change has been made, ‘Changes Pending’ appears in Student Course Plan above the Individual Plan.
- Click the Changes Pending link to review and accept or reject the student’s changes.
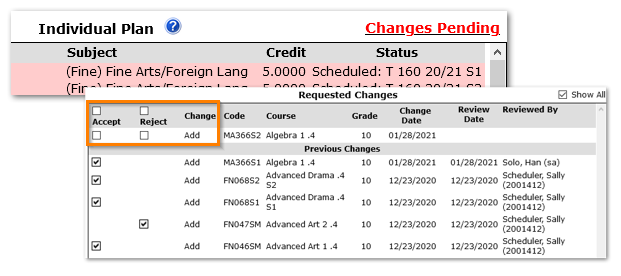
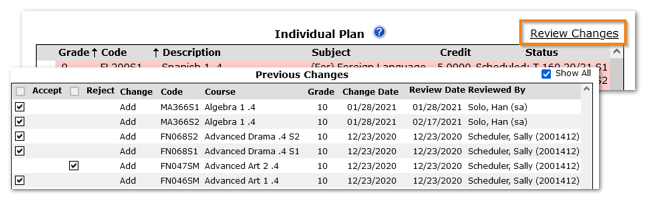
Once changes are accepted or rejected, the ‘Changes Pending’ link changes to ‘Review Changes’ and when clicked, the changes and actions taken are displayed.
Use the buttons at the top right for access to related applications, to see projected graduation results, to generate requests and print the Student Course Plan report for the current student.

Projected Graduation Results
For students that have an assigned Graduation Requirement, clicking the Projected Grad Rslt button will produce a reporting of their projected status, as shown. The information may be printed by clicking the Print button at the bottom right corner.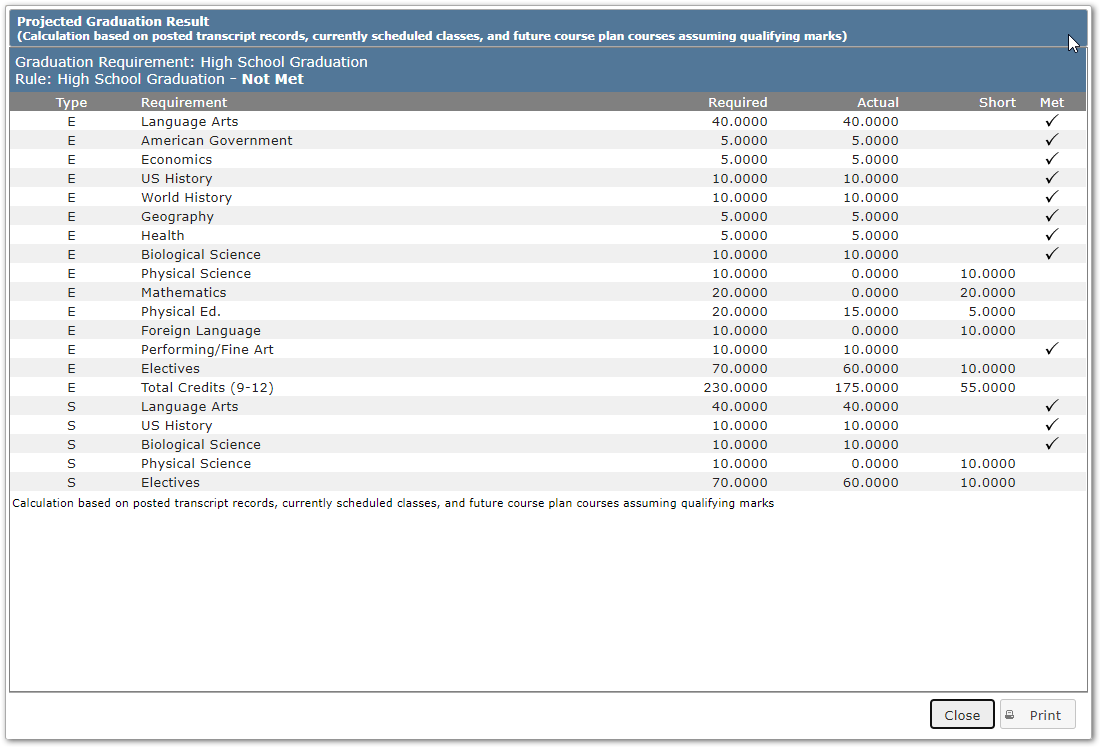
For a student who does not have an assigned Graduation Requirement, the display will indicate ‘No Records.’ Assign the student a Graduation Requirement in the Student Editor, and re-try.

Generate Requests
To generate requests for the student for the current track, click the Generate Requests button.
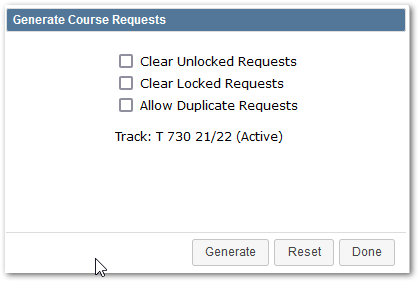
Select whether or not to:
- Clear Unlocked Requests
- Clear Locked Requests
- Allow Duplicate Requests.
Note: If the student is enrolled in more than one track in the logged-in school, and a district preference is set on to generate requests for part-time enrollments, then the track will appear as a drop-down and enable the user to select one of the student’s tracks.
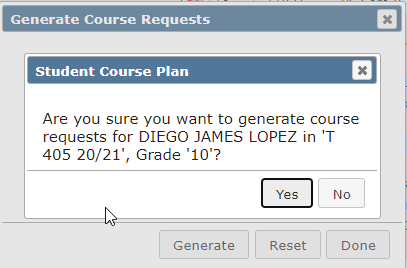
Click Generate.
A confirmation message will appear, click Yes or No.
A message will appear indicating the number of requests added.
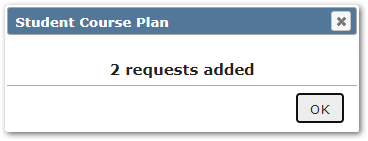
The request information will show in the Status column.
To view the student’s schedule and see the requests, click the Student Schedules button.
To view or edit the student’s CTE Pathway, click the CTE Pathways button.
Print a Student’s Course Plan Report
Clicking the Print icon in the upper right-hand corner will print the student’s Course Plan.

The Student Course Plan Report may also be run from the Reports menu under Schedule.
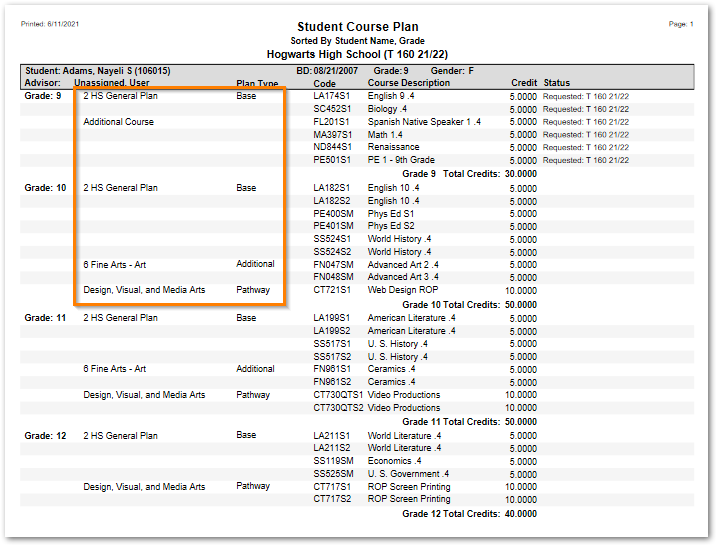
Notice in the Student Course Plan Report, the Course Plan courses are identified with either the Plan name or 'Additional Course' and the type of plan is identified in the 'Plan Type' column.
This report may also be run from Scheduling Reports. For more information about running this report, see Scheduling Reports.
- Use Assign Course Plan to select a Course Plan and mass assign it as a ‘Base Plan’ to selected students using the student selection filters.
- Course Requests may be mass generated using the ‘Generate Requests’ button in Assign Course Plan, just like in Course Plan Setup.
- Use Student Schedules or Student Course Plan applications to review individual students’ plans and schedules or generate requests for individual students.
- Students may also be given options through Student Connection:
- to enter course requests
- to make changes to their Course Plans.
See StudentConnect Manager, Modules page.
Tools for Managing Plans & Requests
| Plans | Requests |
Mass Assign Plans
| Mass Generate Requests
|
Adjust Individual Plans
| |
| Individually Assign Plans ∗ Student Course Plan – Primary Application
| Individually Add or Generate Requests:
|
NOTE: When requests are mass generated, the requests for each student are based on their individualized course plan for their grade level in the logged in track.
The Mass Requests scheduling application may be used to add, remove or modify requests for a set of students, but it will do so without regard for the students’ course plans.
* For districts who utilize the full features of Student Course Plans to support individualized learning plans, including enabling students to edit their own Course Plan in Student Connect, students should NOT also be allowed to enter course requests in Student Connect. Their course requests will instead be generated based on their Course Plan.
