The Q Service Tracker application provides the ability for staff, referred to as practitioners or providers, to record the services they provide for Medicaid reimbursement. It includes tools for administrators to review or update service status, billing status, student eligibility, and setup.
Service Tracker is located under the Programs menu in Q.
Service Tracker is a student banner application with multiple tabs. 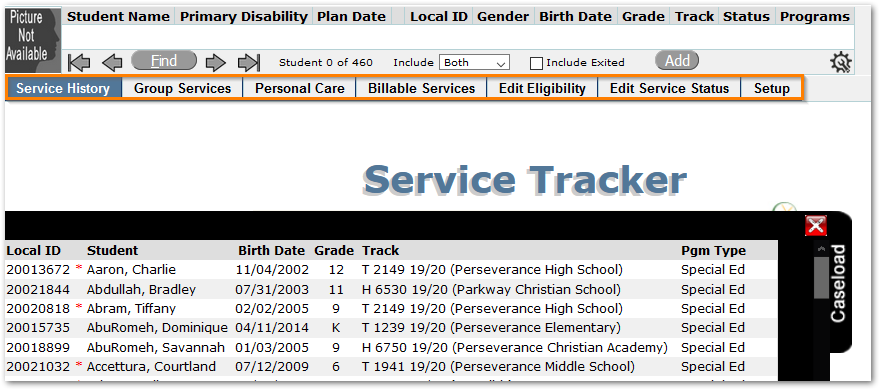
Service History tab is used for recording individual student services.
Group Services tab may be used to define and record services for groups of students.
Personal Care tab is intended to be used by personal care aides who record a single, common service per day for a number of students.
For Administrative Use:
Billable Services tab is used to view records that are ready to bill and may be filtered by date and practitioners. The service status and reason may be changed.
Edit Eligibility tab may be used to set a student’s Medicaid Eligibility and their Medicaid ID.
Edit Service Status tab may be used to review or edit service status for student services.
Setup tab is used to configure Reasons for Treatment and Program Types by Faculty Certification and, to configure Service Type codes.
Navigation
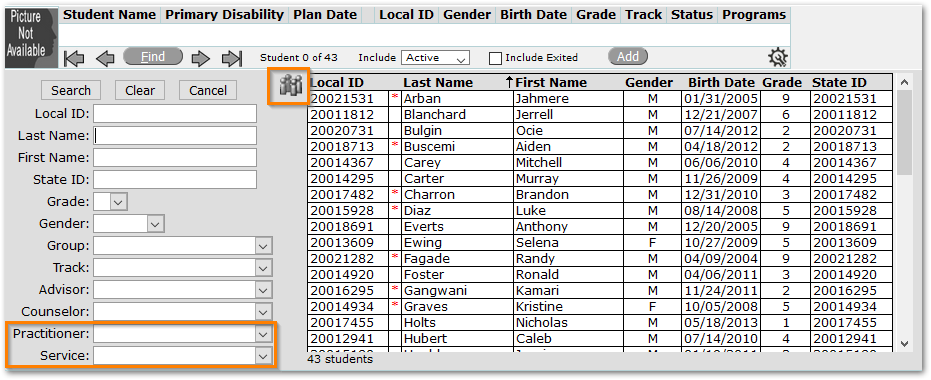
The Service History tab is a student banner and shows practitioners only the students on their caseload. The students shown may be those enrolled in the logged in school or those on the practitioner’s caseload across all schools depending on district preference.
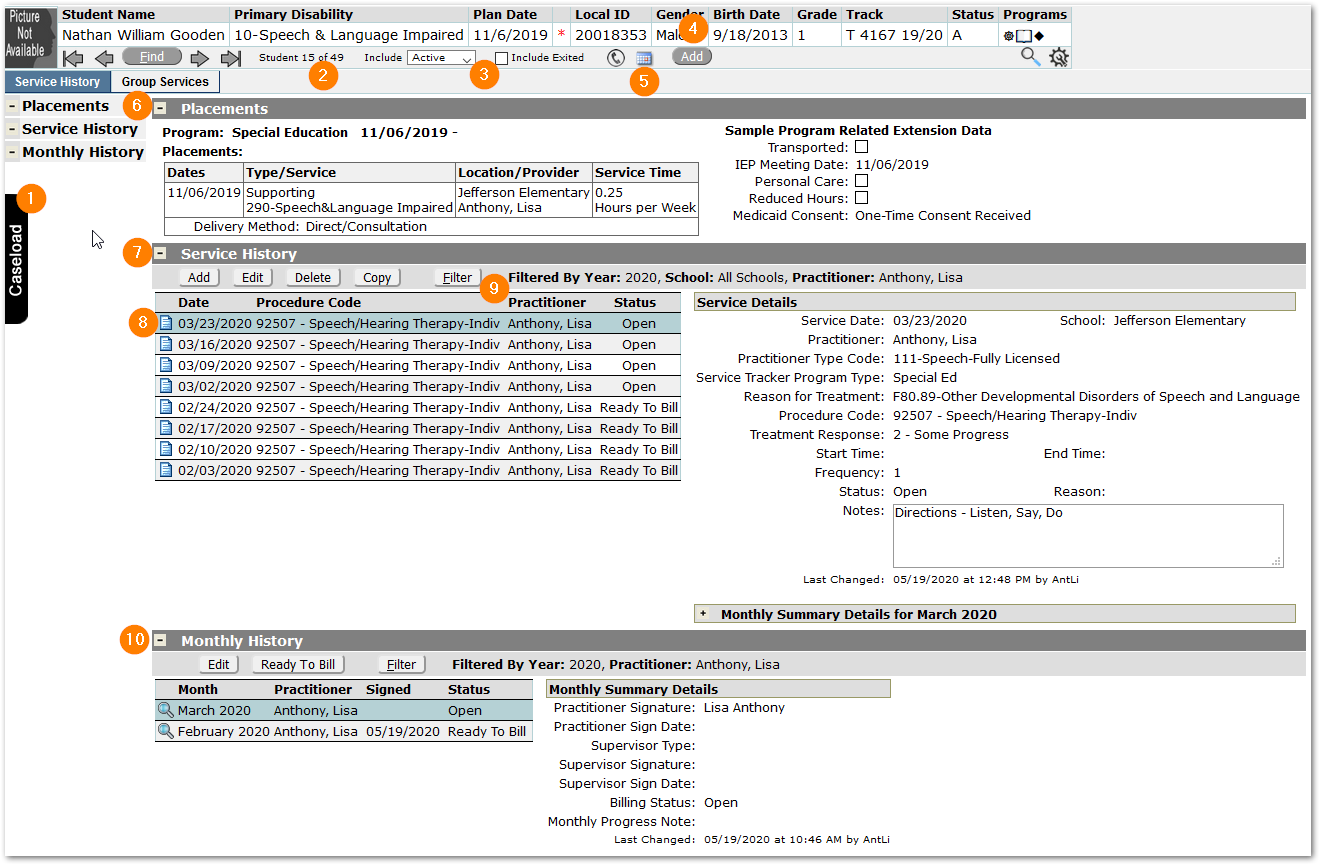
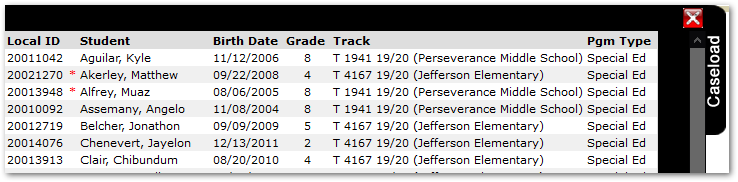
- Caseload: When the application is launched, the provider’s caseload will appear as a slide-out list of students. Students appearing on a caseload list are either assigned to the provider in a program placement record, or the provider may use the Add button, and add a student.
Providers may select a student from the list, or use the banner Find dialog.
Clicking the Caseload icon or the small red X will close the slide-out list. It may be re-opened at any time by clicking on the caseload icon which remains at left.
- Available Students: The number of students available in the application banner will depend upon the District-wide Preference “Include Students from All Schools”. If the Preference is set ON in the district and providers are assigned to students from across multiple schools, then the provider will see all their students from across the district –no matter what school they are logged into. Conversely, if the preference is OFF, providers will need to switch tracks to access the students assigned to them at different schools.
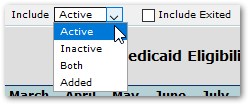
- Using the Include Setting: By default, the application shows active students. To see students who have been on the caseload, but who have withdrawn from school, select ‘Inactive’ or use ‘Both’ to see active and inactive students. To see students who have been on the caseload but who have been exited from Special Education, click ‘Include Exited’.
- To add a student to the caseload to log services for them, click Add and use filter criteria to search for the student.
To see in the banner only students who have been added this way, select Include: ‘Added’. These students will show under Active, Inactive, or Both, depending on their enrollment status as well.
- Medicaid Eligibility is indicated by the small orange asterisk in the Banner. The asterisk will appear if the student has become eligible at any time during the year.
To see a student’s Eligibility History, click the calendar icon next to the Add button in the banner. The Calendar icon will only appear in the Service Tracker banner when the student has Medicaid Eligibility History records.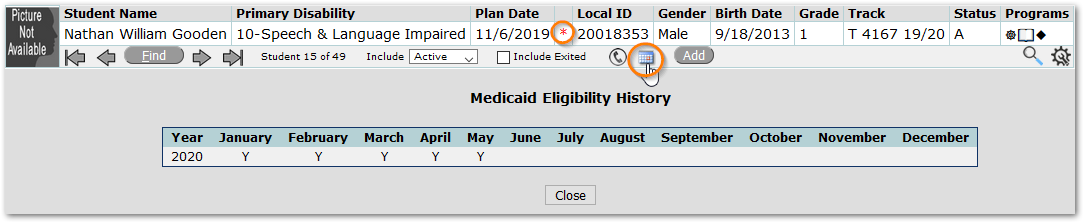
- Placements area shows program and placement information for the programs associated with Service Tracker. Additional district-defined fields may also be shown in this area.

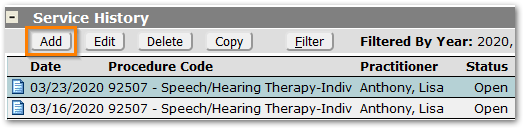
- Service History expands to show recorded services. When logged in as a practitioner with appropriate certifications, services may be added, edited, deleted, or copied (depending upon configuration). Service records appear in the grid at left, with details for the selected Service History record on the right.
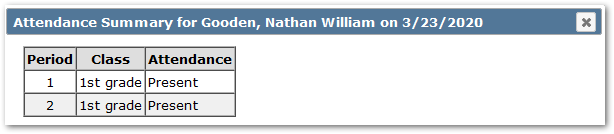
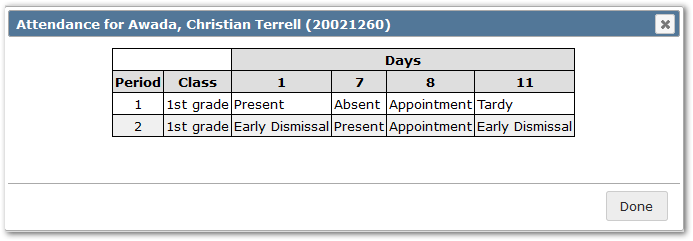
- Notepad icon: Clicking the small notepad icon to the left of the date will open a display of the student’s attendance for the service date. The notepad icon will appear red if the student was marked absent for any period on the date of service.
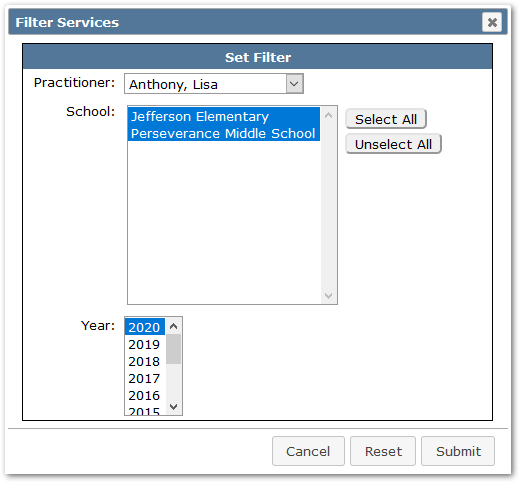
- To Filter or Select Services to View: By default, the application will show practitioners their services for the current year. If there is a need to go back and review prior year services, use the Filter button to select the set of records to view. Click the Filter button and select from the choices and click Submit.
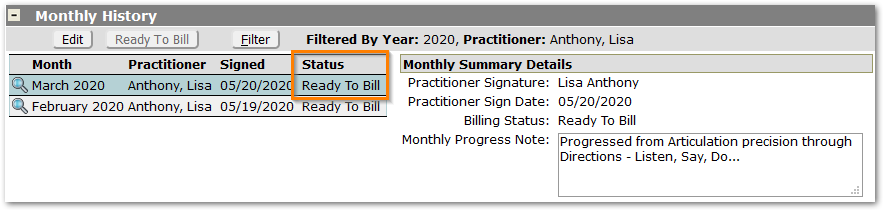
- Monthly History may be expanded to show the summary records for each month. These records may be edited, marked ‘Ready to Bill’ and filtered to view by practitioner or year(s).
 To see details for a month, click the magnifying glass button. This page may be printed using the printer icon button at top right.
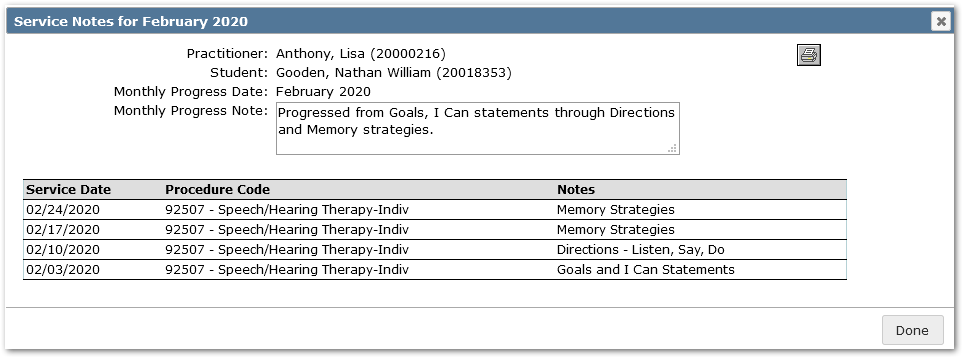
Summary records may be filtered by clicking the Filter button.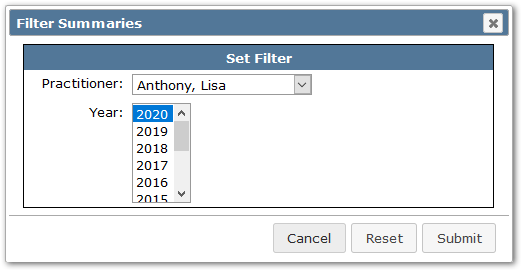
Find Students
Use the Find button to search for students on your caseload and enter search criteria.
- If you search for a group or set of students, i.e. Grade 10 students, click the group button until it turns color to keep your set of students together while you scroll through them after the search is complete.
Note for Service Tracker Administrators:
- The Search Criteria in the Find Dialog include two special criteria at the bottom:
- Practitioner – filters the set of students by Practitioner
- Service - filters the set of students by Service.
Add a Student
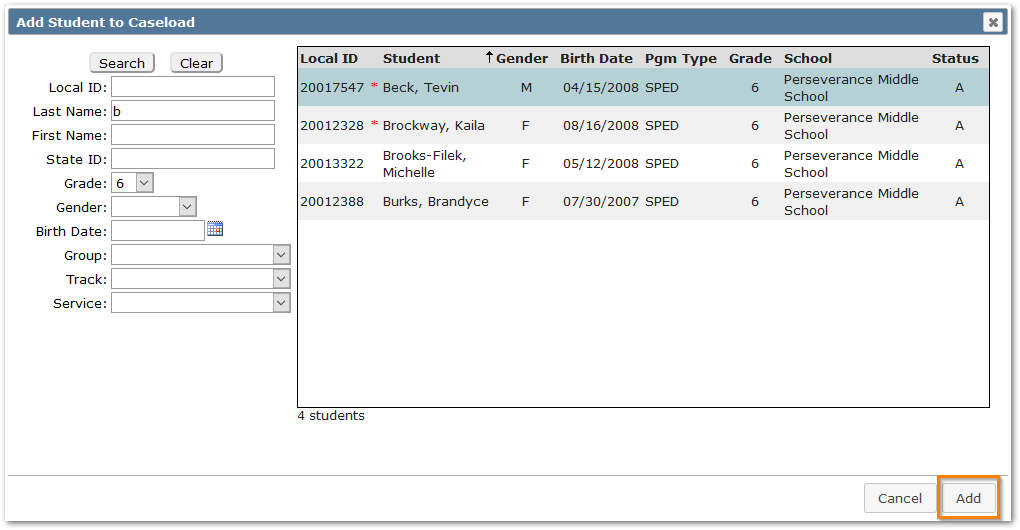
To access a student that is not yet on the caseload, click the Add button in the Banner. Enter search criteria and click Search to see and select from the set of students in Service Tracker-related programs in the district. The list of students may be sorted by clicking on column headers, such as School.
Students will remain available to a Practitioner in their banner for the full school year when a service has been recorded.
Record Services
To add services for a student:
- If you used the Add button and selected a student, you will be taken to the Record Service Record Screen.
- For students already on your caseload, select the student to work with through the Banner Find or caseload list, expand the Service History area and click Add.
The fields that appear as part of the service record, and the drop-lists associated with them, are based on the district’s configuration rules and settings. For detailed information about this please see the Service Tracker Implementation Guide.
Highlighted fields are required.
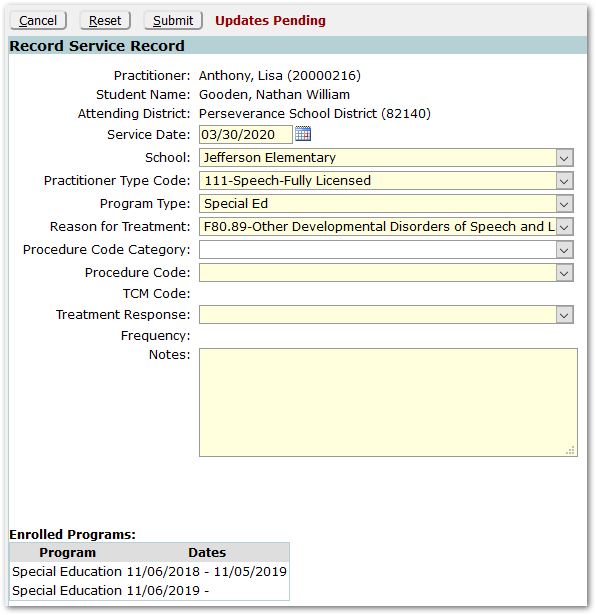
Practitioner – This field will be populated with the logged-in provider.
Student Name – The student’s name will appear.
Attending District – District name will appear.
Service Date - Enter the Service Date or use the calendar icon to select the date.
When the Service Date is set, some fields will auto-populate based on the practitioner’s certification and the Service Tracker-related program the student is enrolled in on the Service Date.
School – School will default to the student’s school of enrollment.
Practitioner Type Code – If the practitioner only has one certification, it will be populated by default. If the practitioner has more than one Medicaid certification, then a code will need to be selected. Only the practitioner’s Medicaid certifications will appear as options in the list.
Program Type - If the student is enrolled in only one Service Tracker-related program on the Service Date, then it will appear by default. If the student is enrolled in more than one program on this date, select the program for which this service is prescribed as part of the student’s plan of care.
Reason for Treatment may populate automatically based on district configuration and may be changed. If not populated automatically, select the Reason for Treatment code.
Procedure Code Category may be used to filter the procedure codes below, if configured.
Procedure Code – Only the procedure codes associated with the selected Practitioner Type code and Program Type will be available to select from the drop-list.
TCM Codes: These will appear if configured for the service.
Treatment Response: Treatment Response is required and if there is only one possible Treatment Response for the Procedure code it will be defaulted, otherwise, select from the available choices.
Frequency: The Frequency is calculated when Start and End Times are entered for Procedure codes. Frequency will default to 1 for Procedure codes that do not require time to be recorded and may not appear on screen.
Start Time / End Time: These fields appear when a Procedure code is configured to require them.
Notes: Service Notes are required unless a specific staff certification is configured to make them optional. See the Service Tracker Implementation Guide.
Enrolled Programs: The student’s Service Tracker-related program information appears for information purposes.
When the Service Record is complete, click Submit.
Edit / Delete / Copy Services
In the Service History pane:
To Edit a Service – Select the service and click Edit. Make any adjustments and click Submit to save changes.
To Delete a Service – Select the service and click Delete.
If the service being deleted was the only service recorded for a month, the associated Monthly History record will also be deleted.
To Copy a Service – Select the service to copy and click Copy, if enabled.
The Copy button is enabled based on the district configuration of the Procedure Code.
Note:
The Service Date will default to ‘Today’. Make sure to adjust the Date of Service if it occurred prior to today’s date.
Adjust the data appropriately before saving and click Submit.
Monthly History
Summarize Monthly History
When a new service record is created, a Monthly History record is automatically created for the month corresponding to the record’s Service Date.
When all services for a student have been recorded for the month, the practitioner needs to enter a Monthly Summary Note and mark the Monthly History record as ‘Ready to Bill’.
To view and print a summary listing of notes for services held in the selected month, click the magnifying glass at left. See Navigation – Monthly History above to see a screenshot of this detail.
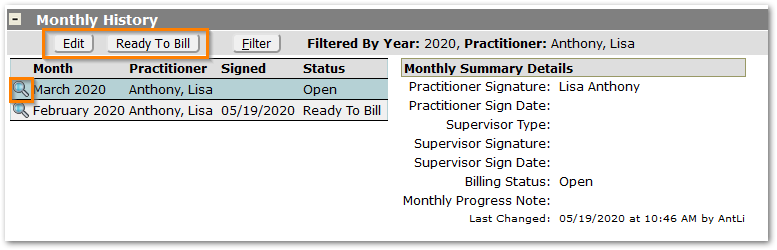
To process the month when all services are recorded:
Click the Ready to Bill button.
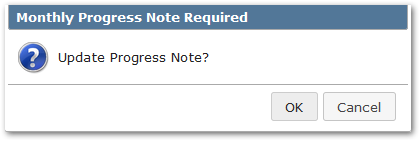
If a Monthly Progress Note does not exist, click OK to enter a note, otherwise Cancel and when ready either Edit the record and create a note, or repeat this step.
Enter a Monthly Progress Note on the Edit Summary page.
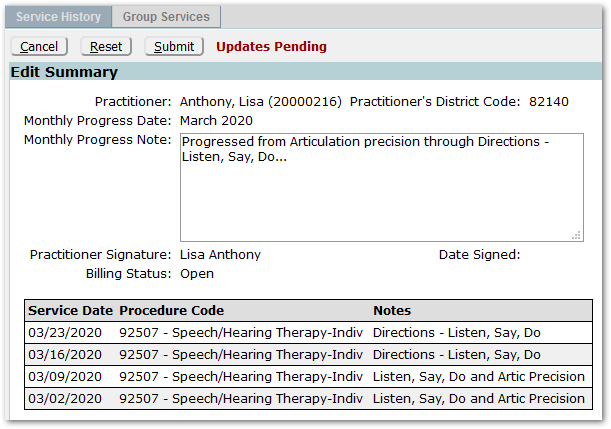
Note:
For some a Supervisor Signature is required. When this is the case additional fields will appear in the record

Supervisor Type defaults to ‘Faculty’ but may be changed to ‘Other’.
Supervisor Signature: When Supervisor Type is ‘Faculty’, those faculty with appropriate certifications will appear in the Supervisor Signature list. If the Supervisor does not appear on the list, select Supervisor Type of ‘Other’ and enter the Supervisor’s name.
Date Signed: Enter the signature date.
Supervisor signature requirements are managed through configuration of the Staff Certifications. Please see the Service Tracker Implementation Guide for detailed information.
Click Submit to save changes.
Ready to Bill
If practitioners moved through the Monthly Summary process beginning by clicking Ready to Bill:
- After entering the Monthly Progress Note and clicking Submit, the monthly record will automatically set the status to ‘Ready to Bill’. The status of each associated individual Service History record will also automatically be set to ‘Ready to Bill’.
- The Ready to Bill button will be disabled once this status has been set.
If instead, practitioners began by editing the Monthly History record to review and enter the Monthly Progress Note:
- The status will be ‘Open’.
- To make the Monthly History available for billing, click the Ready to Bill button. The status of the Monthly History record and each individual Service History record associated with the month will be changed to ‘Ready to Bill’.
- Note: The Ready to Bill button will only be activated when the record is ‘Open’.
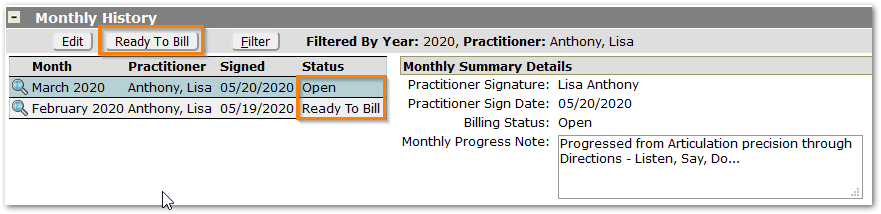
When an individual Service History record with a status of ‘Ready to Bill’ is edited, its status will automatically change to ‘Open’ as will the associated Monthly Summary record. In this way, when changes are made causing the status to be ‘Open’, the Monthly History record will need to be processed and marked ‘Ready to Bill’ again, when ready.
Group Services Tab
Click on the Group Services Tab to create groups, add members to groups and record services for groups.
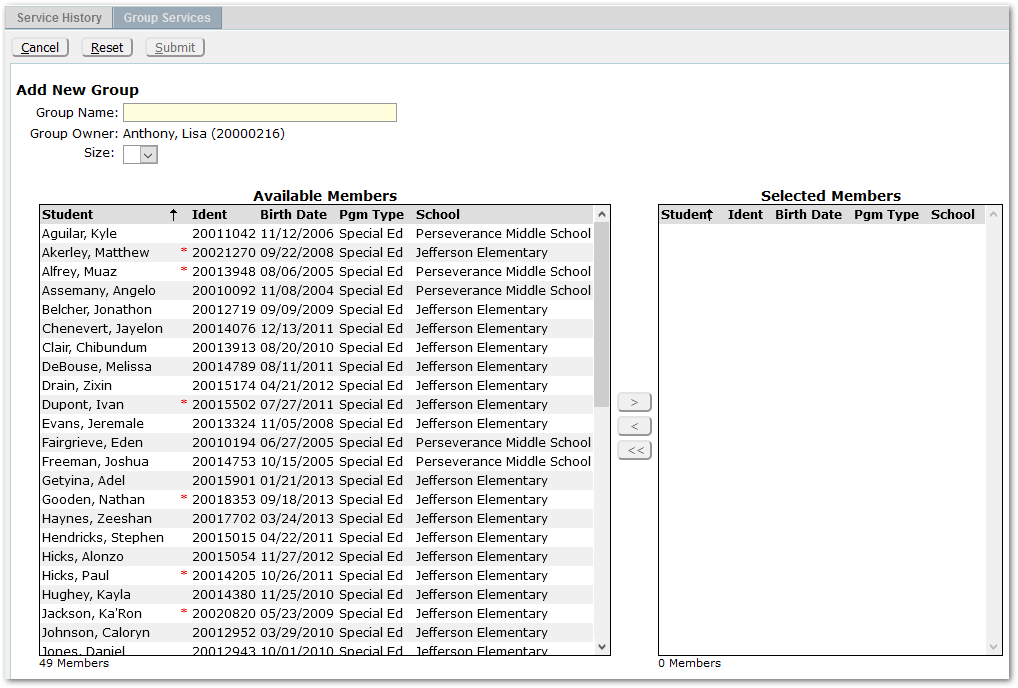
Click Add Group to create a group.
Define the group by entering a Group Name.
Select the student members of the group by highlighting the students and using the arrow keys or double-clicking each highlighted student.
To sort the Available Members list, click on the column headers.
Click Submit to save the group.
Once the group has been defined, it may be edited or deleted using the Edit Group or Delete Group buttons.
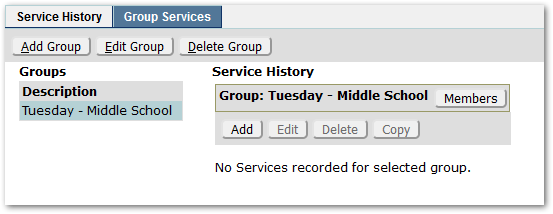
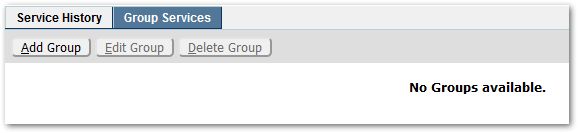
The Group view toggles between Service History and Members. In the screenshot above, the heading indicates ‘Service History’. There are not yet any service records for this group. To create one, click Add.
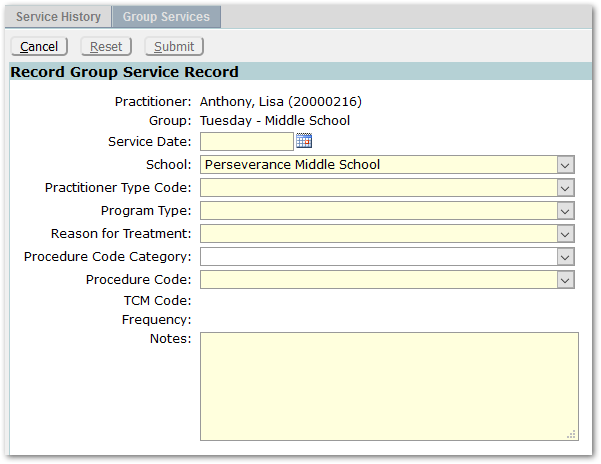
Practitioner – This field will be populated with the logged-in provider.
Group – The selected group will appear.
Service Date - Enter the Service Date or use the calendar icon to select the date.
When the Service Date is set, some fields will auto-populate based on the practitioner’s certification and the Service Tracker-related program the students in the group are enrolled in on the Service Date.
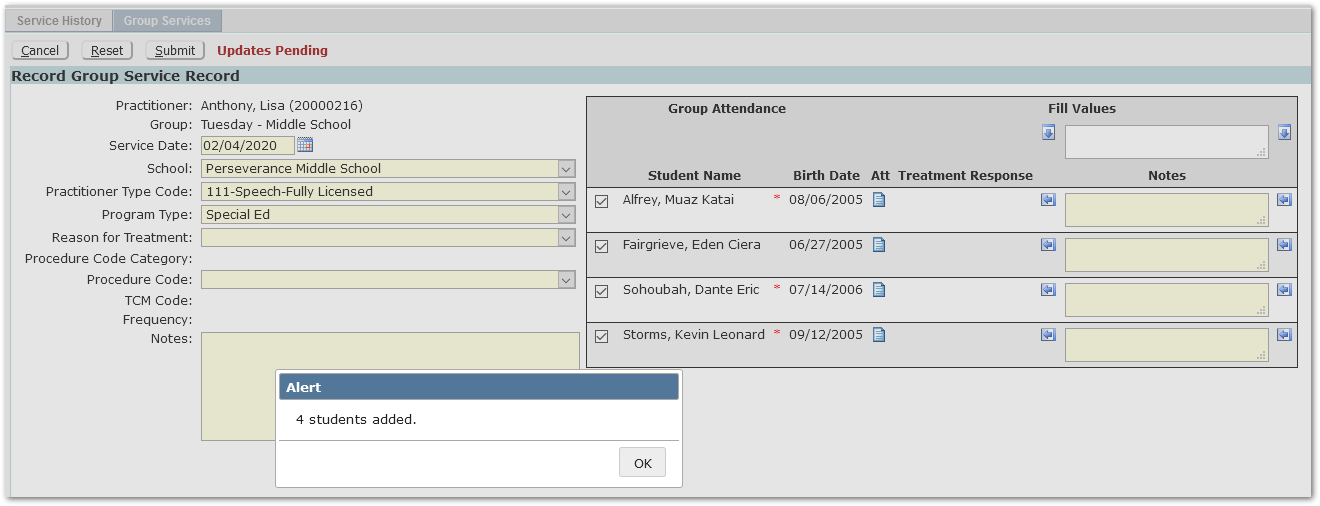
The application will indicate the number of students in the group added for this service.
Note:
If members of the group are not enrolled in a Service Tracker-related program on the Service Date, they will not be added for recording the group service record.
Click OK.
Members shown in the list, for the selected Service Date, default to being selected with the checkmark to the left of each student’s name being ON. If a member of the Group was absent and did not participate in the service, de-select the student by unchecking the checkbox.
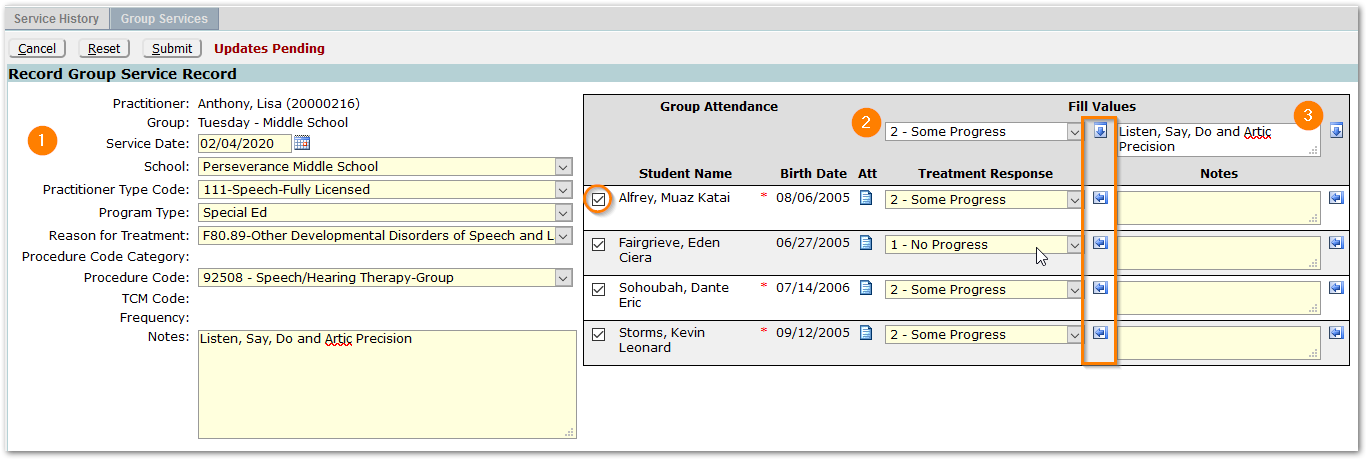
- Input fields on the left as described for Recording Service Records above, setting all required fields including Reason for Treatment and Procedure code.
For Group Attendance on the right use the Fill Values at the top right to enter values once and then fill for all members of the group. Individual settings may be made and pre-assigned before or after using the Fill.
- Select a Treatment Response Fill Value. Use either the blue down arrow to fill this response for all members or use the blue left arrow to select and fill for individual members. To change an individual Treatment Response after the Fill, click in the field for the selected student and choose the desired value from the drop-list.
- Enter a Note Fill Value and apply to the members using either the blue down arrow or blue left arrows to select individuals. Make any needed adjustments to individual notes.
Click Submit to save the records. The individual Service History records will also be accessible for each student on the Service History Tab.
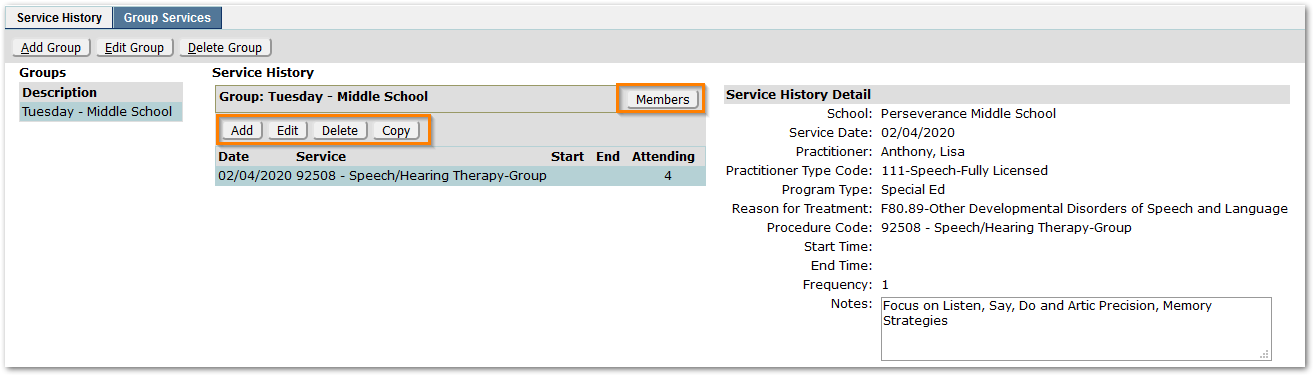
The Service History record now appears for the group, with details on the right.
Use the Add or Copy buttons to add additional group service records. Use Edit to make changes to an existing record and Delete to remove records as needed.
All Service History records added as a group service may be accessed on the Service History tab for each individual student member.
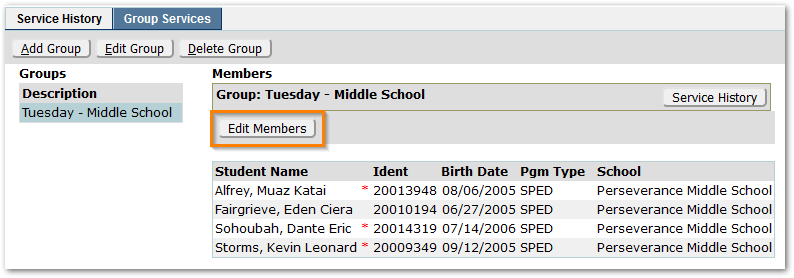
To toggle the view to Members, click the Members button.
To edit the members, click the Edit Members button and make changes.
This tab is designed to provide Personal Care practitioners with a quick way of logging their daily services for students in their care. Students are listed down the left side with a calendar grid at right.
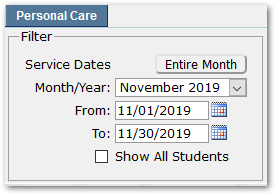
 The Filter area at the top left provides an ability to select the month to view, specify a date range within the selected month, or click ‘Entire Month’ to revert back to the full month.
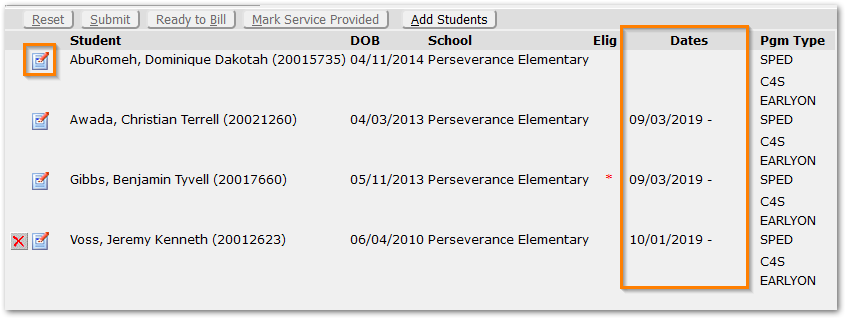
The Show All Students checkbox displays all students on the practitioner’s caseload with their dates. In the example shown below, the last student will appear on the calendar/roster for October, but not September. This tool provides a way for practitioners to access and review students on their roster regardless of the month/year filter setting.
Clicking the pen/paper icon on the left, will open a dialog to edit and set dates for students.
A legend explains the meanings of the colors that will display in the calendar grid.

Settings for the Service History records are set at the top right of the page. Values are set by default based on district preferences, but may, depending on district configuration, be changed by the practitioner.

Add Students
When opening the Personal Care tab for the first time, practitioners may see a message indicating: “There are no students active in the selected date range.”
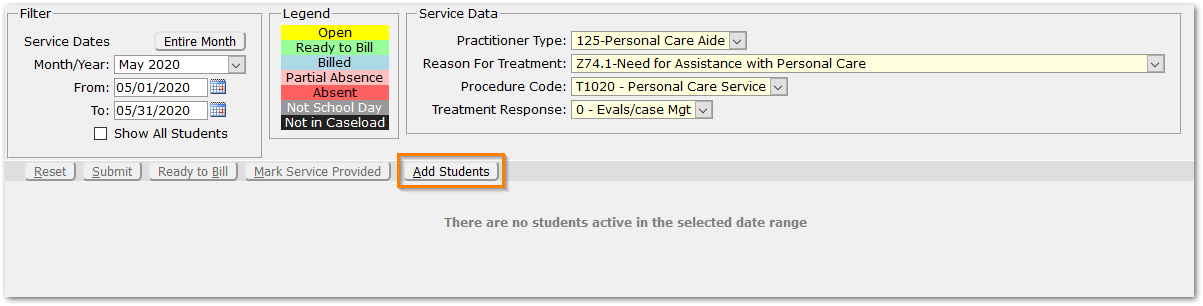
To add students to the caseload roster, click the Add Students button.
Use the filters to search for and select the student(s). Columns in the list of Available Students at left may be clicked to sort the results.
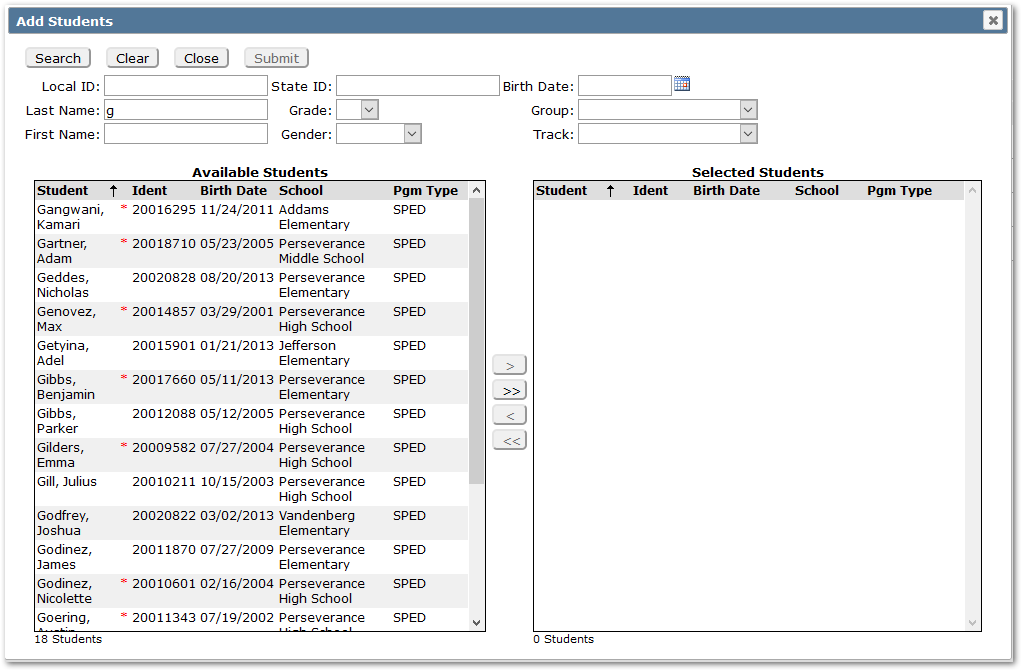
To select students, double-click them or highlight and use the arrow keys to move the students from the Available Students list on the left to the Selected Students list on the right. Click Submit to save the selections.
For practitioners who have placement records associating students with their caseload, the Add Students dialog will have the additional option:
‘Search in: All Students (default) or Students in Placements’
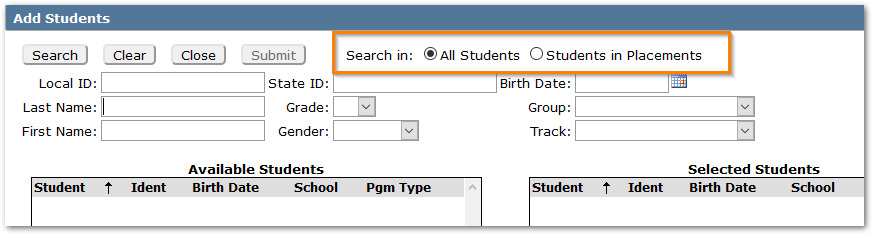
To add students with placements assigned to the practitioner:
- Select ‘Students in Placements’.
- Click Search and all students with associated placements will appear.
- To add all students, click the double-arrow or highlight and select individual students and double-click or use the single arrow.
- Click Submit when complete.
Caseload
Once added, students will appear on the caseload. A set of controls appears to the left of each student, as shown.

Select: Checkboxes select either all students (top) or individual students.
Remove from Caseload: A red X may be used to delete the student from the caseload. The symbol will only appear for students who do not yet have a personal care service recorded by the practitioner.
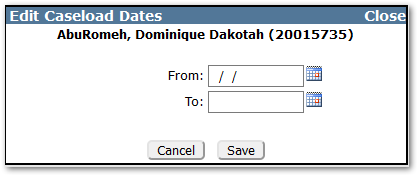
Edit Dates: Pen/paper icon may be used to edit caseload dates.

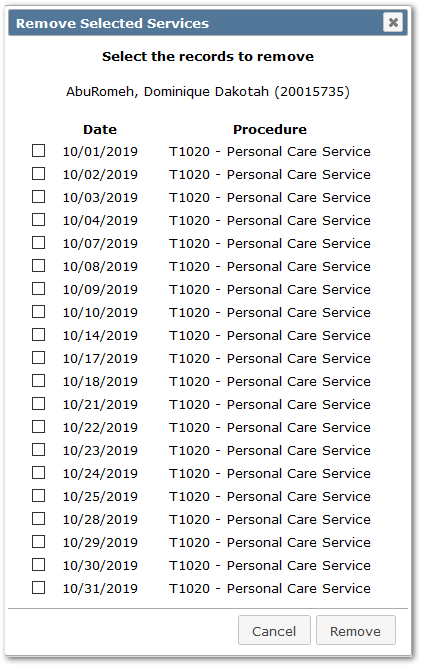
Delete Service Records: Notepad with magnifying glass icon will appear when records have been recorded. Select the record(s) to remove and click the Remove button.
Attendance: Red notepad indicates absence during the service period. Click the icon to view the detail.
Record Services
To record personal care service for students in the caseload roster:

- Student selection checkboxes appear in the far-left column. Select all students by checking the box in the header row or select individual students by checking their box.
- The red note icon indicates attendance absences. Click on the icon to see attendance details.
- When students are selected, the Mark Service Provided button becomes enabled. Click it to set the value ‘Y’ in the calendar for the date range selected at the top. Cells may be toggled ‘Y’ or blank by clicking this button or by clicking in individual cells.
- Toggle on or off any individual cells, such as for student absence, as needed. In this example, the first student received service on the 1st, 4th, 6 – 7th but 8th has been de-selected due to partial absence.
Click Submit when complete.
Mark Ready to Bill
To mark services ‘Ready to Bill’ after logging services for the month:

Select the students.
Click the Ready to Bill button. Note: This button will only be enabled when there are students selected with open records.
A message will appear: Click OK to mark open services for the selected students as Ready to Bill.
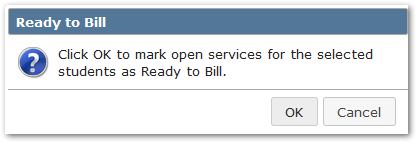
If ready click OK, otherwise cancel and make any changes needed.
The application will indicate the number of students processed, and the color will change to the ‘Ready to Bill’ color indicated in the legend.

Once the district has processed the ‘Ready to Bill’ students, the color will change to the ‘Billed’ color.
Billable Services Tab
Services marked ‘Ready to Bill’ by practitioners are available for administrators to review on the Billable Services Tab. Administrators may review services by practitioner and may change a service status and add a reason for the status change.

- Practitioner will default to ‘All Practitioners’. If desired, select a specific practitioner. The As Of Date will default to Today, but may be changed.
- Expand any student to review details by clicking the + plus sign.
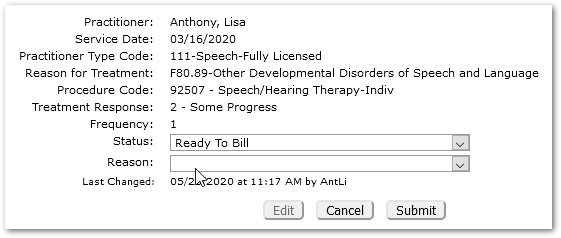
- Click Edit to adjust the Status or Reason Click Submit when complete. Changing the status of an individual service record will affect the Monthly History status.
Edit Eligibility Tab
Select a student to manually set their Medicaid Eligibility, as of a specific date, or to set their Medical ID.
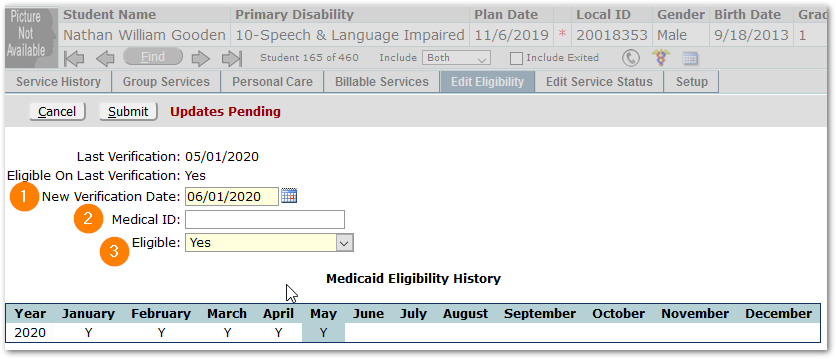
- Set the New Verification Date, typically the first of the month.
- Enter a Medical ID, if using.
- Eligible – Select Yes or No.
Click Submit to save changes.
The student’s Medicaid Eligibility History is shown in a calendar form at the bottom of the screen.
Edit Service Status Tab
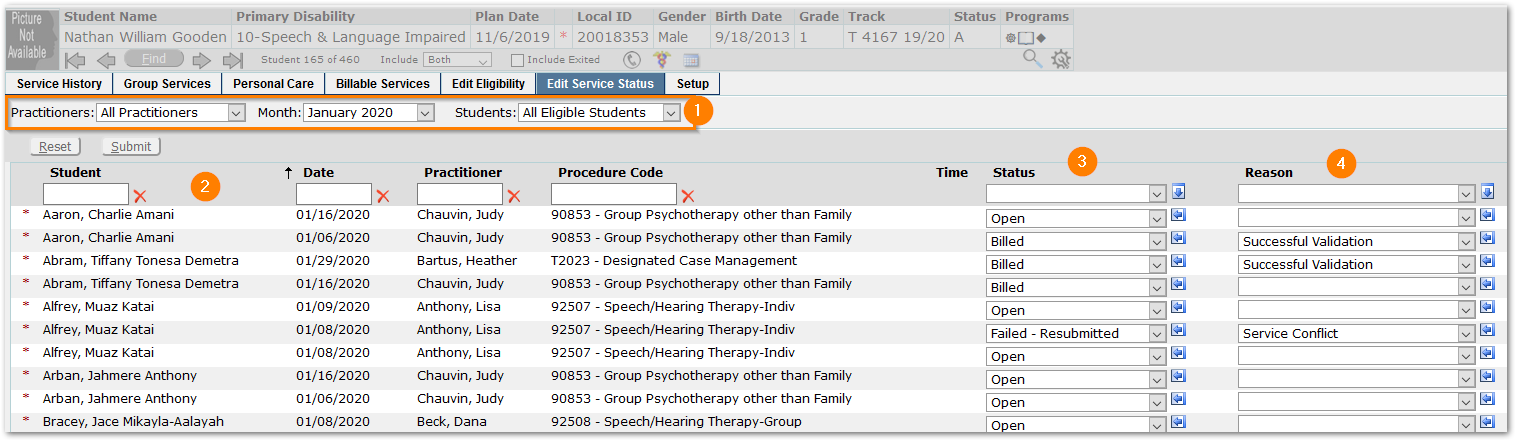
1. To review and edit a service status set the filters for:
- Practitioners – All Practitioners or a specific practitioner.
- Month – select the service month.
- Students – Current Student, the default, or choose one of the following: All Students, All Eligible Students, All Ineligible Students.
2. To search within the results, enter values in the column headers for Student, Date, Practitioner, and Procedure Code. Use the red X to clear your search terms.
3. The Status field of individual records can be changed by using the drop-down lists or setting the value at the top of the column and using the ‘Fill’ arrow button.
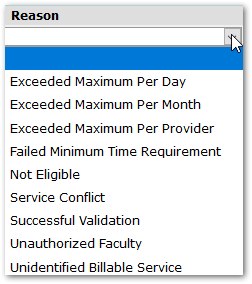
- Open - This is the value initially given to all records as they are created. Records remain editable by the recording practitioner while open.
- Ready to Bill – All procedures completed for the record to be billed.
- Billed –Record has been submitted to appropriate agency for remuneration.
- Closed - When confirmation of remuneration is received through the billing process, records are changed from ‘Billed’ to ‘Closed’. These records remain non-editable.
- Failed – Resubmitted - When a record has been billed and returned as unpaid, it may be flagged as Failed – Resubmitted. This will automatically create a duplicate, editable version of the record for later submission.
- Failed – Not resubmitted - When a record has been billed and returned as unpaid and it is determined that the record is either not billable or not able to be resubmitted, it may be flagged as Failed – Not Resubmitted for tracking purposes.
4. If you make a change in the Status, select a reason for making the change in the Status Reason column to the right.
Click Submit to save your changes.
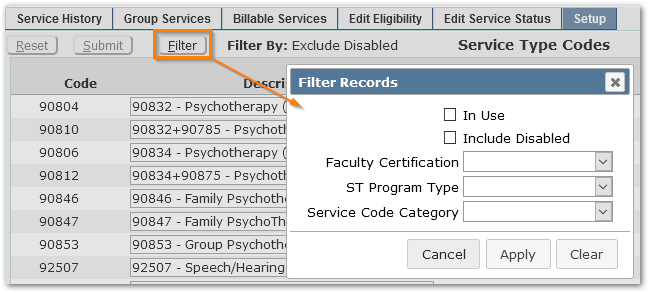
The Setup tab is used to configure Service Type Codes and Faculty Certifications.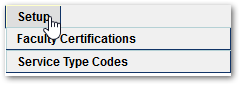
Service Type Codes
Service Type codes are referred to in Service Tracker records as ‘Procedure Codes’. These codes and their parameters form the foundation for the rules that govern Service Tracker.

When opened, Service Type codes default to excluding disabled codes. Click the Filter button at the top of the page to change or set filter criteria.
To set Faculty Certifications that may use the Service Type code, click in the Faculty Certification link. A dialog will open enabling selection of values:
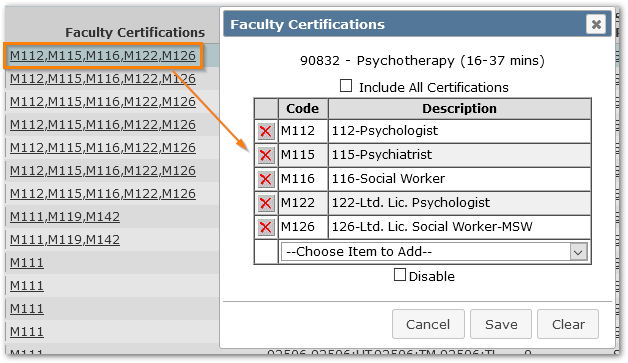
Values selected are shown in the list and may be removed by clicking the red X. Values may be added by dropping open the ‘Choose Item to Add’ drop list and selecting values. The Service Type Code may be disabled by clicking the ‘Disable’ check box. Click ‘Save’ to complete.
For each Service Type code, set:
- Faculty Certifications that may use the code
- Any Service Code Conflicts
- Responses to Treatment
- Service Tracker Program Types
- In Spring 2020 when this column is introduced, all existing Service Type Codes will be set to Program Types of Special Education, since that is the only type of program that had, until this time, been able to track and record services in Service Tracker. Now that additional programs may be included, for each Service Type code to be used by additional program types, set the Service Type code value to the desired Program Type.
- Categories
- Set the Categories under which the Service Type code should be available
- TCM Code
- Select the desired TCM code
- All remaining column values.
Service Type code configuration may be exported to Excel by clicking the spreadsheet icon in the top right corner.
For more information see the Service Tracker Configuration Guide.
Faculty Certifications
For each certification, associated Program Types and Reasons for Treatment need to be set. Optionally a default Reason for Treatment may be selected. When set, defaults are denoted by the asterisk:
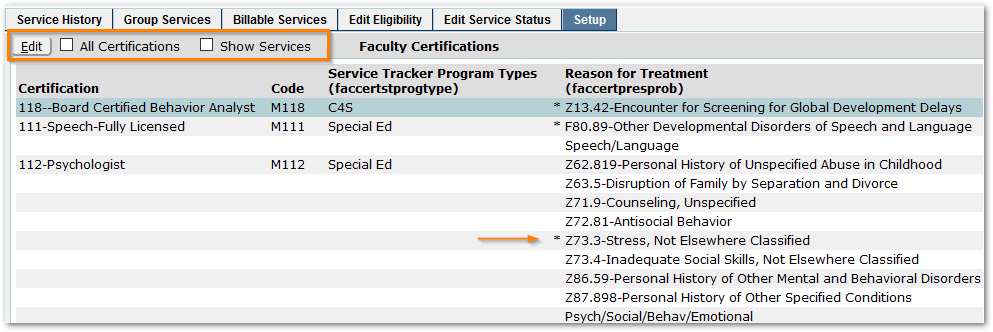
To configure, select the Certification, and click Edit.
- Check the Program Types at left that apply to the selected faculty certification.
- Check the applicable Reasons for Treatments at left. Those selected will appear for providers of this certification in the Service History record ‘Reason for Treatment’ drop-list.
- Select one default reason, if desired, at right. The default reason will auto-populate for providers with this certification when logging services, making data entry easier.
Submit to save changes.

To view the services associated with certifications after certifications configuration has been set, click the ‘Show Services’ checkbox at the top of the page.

The configuration may be exported to Excel by clicking the icon in the top right corner.
For information on Service Tracker setup, see the Service Tracker Configuration Guide.
